
How to Change a Circular Saw Blade [Easiest Way]
In some cases, it is necessary to change the blade of your circular saw. Here is a short tutorial with all the steps on how to change a circular saw blade.
Most of this will depend on the specific circular saw you have on hand, but this article will go through a few steps to show you how to replace a circular saw blade in general terms but also for two specific types of circular saws:
- Ryobi Circular Saw.
- Craftsman Circular Saw
Reasons for changing a circular saw blade:
- the circular saw blade has become blunt
- the circular saw blade is damaged
- circular saw blade has become rusty
- forcing the circular saw to cut
How to Change a Circular Saw Blade Step by Step
In this article we will teach you how to change the blade of a circular saw and the safety measures that you must follow to do so, then we leave you the steps to follow, remember that this article is not intended to replace the information in the instructions for the saw , it is recommended first read the instructions and then visually support yourself with what we present to you today.
Here are the steps to change a circular saw blade:
Step 1: Unplug the circular saw or remove the battery
Disconnect the power supply if using a standard circular saw or remove the battery if using a cordless.
Obviously, this is a very important step because you do not want to accidentally pull the circular saw blade while you are handling it during the change!
This step is critical to avoid serious injury. When changing a circular saw blade, even an experienced craftsman can accidentally press the start button, and the health consequences will be dire. Therefore, when working with cutting electrical units, it is necessary to strictly observe all the rules of safe work.
Recommended is not the right word, rather it is mandatory to disconnect the saw from the outlet, this will prevent injuries from accidental activation of the machine or an electric shock.
Have all the elements at hand : When you give maintenance to a tool make sure you have all the elements that you will use at hand, in the case of changing the blade for the saw you must have the new blade(previously unpacked) and the wrench which includes the saw to change the blade.
Important note: Make sure to use the blade size for which the circular saw is designed!
Step 2: Remove the arbor nut from the circular saw blade
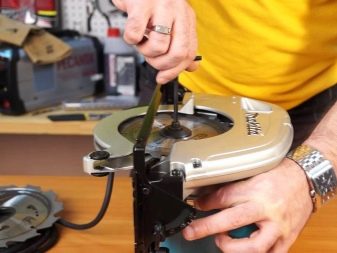
Place the circular saw on a safe surface and remove the blade guard so that the blade is exposed. If your circular saw has a safety lock, engage it.
The shaft is the axis on which the blade is located, and locking it will keep the nut stable when you loosen it to release the blade.
Look for the locking button of the disc or shaft : Currently all circular saws have a locking button, lever or knob, when this element is activated the blade will not be able to continue rotating and you will be able to press with the blade change key without the blade rotating .
If you don’t have an safety lock, you must push the blade into a wooden surface to keep it stable for the next step.
This locking button is not and should never be used as a brake when the circular saw is in operation (this button is sometimes different depending on the brand, it is highly recommended to read the instructions to know its location).
Step 3: Remove the worn blade
Insert your wrench on the arbor nut, then turn it in the same direction as the blade turns.
While pressing the locking button, use the key to remove the screw that fixes the blade : By activating the locking button, the blade will no longer rotate and at this point you must use the key that should come with your circular saw to remove the arbor nut or bolt that attached to the blade, almost all saws must turn the key counterclockwise, however it is always recommended that you consult the manual of your tool.
This will be counterclockwise for a direct drive saw, or clockwise for a worm saw. Once the arbor nut is unscrewed, you can slide the blade.
Step 4: Change the old circular saw blade with a new one
Take your new blade and slide it onto the shaft, just the opposite of how you removed the previous blade.
Change the old circular saw blade for the new one and place it correctly: Once you take out your old blade you must place the new blade on the saw shaft, however before you must be careful to know in which position to place it, since the position involves the sense turning .
All blades have an arrow which indicates in which direction the blade will rotate when placing it in the tool, this is the indication that you must follow when placing your circular saw blade.
Step 5: Replace the arbor nut
Replace the nut and tighten it with your wrench. Make sure not to over tighten and also keep in mind that the nut tends to tighten even more when cutting, so the risk of loosening is quite low.
Finally, place the ring and the clamping screw again and tighten with the circular saw wrench : Once the blade is already in the correct position, you just have to place the clamping ring again and the screw or bolt in place. Then you must press the shaft lock button and tighten the screw (the screw should not be tightened too much, it should only be tightened to the point where it feels firm and is not loose in any way).
So just tighten it well, and you’re ready to cut.
Step 6: Test the new circular saw blade
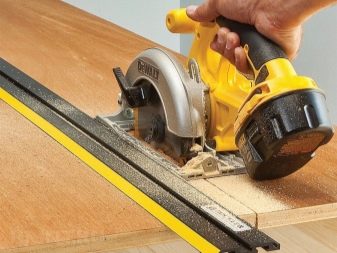
Replace the battery or reconnect the power outlet, and then test it.
Make sure there are no excessive vibrations and that everything seems secure and ready to start cutting.
And these would be all the steps you must follow to change the blade of your circular saw, a similar procedure is used for miter saws which we can see in this topic.
If you have a miter saw, then this easy guide I wrote will show you how to change a miter saw blade.
When to change a circular saw blade?
When your circular saw blade begins to wear out, you must change it or sharpen it to ensure optimum cutting power. You will quickly realize this when the cut takes longer than usual. Also, according to certain types of materials, it is sometimes necessary to use a specific blade.
Want to change a jigsaw blade? Then this guide will show you how in a few easy steps!
How to Change a Craftsman Circular Saw Blade
Craftsman circular saws are portable power tools powered by either a battery or cord. The circular saws have a replaceable lathe blade with several sharp teeth that rotates quickly to cut materials such as wood and plastic.
As the circular saw is used, the material cut by the saw will slowly break the blade down, causing it to look dull. As the blade dulls, it becomes more difficult to cut materials and the blade will draw more power from it.
Things you will need:
- blade wrench (included with circular saw)
Steps to change the blade of a craftsman circular saw:
- Turn off the saw and disconnect the power cable from the wall, or remove the battery.
- Place the saw on the side of your work table so that the guard is raised and the blade rests next to the table.
- Press the “Spindle Lock” button, located on the top of the saw to hold the blade in place.
- Insert the blade wrench into the center bolt on the blade, then turn clockwise to loosen.
- Remove the bolt and outer washer, then slide the blade out of the spindle and through the blade slot at the bottom of the saw.
- Place the new blade on the spindle, then secure the outer flat washer and bolt using the blade wrench.
Tips and Warnings
- On most Craftsman circular saws, the blade key is stored on the saw itself.
- If you don’t have the blade key, it can often be replaced with a hex key or adjustable wrench, depending on the model of the circular saw.
- Remember to unlock the blade after you have replaced it.
How to Change a Ryobi Circular Saw Blade
Ryobi manufactures many types of power tools, outdoor products and paint supplies. The Ryobi line of circular saws are designed to make precision cuts in a variety of surfaces, including wood and PVC.
The saw blade contains several teeth that rotate quickly to slide through the material to be cut. After regular use, the material begins to tarnish the blade, making it more difficult to make cuts.
When signs of tarnishing, such as difficulty making cuts, stronger cuts and burn marks on the side of the wood, are identified, change the blade of your circular saw.
Steps to change the blade of a Ryobi circular saw:
- Unplug the saw power cord from the wall outlet or an extension cord.
- Press and hold the spindle lock button to prevent the blade from moving. The spindle lock button is located above the blade on the top of the middle of the saw.
- Loosen and remove the screw in the center of the blade with the saw blade while holding the spindle lock button.
- Remove the washer and the outer washer from the blade shaft.
- Lift the blade guard, then remove the blade.
- Wipe a drop of oil, included with the saw, on the inner flange ring, which is the part in contact with the center of the inside of the blade.
- Wipe a drop of oil on the outer flat washer of the blade, which is the washer in contact with the center of the outer part of the blade.
- Lift the lower blade guard, then place the blade on the spindle.
- Hold the spindle lock button once more, and replace the flat washer and the outer flat washer of the blade.
- Install the blade screw in the spindle, then tighten with the blade wrench.
How to remove the blade from a circular saw?
To properly remove the blade, you must do to the following sequence:
- For your own safety, be sure to disconnect the electrical cord from the network or remove the battery
- For easier replacement, install the tool on a flat, hard surface.
- To start unscrewing the bolt, it is necessary to press on the locking spindle, which blocks the rotation of the blade when unscrewing
- Unscrew the bolt using the special wrench provided.
- Pull out the bolt and remove the flat washer holding the saw blade.
- Move lower guide lever to raise protection
- Remove the sawing circle
Which side should the blade be on a circular saw?
When changing the circular saw blade, it is of course also important to pay attention to the later and correct running direction of the blade. If this is not obvious from the saw blade itself through markings, this is usually also in the saw’s operating instructions.
With a hand-held circular saw, the saw blade is normally clamped in such a way that it runs counterclockwise and the teeth only hit the workpiece from below.
The direction in which you open and close the screw depends on whether it is a right-hand or left-hand thread.
A normal thread is usually a right-hand thread. With circular saw blades, however, you are often dealing with a left-hand thread. This can be opened the other way around.
A good rule of thumb is: “As I run, I go up”
If the saw blade runs to the left, the nut or Allen screw should also open to the left.
As a rule, the operating instructions should be able to provide information about this. Alternatives would be to look up on the Internet (at the manufacturer) or to have the blade changed in specialist shops (but usually only works with hand-held circular saws ).
Many types of blades can be sharpened when dull, however, unless you sharpen the blade yourself, the cost of sharpening the blade will often outweigh the cost of purchasing a new one.
Conclusion
Changing a circular saw blade is usually an easy process these days, as you can see from these simple steps. Whether you use a standard, mini circular saw or a cordless circular saw, the work remains the same.
Anyway, after you start to change the circular saw blade several times, you will know how to change a circular saw blade like a pro!
It’s easy to judge that a circular saw blade has become blunt.
If you have to use excessive force when sawing and press the circular saw into the workpiece to get a cut and there is no cut at all when sawing without pressure, then the circular saw blade is too blunt.
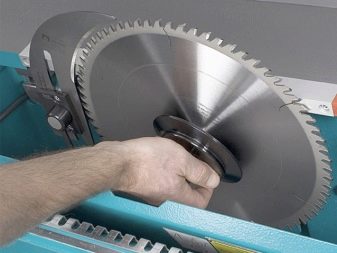
A saw blade for the circular saw is a round blade with teeth in different numbers (depending on the material) that you can clamp into the device. Due to the radial uses, it usually wears evenly.
These round saw blades can be used not only for table saws but also for other saws (cross-cut saws, circular hand saws, etc.) – provided the holder and sizes match.
Circular saw blades with a number of teeth less than 25 are suitable for cutting wood very often, while those with a greater number of teeth are used for thin thicknesses.
The type of material to be cut also affects the number of teeth that the blade must have to ensure optimal results and a good finish of the cut.
Plastic and aluminum, for example, require blades with a high number of teeth, from 40 to 80 or even more depending on the specific cases.