How to Carve Wood (In 7 Easy Steps)
Carving wood is a perfect hobby for everyone who loves wood and likes to work with their hands. In this article you will find out everything you need to know about how to carve wood, the materials you need, the tools you will use, as well as some tips that are guaranteed to improve your carving skills.
How to Carve Wood
Step 1. Setup the workbench for carving
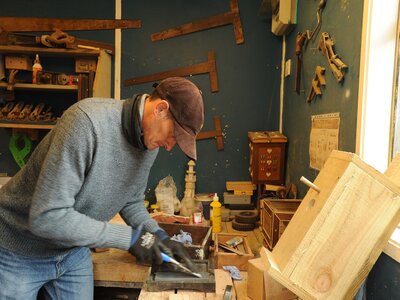
Before you can start to carve wood as a beginner, it is important to set up the carving table(workbench). This includes bright lighting, which can consist of a lamp with an integrated magnifying glass, for example.
In order to be able to work safely and without injury, a device for clamping the wood is necessary. And finally, you shouldn’t skimp on the procurement of carving tools. Because only with perfectly sharpened, stable and hardened tools can good results be achieved.
To carve wood, the first thing we have to know is which are the best woods , the ones that are easy to carve by beginners.
Step 2. Choose the type of wood to carve
The first step is to choose the type of wood you should use. The woods can be separated into two categories: softwoods and hardwoods , but when starting out, it is best to use softwood.
In this way, we can choose between:
- linden wood , very soft and easy to carve wood with a fine grain, also has a creamy tint and is an excellent option for beginners, since it can be found in most of the cheap craft shops;
- balsa wood is another soft wood with a fine grain;
- pine wood, which, although it has a slightly coarser grain, is also very soft.
When you are starting out in the art of carving wood and you have no experience, it is best to choose woods and rough logs that are as clean as possible , that do not have too many knots, since these are much more difficult to carve. These wood logs are ideal for carving wooden figurines , and start learning.
Find out exactly what kind of hardness rating each of these type of woods have in this article!
According to experts, the best wood for carving is linden ,as it has a fine texture and is easy to carve and handle. Cherry is also a fairly easy wood to carve, as well as walnut, poplar or oak.
| Types of wood suitable for carving | Reason why to be use for carving |
|---|---|
| 1. Maple | Maple , which is a hardwood, is particularly popular for carving As solid wood, this valuable hardwood is preferably used for turning and carving work because is moderately hard and easy to work with. |
| 2.Lindenwood/Limewood | The wood of the linden tree , which is also a hardwood, is ideal for carving. Limewood is a relatively elastic, soft, durable wood and therefore particularly suitable for carving work. The solid wood has hardly any knots, is whitish-yellow to slightly reddish in color and darkens slightly. |
| 3. Oak | Another good wood carving is Oak wood. This densely grown type of wood has a narrow tree ring structure and is extremely robust. Although wood is a hardwood, it is good to carve. However, the felled trunks require a long drying time. |
| 4. White Pine | This wood is similar to linden in that it is quite soft, easy to carve, and has a creamy color. |
| 5. Butternut | This wood is slightly more brown than linden and shows an attractive grain, although related to walnut, it is still fairly easy to carve. |
| 6. Walnut | Its dark, rich color makes walnut a popular choice for carvers, however, it is quite difficult and tough to carve. You will need to use additional sharp tools and a mallet for the best results. |
| 7. Birch wood | The birch wood is light in color and has a sleek, even grain. It is well suited for carving, but our experience has shown that it can “break” faster than other types of wood. |
| 8. Ash | The valuable hardwood is well suited for all carving work. The wavy grain of the wood can often be seen in the wood, which gives the figures a certain liveliness. |
| 9. Swiss stone pine | A very good material for the carvings is the wood of the stone pine (Pinus cembra), a type of softwood that grows in the Alps between 1,400 and 2,600 meters above sea level. The light, soft stone pine offers excellent processing properties for every carver. In contrast to linden, Swiss stone pine has a relatively large number of branches |
| 10. Cherry | Known for its pinkish brown color and contains a fine grain that often has a wavy pattern, making it difficult to work with. |
| 11. Poplar wood | The poplar is a popular carving wood. The thick poplar wood has a wet core and has to dry for a long time before processing. After that, it proves to be pleasantly light. Thanks to its overgrown annual rings, poplar wood is very tear-resistant and is considered “hardwood with softwood properties”. The wood of the poplar is well suited to carving sculptures for indoor use. |
Step 3. Choose the carving tools

As basic carving tools, we would need the following:
- Workbench (to work on)
- Gouges /Chisel
- Flat, pointed and round gouges (they are the most common).
- Wet brush or sponge.
- Pencil.
- Chinese ink, or paint .
- Sandpaper or a whetstone
Regarding chisel, the most important are the bowl, the flat, pointed and round and there are different sizes.
When carving wood, the blades become dull, so you should have a good ceramic whetstone to sharpen the carving tools.
To sharpen a dull carving tool you want to keep the blade at an angle of 10-20 degrees and move the knife back and forth on the stone while keeping the wrist locked and bending only the elbow to maintain the angle and trajectory. Another key to safety is wearing a glove.
For more advanced work, we may also need the following tools:
- Gouges: these are the most necessary tools, as mentioned before, and they are used for contours, crevices and channels
- Chisels: these are tools very similar to the gouge and are used to make straight cuts and shapes
- Rasps and files: are used to go over carved wood, and have a finer finish. It is a tool that help smooth the carved wood.
- Saw: we will need it when we have to cut a piece of wood.
Step 4. Prepare the wood for carving
The following applies to all wood carvings: The wood should be well dried before carving. Freshly felled wood, the so-called green wood, is particularly soft, but still contains too much moisture to create high-quality, long-lasting carvings.
The carving is therefore also a test of patience in a certain sense. But don’t worry: you only have to wait if you want to use wood from your own courtyard. Well-dried wooden blanks are always available in a wide variety in the stores.
To get started with carving, experts recommend starting with experiments on small pieces of soft wood. The first project shouldn’t be an ambitious carved figure, but a shapeless blank for testing the techniques and tools.
Only when you have developed a feeling for the wood, which tool and which cutting angle can achieve which results, should you dare to embark on a “real” project. And this should have a rather simple design with few details.
Step 5. Take the safety precaution before carving
In addition, it will be necessary for you to take adequate security measures when we are preparing to carve wood at home:
- We must use gloves to handle the gouges. Use leather gloves because it protect the hands very well and are the most resistant.
- Wear safety glasses , as some chips can jump out and hurt us
- Finally, a dust mask is necessary, to avoid breathing the dust that we are going to generate when carving wood.
Working with sharp tools should be carried out at a workbench that meets all the requirements for stability and strength. If it is not possible to make such a workbench, you can limit yourself to a wood tabletop.
It can be of any size, but the height should not be higher than the level of the cutter’s belt. The wood table top should always be smooth and clean. Often, when working, the knife slides and hits the table top.
Step 6. Start to carve the wood
To start carving wood here are the basic steps you must follow:
- After we have the piece of wood which we want to carve, we create the design that we want to sculpt with a pencil on the surface of the wood.
- With the gouge, we begin to dig in the contours of the design , and we do the same, with a narrower blade, in the thinnest parts of the wood.
- Once we have dug all the contours of the design, with the flat blade gouge we give depth to the notches that we have made in the contours.
- When we finish carrying out this operation, and the piece of wood is well outlined, we use the round-shaped gouge to flatten the pieces of wood that presents irregularities.
- After this step the surface of the wood must be thoroughly cleaned, to prevent the sawdust and chips from being reinserted into the grooves created by the notch.
- The operation must be done with a brush or a damp sponge.
- To differentiate, once we have carved the wood, the deepest parts from the superficial parts, we paint the notches with India ink.
- The secret of a good carved wood is to alternate deeper areas with those that, on the other hand, are more superficial. Only in this way, with the notch cut out, the desired effect is obtained and you can obtain a masterpiece.
- Finally, we will sand well what we have carved, so that all the reliefs are homogeneous.
When carving, always cut in the direction of the grain, that is, along the fibers. This makes the work easier, as the wood offers less resistance in this direction. This will also prevent the wood from splintering or tearing off. In most woods, the fibers are easy to see as fine lines in the wood.
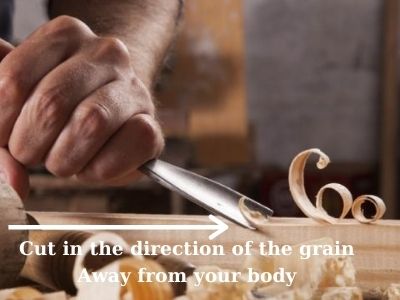
Plan your object so that you can make as many cuts as possible parallel to the direction of growth of the wood. If you are unsure which direction is with and which against the fiber, just make a short cut in both directions.
Also important: Always cut away from your body – regardless of whether you are holding the workpiece in your hand while carving or have clamped it in a vice.
You will immediately notice the difference. Place the knife close to the handle, sliding it through the wood toward the tip instead of pushing the knife through the wood.
To carve wood in a more professional and sophisticated way, there are also other techniques which are presented below , but that require a more in-depth article, if what we want to become expert craftsmen.
We would also need other types of tools, such as axes, very sharp knives (special for wood carving), as well as ceramic sharpening stones. Learning to carve wood has become a hobby for many.
Step 7. Finish the carved piece of wood
During the finishing phase, the round-shaped gouge is used , which is used to eliminate or flatten the pieces of wood that present drafts and irregularities.
It must be said that, at the time this operation is carried out, the surface of the wood must be thoroughly cleaned, to prevent the pieces and chips from being reinserted into the grooves created by the notch.
The operation must be done with a brush or a damp sponge. During the finishing phase, it is advisable to paint the parts of the notch with ink that must remain shallower to prevent them from falling.
In fact, the main characteristic of wood carving is to alternate deeper areas with those that, on the other hand, are more superficial. Only in this way, with the notch cut out, the desired effect is obtained and you can hope to obtain a masterpiece.
And with these steps, which are quite basic, we learn how to carve wood and we already have our first carved piece of wood. Now we can sand it to finish removing impurities, and varnish it, or use paint in our favorite color.
What tool are used to carve wood?
| Tools used to carve wood | Description |
|---|---|
| 1. Chip cutting knife | Chip cutting knife is he most basic wood carving tool. It consist of a blade about an inch and a half long, with a long handle designed for comfort, so that it doesn’t hurt your hand. You can find chip cutting knives for around $ 20. The high quality ones sell for around $ 50. If you are serious about your work, it is a valuable investment. A quality chip cutting knife will be made of high carbon steel and will not wear out as quickly as a cheap knife. |
| 2. Gouges | Gouges are curved carving tools that can hollow out large or small areas of wood, depending on the width of their sweep. U, V and spoon gouges there are many different types that can be used to sculpt, shape and smooth surfaces. It is an essential tool for every carver. It is made up of a handle, usually made of wood, and a metal blade. There are gouges of various types, the most common being those to be made, the knuckle, the straight and the angled. |
| 3. Chisels | Tool very similar to the gouge, but whose cut is only straight. Ideal for cutting down and making straight cuts and shapes. Chisels are sharp tools used with mallets for wood chipping techniques. Wood chippers can use a rubber mallet on their chisel, instead of a wooden mallet, to reduce noise and prevent excessive wear on the chisel handle. |
| 4. Saws | When we have to remove large parts of the piece of wood to work , it is best to use a saw or handsaw. There are several types, to adjust to each job, depending on the type of tooth or stiffness. |
| 5. Rasps and files | After rough gouge work is done, these wood carving tools are used to go over and leave a much finer, smoother finish on this surface. The function of the rasps and files is none other than, so to speak, to sand the wood. There are some that even fit a drill. |
| 6. Mallets | Somehow you have to force yourself so that the gouges and chisels do their job. A rubber or wooden mallet is the best option to keep your tools in good condition. Using a metal mallet will damage gouges and chisels more quickly. |
What are the types of wood carving ?
Although it may seem like a simple form of woodworking, there are actually different types of wood carving techniques. Below are four of the main types of wood carving:
| Types of wood carving techniques | Description |
|---|---|
| 1. Relief carving | Unlike full wood carvings, relief carving is the process of carving figures into wood. As the name suggests, relief carving refers to the creation of a carved piece with a flat back . Usually this is hung on the wall and shows entire scenes or individual people or animals. A distinction must be made between high relief and low relief You start with a flat panel of wood, and carve figures into it, leaving the back flat. In most cases, reliefs carving is done by hand, but it is also possible to use power tools for example, to smooth the back. |
| 2. Round carving | It is like the clay sculpture of cutting wood. Objects are smooth, angles are rounded, hence the name and all sides are carved, unlike relief carving. This technique can be used to produce a wide variety of effects and designs, and could be considered the simplest of the wood carving techniques. |
| 3. Chip carving | Chip carving involves the use of a knife, chisel, and hammer. The process is exactly as the name suggests: chipping a piece of wood. This can be used to create intricate patterns in wooden plaques and planks. Most of the time, the carvings are made in geometric shapes , such as triangles or circles . This type of carving is probably the most filigree and the most difficult to do. |
| 4. Whittling | This technique can be used to produce a wide variety of effects and designs, and could be considered the simplest of techniques – being possible with nothing more than a sharp knife and piece of softwood. |
How to Carve Wood with a Knife
Regarding the tools to use, we will only need a knife or a specific knife for carving, since they have a fixed blade and a longer handle, a sharpening whetstone.
Step 1. Sharp your knife
In the end, you are much more likely to cut yourself with a blunt knife than a sharp one. Thus, we must sharpen it with a ceramic whetstone .
Keep the blade tilted at a 10 to 20 degree angle and move the blade back and forth over the stone, keeping your wrist locked and bending only the elbow to help maintain the angle and trajectory.
Step 2. Put on gloves
The leather gloves used when carving wood protect your hands from any danger and are already designed to be comfortable, but at the beginning it might be uncomfortable.
On your hand, the one not holding the knife remembers to wear a work glove. Leather work gloves may seem a little bulky at first, but at least it’s something you probably already have lying around the house that can save you from unwanted cuts.
You can purchase carving specific gloves that will protect your hands and are designed to be more comfortable.
Step 3. Don’t rush, stay calm
The art of carving wood does not require fast rhythms, so whether the carved wood piece it turns out well or badly, relax, take it easy and, above all, do not get frustrated if the first time a piece does not come out as you had planned.
Step 4. Cut the grain
Not only is grain carving easier due to the lower strength of the wood, but it also prevents rips, chips, and unsightly visual artifacts . The grain is identified by the dark stripes that run through the wood, so you will need to make a “cross cut” through the grain to determine the direction for or against it.
Step 5. Trace your design
In general, following your design first will help you stay oriented as the piece begins to change and take shape. In a first phase, you try to get a very basic shape.
Starting with a simple project, without overly complicated shapes, they are excellent projects for beginners, and therefore, we leave you with this excellent tutorial to whet your appetite.
What Types Of Wood Are Suitable for Carving?
In general, all types of wood can be carved. However, there are some that are particularly suitable. These include maple, linden and Swiss stone pine. Linden and Swiss stone pine are particularly recommended for beginners because they are very soft woods. Advanced carvers also like to work with oak , a very robust hardwood.
Olive wood is also popular with professionals and can be easily carved by hand. Alder and ash are also considered good wood carvings. Spruce, on the other hand, is not indicated for carving because it is too knotty.
Conclusion
If you want to learn how to carve, you need not only good carving tools but also a high level of safety awareness, check your carving tools regularly and re-sharpen them and above all, patience.
When learning how to carve wood, it is important to first practice how to use the carving tools correctly. Therefore, at the beginning, start with a project in which the result is not yet so important. So you can concentrate fully on the techniques at first. It takes a little practice to get a feel for the wood.
As it has almost no grain and being one of the softest woods to carve, linden is very easy to carve by hand. Linden wood has a white appearance and can be found throughout Europe and America. Linden is ideal for relief carving, as it can be carved into many different objects, such as spoons, plates, or more detailed pieces of art.
The woodcarving is one of the most popular and most complex in the world of woodworking and craft techniques. The
woodcarving takes time, concentration and dedication it is a process that requires rough wood which is carved slowly until you get translated into reality what you have in mind.