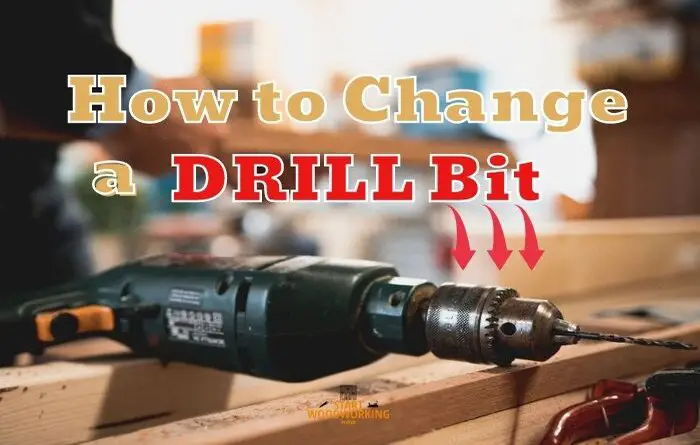
How to Change a Drill Bit [In 5 Easy Steps]
The drill is a tool that can help us with many DIY tasks, so it is very important to know how to change a drill bit.
Drills are one of the most common tools used by those who need to work on plaster, pipes, wood, metals, and other types of surfaces. Carpentry, renovation, plumbing, woodworking and many other jobs require a drill.
But when it comes to changing these bits on the drill, many beginners have trouble. By making sure you know the exact steps of changing a drill bit, you can take your job a step forward.
And this is what we will present in this article.
How to Change a Drill Bit Step by Step
When handling drill bits, wear gloves to protect your hands.
The essential equipment are gloves, goggles and rubber boots.
Always switch off the drill when not in use, even for a coffee break.
Here are the steps to follow to change a drill bit:
Step 1: Loosen the chuck
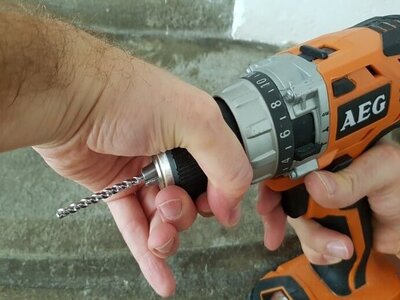
To hold the bit, there is a mechanism called a drill chuck. And to replace the current bit with a new one, it must be loosened. To do this, simply turn the chuck counterclockwise and unwind it with firm finger pressure until you can remove the old bit.
Also, don’t forget to squeeze the trigger while holding the chuck. Once it’s done, this will open the jaws of the chuck that hold the drill bit.
Step 2: Remove the drill bit
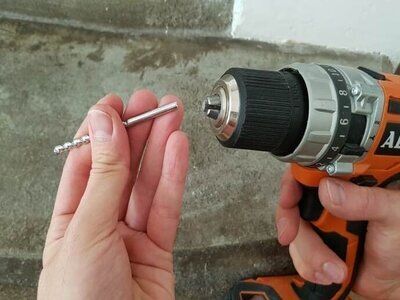
Once you loosen the chuck, you can see the bit wobble. If you have just used it, do not dare to hold it with your fingers because it will be very hot.
In this case, use gloves or the like to protect your finger. If possible, hold it up in the air while it’s cold enough to do so.
Step 3: Take the new bit and insert it
Now select the correct size bit to put in the drill (check the table below). Once you’ve picked the right one, place the smooth portion of the bit into the chuck jaw of the drill. The smooth part is in fact that which is inside the chuck jaws.
Once you have inserted the smooth portion of the bit into the jaws of the chuck, insert the bit into the chuck and pull it out towards you. The length of the pull back should not exceed one centimeter.
Step 4: Pull the trigger

To put it back in place, you have to give the trigger a few shots. To do this, squeeze the trigger for 1-3 seconds, then use your other hand to hold the chuck. This will help the bit to stay in its place. Another advantage of holding the bit and the chuck is that it allows the bit to be installed straight.
Step 5: Check if there is a self-locking chuck mechanism
Some brands of drill rigs are equipped with a self-locking mechanism. In this case, you have to work on the ratchet mechanism to make the bit even more resistant. To obtain this ratchet mechanism, you must turn the ratchet firmly on the shank of the bit.
Once you have heard the click, you will see that it is in its place. To engage the ratchet mechanism, it must be turned firmly next to the chuck. This twist must be done in a clockwise direction.
Type of Drill Bits for Wood
| Type of Drill Bits for Wood | What are used for |
|---|---|
| 1. Twist drill bits | Its use is in conjunction with a manual drill. These types of drills allow drilling holes at very low revolutions of the tool. |
| 2. Spade drill bits | It provides a large drilling diameter, while allowing installation in a conventional drill. This type cuts clean edges without torn wood grain. |
| 3. Three-point drill bit (Auger bit) for wood | They are the most used for drilling wood and are usually made of chrome-vanadium steel. Intended for all types of wood: hard, soft, plywood, chipboard, etc. |
| 4. Forstner drill bits (Hole saws) | Forstner bits and artificial bits are wood bits that are used to drill large blind holes, for example for holding concealed hinges and for drilling knotholes . |
Type of Drill Chucks
| Type of Drill Chucks | Description |
|---|---|
| 1.Keyed drill chuck | The bits are placed in the chuck, which is then tightened or loosened with a wrench. The wrench allows the bit to be tightened safely, but it is not very practical and you have to be very careful not to lose it. |
| 2.Semi-automatic quick-lock chuck | Two hands are required to operate a semi-automatic quick-release chuck. While one hand firmly grasps one part of the chuck, the other part is rotated with the other hand to tighten or loosen it. |
| 3.Self-locking chuck | This is the most practical option, as it can be operated with just one hand, leaving the other free to hold the tool or accessory. |
| 4.SDS chuck | This chuck system is only offered on hammers and is only compatible with special SDS bits. These bits are very easy to fit. If you want to drill wood and metal with normal drill bits, you will need a special SDS + adapter. |
| 5.Hex connection | Cordless screwdrivers usually have a hexagonal magnetic connection. This hex connection for cordless impact drivers works a little differently. The chuck must be pulled forward to position the accessory. The chuck can then be released. In neither case will you need additional tools to connect the accessories. |
How to change the Drill bit using a Chuck Key
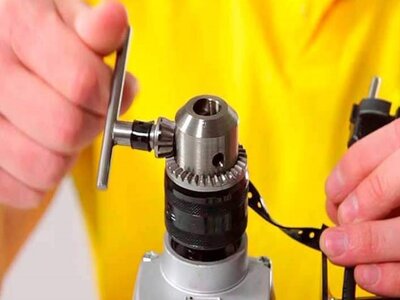
If you have a drill bit with a chuck key, these are the steps we will follow to change the bit:
1.Use the chuck key. To tighten or loosen a chuck of a drill equipped with a chuck key we use the head of the key. The head of the key has the shape of an toothed wheel crown.
To use it, insert the tip of the key into one of the holes provided and interlock its teeth with those of the chuck. Note that there is usually a place on the drill to store the chuck wrench. Be aware that it will be common to find a chuck wrench on a corded electric drill and rarely on a cordless electric drill.
2. Spread the jaws of the chuck. Once the wrench is in position on the drill, turn it counterclockwise. You will notice that little by little the jaws will open up. Stop when you feel there is enough space to insert a drill bit. Note that the jaws are three or four pieces that protrude from the chuck and serve to immobilize the bit.
3. Remove the bit. When the jaws are fully open, with your thumb and forefinger take the drill. Remember to retrieve the bit before it falls and gets damaged, because when the jaws are wide enough the bit can easily fall if you tilt the front of the drill towards the ground.
Check your bit after removing it from the drill. If you notice that the cutting parts are frayed, cracked or that the tip of the bit has changed color and seems duller (metal overheating during drilling), do not reuse it and put it in the trash.
4. Place a new drill bit. When the jaws are fully open, insert a new bit. You need to place the smooth part of the bit between the jaws of the chuck. With your thumb and forefinger, hold it inside Search Source. Hold the bit securely in place until the jaws are tightened on it, as it may slip out. Retighten the chuck.
5. Retighten the chuck. Hold the bit with one hand and with the other hand with the wrench, close the jaws on the bit by turning the bit clockwise. To finish and make sure that the drill is well held between the jaws, give a final turn of the wrench in each of the slots provided for this purpose.
In general, there are three places where you can insert the key. Once it’s done, remove the Search Source key. When your bit is in place, you can stop holding it. Then spin it while pushing the button on the drill to make sure it is operational for drilling.
How to change a drill bit without a chuck key
Here are the steps to change a drill bit without a chuck key:
- Loosen the chuck : The chuck , will have to be loosened if we want to insert the new drill. This should be easy to do. We just take the chuck with one hand and grab the handle with the other. We turn the chuck in an anti-clockwise direction and it should loosen. If it was hard, we can press the trigger gently while locking the chuck.
- Use a screwdriver: If the drill doesn’t have a self locking mechanism, the most common method is to use a Phillips screwdriver or a nail of a suitable diameter. Insert into any of the available recesses on the chuck, thereby securing the first half of it. You can try to twist the other half by hand. Usually this way it turns out to be quite easy to unwind.
- However, if it does not work out this way, then you can use a gas wrench or a vice instead of a hand. Using them, you will be able to create the necessary effort, which is most likely enough to carry out the rotation.
- Drill Bit Removal: Doing this will open the fasteners that are holding the bit. It will be then when we will remove the drill that is inside, or when the drill is ready to insert the new one.
- Placement of a new drill: We place the drill in the center of the hole and turn the chuck so that it closes. Make sure the bit has gone all the way in. We must rotate the chuck until we conclude that the bit is well attached, but well centered at the same time.
- Check: Press the drill lightly and check that the bit stays in place.
- Ratchet Mechanism (Optional): In the event your drill has a ratcheting mechanism, you can apply a little extra depression to the bit shank. Rotate it until it clicks into place.
How to change the drill bit in a Makita drill
In order to be able to change the drill bit on your Makita drill do the following steps:
- You must first unplug the power cord from the socket. If you do not disconnect the device from the power supply, you can injure yourself when you press the start button.
- Now hold the drill with your left hand underneath the drill chuck.
- Place your right hand on the drill chuck.
- Place your hand so that you can easily turn the drill chuck.
- Now open the chuck so that the old drill bit can be loosened and the new one inserted.
- To loosen, turn the drill chuck to the right.
- Then insert the new drill bit.
- Finally, close the chuck again, for this you have to turn it to the left. The drill should be as straight as possible in the chuck and rest on the back.
- Tighten the drill chuck well, otherwise it will come loose as soon as you start drilling.
How to Change the Bit in a Black & Decker Drill
Black & Decker manufactures many types of power tools that are used for a variety of different projects, both at home and on the job site. Some of Black & Decker’s most popular products are power drills and wrenches, which are used both for drilling holes in a variety of surfaces and for securing and removing screws.
Black & Decker drills have keyless chuck, which allow you to insert and remove bits without a key. Key removal makes changing quicker, saving you time searching for a misplaced key.
Here are the steps to change the Bit in a Black & Decker Drill:
Step 1: Move the “Unlock” button, located above the trigger, to the “Lock” position.
Step 2: Grab the bottom of the chuck, which is on the thin black ridged piece, with one hand.
Step 3: Rotate the front of the chuck counterclockwise (looking from the front of the drill), using your other hand to open the chuck.
Step 4: Insert the bit fully into the chuck, then turn the chuck clockwise until snug.
How to remove a drill bit from a damaged chuck
Here are the methods to remove the drill bit from a damaged chuck:
- Hold the chuck and run the drill in reverse , I almost burned my hand. Tried it with a thick gardening glove and almost burned my hand.
- Soak the head in WD40 to loosen the bit ; none of this worked for me
- Tap the bit into the chuck as this helps to free the jaws inward, despite multiple hits with a hammer nothing moved and the bit was no looser than when I started
- Use a strap wrench – the only way to do that was to grab the chuck and run the drill in the opposite direction. Since the bit was so stuck and the drilling torque was so high, it was the drill (rather than the chuck) that started turning and started drilling my arm!
Conclusion
Changing the drill bit is not always that easy. Sometimes you have to apply a little extra force on the spindle, other times you have to take everything apart. It happens above all when you leave the drill in wet areas, even if these tools are qualitatively superior there is always the risk of some mechanism blocking.
Regardless of the type of chuck your drill has, changing the bit can be accomplished in just a few steps. And so you will have finished with this process of how to change the drill bit .