How to Replace Door Hinges [The Easiest Way]
The door hinges are most stressed, and although they are made of durable metal, they wear out over the years and need to be replaced. To remove old hinges and install new ones, it is not necessary to completely remove the door. So how to replace door hinges correctly?
How to Replace Door Hinges
1) Press down the door latch on both sides.
2) Pull out the door.
3) Unscrew the 2 screws holding the door hinge.
4) Pull out the hinge and replace it with a new one.
As much as if you want to replace your old door hinges or if you want to install new ones, it is important that you know in detail the steps to follow. Make no mistakes and take note of what you have to do!
How to Replace Door Hinges Step by Step
Do you have a wooden door that has problems with the hinge? Are you going to install a new door and do not know how to place it? We tell you how to replace door hinges or install it completely new.
To replace the hinges of your door, you must first of all acquire new hinges, which will be the ones that we will change for the old ones, replacing these in search of a better quality.
Tools necessary to replace a door hinge:
- Wedges
- Tape measure
- Hinges
- Sand paper
- Paint
- Scraper
- Screwdriver
- Silicone grease
Step 1: Block the door with wedges
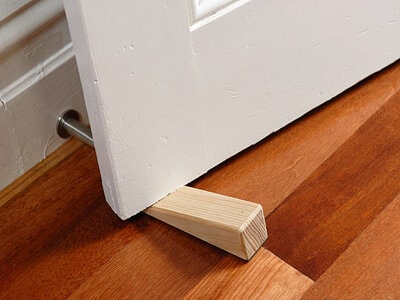
The first operation to do is to open the door completely so that the hinges are clearly visible, after which it is advisable to place wedges under the door in order to keep it firm and at the same time they will act as a support once the hinges are removed.
Furthermore, it is always advisable to make sure that the new hinges are the same size and that they match the old ones. A tape measure is used instead to verify the exact position.
In fact, the hinges should be one at 14 cm from the top of the door frame, and the other at 20 cm from the bottom.
If the measurements are not correct, it will be necessary to proceed with a split in the wood so that the accommodation of the new hinges is adequate, and a chisel is more than enough to optimize the result.
Step 2: Remove the old door hinges
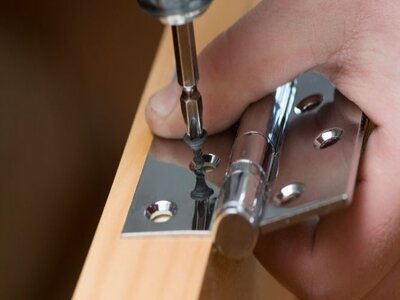
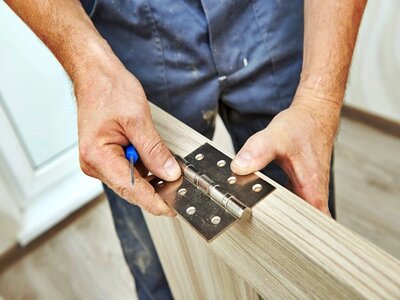
Once the door has been secured and the above mentioned necessary checks have been carried out, the old hinges can be disassembled starting with the one positioned at the top. To do this, first remove the screws that hold the hinge plate in place, making sure that the wood underneath the keying is in good condition.
In case of negative result, you should sand the part and possibly add a wooden dowel. And if the new hinges are slightly higher than the old ones, the advice is to make the keying itself smaller with specific putty for wood.
Once the latter has dried, it must then be sanded to make the part uniform with the rest of the door. At this point you can proceed with the installation of the new hinge, using a screwdriver and the screws included in the purchased set. The operation must be done precisely and as described in the next step of this guide.
Step 3: Replace the old door hinge with a new one
Once the new hinge has been inserted into its keyway, you can proceed in the same way for the one located in the lower part, adjusting it perfectly with the upper one, to prevent the door from opening correctly.
And if the door of your house consists of a third hinge in the central part, the operation of disassembly and installation of the new one is carried out after the first two and in the same way and with the same precautions.
Once you have completed the gradual work of dismantling the old hinges and replacing them with the new ones, you can remove the wedges and make the necessary tests. If the door opens smoothly and without any creaking, then it means that the work of removing and placing the new hinges has been done correctly.
Do you know how to fix a warped door? I have written an easy guide to show you how!
Step 4: Install a second hinge if necessary
Switch to the other hinge and use a screwdriver to remove it. Replace it with a new hinge, secured with new screws. To do this, keep it in place so that it does not move.
When the two hinge flaps are attached, connect them by sliding them into each other. Also replace the third central hinge at this time, if your door has one.
Step 5: Check the door hinge installation
Now, always with the help of a friend, lift the door by placing it back on the hinge, then, exerting some pressure on it with your foot, bring it to the height of the hinges and let it descend “gently” on them by making a movement very slow.
Your effort is practically over. All you have to do is check the result of the whole operation, then close the door (note: in the rush to complete the job, do not lock!) And make sure that the movement of the hinges is perfect and that the lock works properly.
Step 6: Lubricate the new door hinges
To complete the work described so far regarding the replacement of the door hinges, in the end of this guide it should be added that to maximize the result, in a hardware store or in a paint factory you can buy silicone grease in paste that must be applied in the hinges.
The aim is to eliminate any small squeaks, and at the same time the product serves to prevent the formation of rust as well as facilitate opening and closing.
Finally, if the door on which you have to intervene is that of the entrance and of the armored type therefore rather heavy, the advice is to opt for decidedly more robust hinges and perhaps of the stainless steel type and equipped with hinges of the same nature.
| Type of door leaves | Method of opening |
|---|---|
| 1.Swing | This type of mechanism is one of the most common. The door is fastened on special hinges, which allows it to be opened in one direction. |
| 2.Sliding | This type of door presupposes the presence of small runners along which the sashes move parallel to the walls. Perfect for small spaces as they do not take up much space. Installation is carried out using special roller mechanisms. |
| 3.Foldable | The door of this design consists of several blocks that can be folded into a small canvas. Folding doors allow you to create a unique interior. Very often they are used in modern interiors, for the purpose of high-quality and simple zoning of space. |
| 3. Carousel | The revolving door is a round leaf with several leaves. To enter inside, they need to be rotated around the central axis. You can meet such structures at the entrance to shopping centers, but there they are set in motion automatically. |
How to Replace Interior Door Hinges
Whenever, as a result of breakage, aging or because they are new interior doors, we have to replace some or all of the hinges, it is advisable to remove them and take one of them in good condition to the hardware store or specialized store. In this way, we will ensure that they provide us with a fitting that is the same or similar enough to correctly replace the previous one.
The replacement process will not be complete without:
- A new set of hinges;
- Screwdriver;
- Wood putty;
- Spatula;
- Sandpaper;
- Stain or paint;
- Construction knife;
- Chisels;
- Hammer.
Replacing the hinge of the interior door is carried out as follows:
- The first step is to open the interior door and fix it using wooden wedges and placing them at the bottom of the door. It is not necessary to completely remove the interior door leaf when the door pin and hinges are replaced. Wedges placed underneath will prevent the door from falling;
- Then you need to compare the sizes of the old hinges and the new ones (they must be identical), check that they are correctly located. The parameters for the correct location of the hinges are 17 cm from the top of the interior door frame and 27 cm from the bottom. If the new hinges are smaller in size than the previous ones, the excess part of the grooves in the casing can be repaired using a special wood putty. After the putty has completely dried, the surface must be leveled by grinding with sandpaper, covered with a stain;
- Next, you need to dismantle one old hinge. To do this, using a screwdriver, you need to unscrew and remove the fasteners, carefully remove the hinge wings from the interior door frame and door leaf;
- The next step is preparing for hinge replacement. If the old hinge was used for a very long time, then the surface of the wooden casing under it could be slightly damaged. To restore the surface, you need to clean it using sandpaper and apply a layer of paint or stain on top;
- Installation. The new hinge is mounted in the place left from the old hinge, its wings are fixed on the interior door frame casing and on the door itself using fasteners and self-tapping screws. Mounting parts are included with hinges.
- At the end of the installation, the hinge wings are connected to each other and fixed using a special axis (door finger), which is inserted into the spot intended for it;
- Next, you need to do all the same steps with the second hinge;
- The last step of the replacement is to check that the new interior door hinges are installed correctly and that they work. To do this, remove the wooden wedges from the bottom of the door leaf and open / close it completely several times.
Door hinges are presented on the construction market in a wide range: for doors of different weights, for use in different climatic conditions, for fewer or more openings without wear.
You need to carefully choose new hinges, taking into account all the details.
Correctly selected hinges will last a long time with any doors and in any conditions.
| Types of Interior Door Hinges |
|---|
| 1.Butterfly Door Hinges |
| 2. Screw-in Hinges (Pin hinge door) |
| 3. Concealed Hinges (Hidden Hinges) |
How to Replace Different Types of Interior Door Hinges
1.Butterfly Door Hinges
So, let’s look at how to remove the interior door from the butterfly hinges. All models, regardless of the principle of fastening and design, have a common structural principle. They consist of two straight or corner plates, which are screwed to the box and the doors with self-tapping screws. They are connected by a hinge element, which sets the door in motion.
The vast majority of butterfly hinges consist of two halves: an upper and a lower plate. Therefore, in order to remove the door, you need to make a minimum of effort. It is best to work with an assistant, especially if the item is heavy or has fragile glass inserts.
First you need to support the door from below and slightly raise it. After that, continue to slide it up, twisting slightly if necessary. At a certain moment, the upper half will be removed from the pin and it will be possible to remove the doors to the side.
Finally, we screw the two plates that form the hinge, one on the frame and one on the door. Then we only have to put the door back.
2. Screw-in Hinges (Pin hinge door)
Models of interior door hinges made on the principle of a screw-in mechanism will be somewhat more difficult to remove.
The pivot pin of the screwed-in hinges has a small pin that must be removed from the structure to separate the hinge plates. To do this, you must first close the door.
Then, using a screwdriver or any other tool convenient for you, push the pin up and pick it up with pliers or fingers, if that’s convenient for you. Gently pull it up, twisting slightly as you go. Then just peel off the door.
Since the main load falls on the upper part of the structure, it is best to start work from the lower hinge. In order to prevent the door from collapsing on you, ask someone to hold it or use improvised items to support it.
To replace the screw-in door hinges, then you should move in the reverse order. Start by installing the hinge on the end. Lift the door gently and start pushing it onto the pins. After fixing the door to the fittings, fix its position with self-tapping screws.
3. Concealed Hinges (Hidden Hinges)
The most difficult are the hidden hinge models. To remove the interior door hinges, you may need a special tool. Also, much depends on the position in which to carry out the work:
- Opened door. First you need to decide on the type of connection of the hinge plates. For the simplest models, it is enough to use a screwdriver in order to unscrew half of the fittings. More complex products require a hex wrench. The method of knocking out the axis can also be used, but since most of the mechanism is hidden inside the doors, it will not be very convenient to perform such manipulations.
- Closed door . In such a position, it is extremely difficult to cope with the task. If we are talking about the hidden hinges of the balcony block, then it is enough to remove the protective caps, knock out the axle and remove the doors in the same way as in the case of screw-in fittings. But the hinges completely disguised in the door block in this position cannot be removed by a beginner. Therefore, you will either have to look for another way to open the door.
How to replace door hinges on a stove/oven
What you need
- Screwdriver
- Oven hinge
Remember to disconnect your device before starting any repair.
Steps to replace door hinges on a oven
- Remove the door
Start by opening your oven door. To remove it, slide your hands under the door and place your thumbs on the top of the hinges. Press down on the hinges to lower them and remove the door.
- Remove defective hinges
Place your door on a flat, protected surface. To gain access to the hinges, you will have to separate the two sides of the door by removing all the screws from it. Start by removing the screws that hold the glass in place.
Remove the glass and set it aside. Then remove the screws securing the hinges on each side of the door, also removing the washer. Finally take out the old hinges.
- Fit the new hinges
You will need to start by creating a wiring at the location of the screws on the new hinges using the screws. Then insert the new hinges into the slots in the door. Line up the holes and start screwing the hinges to the door by hand.
Finish using the screwdriver. Also, don’t forget to put the washers back in place. Then turn the door over to put the glass back in place and screw it back on.
- Put the door back on the oven
Now all you have to do is put the door back on the oven. To do this, you will place the hinges in the slots on your oven. The new hinges will be tight enough, so before inserting the lower part of the hinges, lower the upper part using your thumbs.
Insert the lower part and the hooks into the slot in the door on the oven. Release. Check that the lower part is properly inserted, then close the door.
Conclusion
It’s the details that make the difference. To replace the hinges if the door touches the floor it does not take a locksmith or a carpenter, just remove and reassemble the hinges one at a time.
With particular attention to antique fixtures which can be particularly delicate. In these cases some restoration is needed. And here’s how to replace your oven door hinges.