How To Screw Into Wood [In A Easy Way]
Knowing how to screw into wood is not very complicated and will also be useful for construction work, installation of parquet, installation of paneling or even assembly of furniture or a wooden door. When screwing into wood, it is necessary to take some precautions in order not to split the wood and to obtain a quality result.
Using wood screws offers considerable advantages, in fact you can easily remove and detach the pieces in case of need. Furthermore, the thread of the screws is firmly anchored to the wood fibers and therefore allows a very robust assembly. Here’s how to screw into wood:
How To Screw Into Wood Step by Step
Step 1: Choose the wood screws
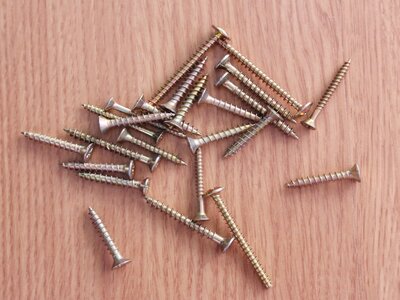
In order to screw into wood you must ensure that the screws do not protrude from the wood and take into account the thickness of the wood to be drilled. Most often their head is split.
There are different types of screw heads with countersunk heads being the most common and the most recommended for wood because they sink in easily.
Note that the round and domed-countersunk screws remain visible and that the domed will allow a more aesthetic side. Use cruciform screws for easier screwing. Finally, be aware that, most of the time, the screws used are made of steel, but that there are also some in brass or stainless steel.
The sizes available in stores usually vary between 10mm and 25cm millimeters in length depending on the uses. Usually shorter or longer screws are suitable for other materials.
For wood, moreover, screws with star and cross cut grafting are usually used, while other types of grafting are much rarer because the amount of force necessary to make them enter the wood is not very much.
How to choose screws?
According to its material and mechanical resistance:
How to choose screws : The quality and mechanical resistance requirements depend on the surface on which they will be fixed. For wood, metal screws are used, treated with different compounds to make their surface anticorrosive.
According to screw head:
The head allows to hold the screw and print a rotating movement for fixation. There are different types of head according to the use and the type of termination that is required (hidden or visible head), the most common are:
| Head | Use | Termination | Application tool |
|---|---|---|---|
| Hexagonal | Tightening of metal parts and nuts with greater mechanical effort. | In sight. | Fixed or adjustable wrench. |
| Rounded | Squeeze sheets or thin pieces so as to allow the screw to sink into them. They generally use washers. | In sight. | Manual or electric screwdriver. |
| Countersunk or Flat | In woodwork where the head needs to be flush with the surface. | Hidden. | Manual or electric screwdriver. |
| Star or Phillips | In wood and metal carpentry. | Hidden. | Manual or electric screwdriver. |
| Allen | Wood carpentry with low level of mechanical stress. | Hidden. | Allen wrench. |
| Knurled | In minor wood or metal carpentry. | In sight. | Manual tightening. |
There are different categories of screws but the most suitable for wood are steel screws which resist tightening. For outdoor uses, opt for brass or stainless steel screws which do not deteriorate with climatic variations. Choose the countersunk head ones that dig easily into the wood. And for the aesthetic side, decline your choice on screws finished with a slightly rounded round end.
Step 2: Pre-drill the wood surface
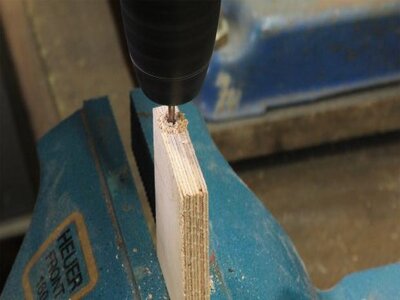
Does wood have to be pre-drilled before screwing in the screws? That is the central question here. But the answer to this is easier than you think: No, you don’t always have to pre-drill.
But it would be good if every hole was pre-drilled. Because there is no adverse effect from pre-drilling. So if the wood is pre-drilled before screwing in wood screws, every screw will inevitably be screwed in.
However, if the pre-drilling is neglected in hardwood, thin workpieces or plywood panels, it can end in a failure. Either the screw breaks off or the workpiece jumps. There is then no longer any question of success. So the question should rather be: When can you do without pre-drilling in wood?
TOOLS AND MATERIALS FOR PRE-DRILLING IN WOOD
For pre-drilling in wood, nothing more and nothing less is needed than a cordless screwdriver with a wood drill and a countersink. How big the hole has to be when pre-drilling, however, depends on the hardness of the wood.
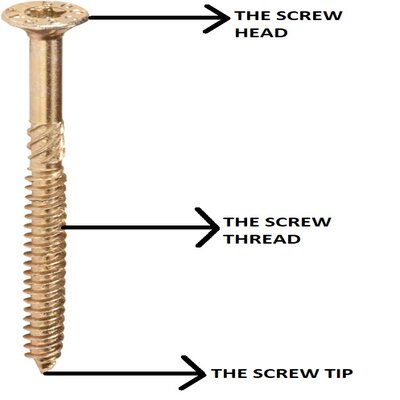
Whether you have to pre-drill is also a question of the screw structure. Two factors influence this:
- the screw tip
- the screw thread
Since conifers (fir, spruce, larch, pine, Douglas fir) are generally softer than hardwoods (beech, oak), the required diameter for conifers is smaller, as the following table shows. The following table gives you an overview with which you can find the right diameter of the screw for different woods:
| Screw Thread diameter [mm] | Pre-drilling diameter softwood [mm] | Pre-drilling diameter hardwood [mm] |
|---|---|---|
| 3.0 | 2.0 | 2.0 |
| 3.5 | 2.0 | 2.0 |
| 4.0 | 2.5 | 3.0 |
| 4.5 | 3.0 | 3.0 |
| 5.0 | 3.0 | 3.5 |
| 6.0 | 4.0 | 4.0 |
| 8.0 | 5.0 | 6.0 |
| 10.0 | 7.0 | 7.0 |
| Screw Thread diameter [inch] | Pre-drilling diameter softwood [inch] | Pre-drilling diameter hardwood [inch] |
|---|---|---|
| 3/32″ | 5/64″ | 5/64″ |
| 9/64″ | 5/64″ | 5/64″ |
| 5/32″ | 3/32″ | 1/8″ |
| 11/64″ | 3/32″ | 3/32″ |
| 3/16″ | 7/64″ | 1/8″ |
| 15/64″ | 5/32″ | 5/32″ |
| 5/16″ | 13/64″ | 15/64″ |
| 25/64″ | 9/32″ | 9/32″ |
The length and diameter of a screw depends on the dowel, hole and workpiece. But the material and thread are also decisive for the correct selection of the suitable screw.
Step 3: Clean the drill holes
- Remove coarse contamination
- Vacuum the borehole
To ensure permanently tight screw connections , remove dust and loose parts from the drill hole. It is best to thoroughly vacuum holes with a vacuum cleaner. If there are holes in workpieces, turn them over and tap out the drill holes. You clean surfaces with a cloth.
Tip : If you do frequent work in the workshop, you can blow out wood holes with a compressor and pressure gun.
Here is everything you need to know about dowels (how to made a dowel, uses, types)!
Which screw fits which dowel and drill bit?
| Screw size diameter [mm] | Dowel diameter (Ø mm) | Drill bit diameter (Ø mm) |
|---|---|---|
| Screw 2.5 mm to 4 mm Ø | 5 | 5 |
| 3.5 mm to 5 mm Ø screw | 6 | 6 |
| Screw 4.5 mm to 6 mm Ø | 8 | 8 |
| Screw 6 mm to 8 mm Ø | 10 | 10 |
| Screw 8 mm to 10 mm Ø | 12 | 12 |
| Screw 10 mm to 12 mm Ø | 14 | 14 |
| Screw 12 mm to 14 mm Ø | 16 | 16 |
| Screw 16 mm Ø | 20 | 20 |
| Imperial Screw size [gauge] | Dowel diameter Ø (in inch) | Drill diameter Ø (in inch) |
|---|---|---|
| 3 Gauge to 8 Gauge | 13/64″ | 13/64″ |
| 6 Gauge to 10 Gauge | 15/64″ | 15/64″ |
| 9 Gauge to 14 Gauge | 5/16″ | 5/16″ |
| 9 Gauge to 16 Gauge | 25/64″ | 25/64″ |
| 16 Gauge to 19 Gauge | 15/32″ | 15/32″ |
| 19 Gauge to 24 Gauge | 35/64″ | 35/64″ |
| 24 Gauge to 26 Gauge | 5/8″ | 5/8″ |
| 26 Gauge | 25/32″ | 25/32″ |
Step 4: Screw the screws into wood
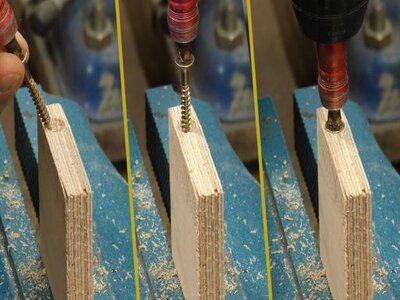
To screw into hard wood, make a pilot hole with a wood bit, a gimlet or a square point whose diameter is one millimeter less than the final screw. This is how you will prevent the wood from splitting during screwing.
After pre-drilled, you can dip the thread of the screw in paraffin or candle wax so that it penetrates better. If you use a screwdriver, be sure to adapt the screwdriver speed as you go.
Note that brass screws are more fragile than others, which is why you must also make a pilot hole with a screwsame size steel. If you want a screw to not move at all, dip it in vinegar to rust it, before putting it in place, and add wood glue.
Once the predrill hole has been made, we must proceed with the insertion of the screw and, begin to screw it with a screwdriver of suitable size for the cut or the cross that is on the head of the screw itself.
The screwdriver must be firmly gripped on the end of the handle, making it rest on the palm of the right hand while, with the left, the blade is held in the correct position so that it can rotate between the fingers just ajar.
Avoid keeping your fingers close to the drill as it is dangerous, instead keep them about halfway up the wood. Of course, then everyone can challenge it as they see fit, but this is the most correct procedure. Be careful not to push too hard while screwing as the tool may slip out of your hand. The common screws are tightened by turning clockwise.
If you use a screwdriver to screw in the wood, select the screwdriver or bit of the appropriate size. The bit here means the screwdriver blade depending on the screw head, you can choose, for example, between a cross-head, hexagon or inner square shape .
If the blades are too large or small, the tool slips easily and can leave scratches. The screw head can also be damaged by unsuitable tools, so that in the worst case, the screw can no longer be turned.
The right screwdriver is easy to hold. In addition, the handle and blade are firmly glued or fused together. In this way you work safely and the ideal power transmission is guaranteed.
When you realize that the screw has difficulty in entering into wood, it is better not to insist, but rather to extract it, rub the threaded part with a little dry soap, and then put it back in place. If this is not enough, it is necessary to slightly enlarge the guide hole.
If you want to apply screws that must be invisible, you must, with a countersink or a drill with a helical diameter, widen the upper part of the pilot hole, so that when you tighten the screw, the head of the same enters the countersink, then cover it with the putty.
Step 5: Remove chips after screwing into the wood
Even when using a suitable tool, it can happen that when the screw is screwed in, wood chips form on the hole of the screw . To avoid injury, remove these wood chips directly. Smooth the areas in question with a fine wooden or metal file or sandpaper.
How to Screw Into Wood without Splitting
Screwing into wood without splitting can be done in two ways:
1.Sandwich wood method
The solution against wood splitting: Use a “sacrificial wood” as a buffer – this is a piece of leftover wood that you “sacrifice”, so to speak, for your beautiful piece of wood.
Place the sacrificial wood (red, shown on the left in the picture) under the piece of wood you want to screw into and clamp the two pieces together with screw clamps.
Place the drill bit on the marked center of the screw hole. The drill bit should be held at right angles to the wood so that it can work its way straight through the wood. Screw through the upper wood into the sacrificial wood.
The result on the front and back: a clean screw into wood without splitting. The sacrificial wood stabilizes the wood fibers and prevents tears at the drill hole.
2.Pre-drill method
- I put the two wood pieces together with a clamp. The two parts must be joined securely to ensure correct screwing.
- Mark the location of the borehole with a centering punch .
- I make a pre-hole of 3 mm on the two pieces, the length of the screw.
- I can drill the top part with a 6 bit to prevent shattering under the pressure of the screw.
- You can also machine a location for the screw head.
- Screw with a screwdriver and maybe finally, with a screwdriver.
- You can remove the clamp.
How To Screw Into Wood with a Cordless Screwdriver
Select the right bit (i.e. the right screwdriver blade) for your cordless screwdriver. Also check the direction of rotation and torque settings before screwing .
Set the torque for screwing in wood relatively soft. Otherwise there is a risk that a screw will be tightened too tight and the material will be damaged as a result.
When screwing harder materials, choose a tighter torque, otherwise the cordless screwdriver will spin with less resistance and the screw will not be tightened. If this happens accidentally, stop the screwdriver, correct the torque and start again.
Place the cordless screwdriver straight onto the head of the screw and hold the machine steady with both hands. One hand leads, the other exerts pressure.
Turn at low speed to start with. Do not press the control switch any further until the screw has found a grip. As soon as the screw is completely screwed in, you first release the control switch and then put the screwdriver down.
How To Screw Into Wood by Hand
To do this, you can use traditional screwdrivers different bit holders, why not a tap holder or even a chuck screwdriver.
We can screw into wood completely by hand:
- The pre-drilling can be done using forged gimlets, hand drills or even needles. It can be helped by a carpenter’s square (for example) to ensure a straight hole.
- Then, the pre-hole can be deburred with a manual deburring cutter in order to facilitate the seating of the screw head.
- Then, in order to help manual tightening , it is advisable to lightly grease the screw (multifunction grease or liquid soap such as black soap, for example…) over a good half of its thread.
- Finally, apply good pressure to the tool so that it adheres well to the pattern of the screw head (cruciform, flat, torx, etc.).
Note : This method is acceptable on soft wood. For a harder type of wood, it is better to use a method with more suitable tools.
Conclusion
Screwing wood helps to better maintain certain installations, for which gluing or nailing would not suffice. In addition, it allows the furniture to be dismantled, if necessary.
In this article there are presented a few methods how to screw into wood: using a manual drill or screwing with power tools (drill / screwdriver – impact wrench, corded or cordless, etc.)
You have to make a choice depending on the work to be done. Softwood, hardwood thickness of materials, length and diameter of screws.

