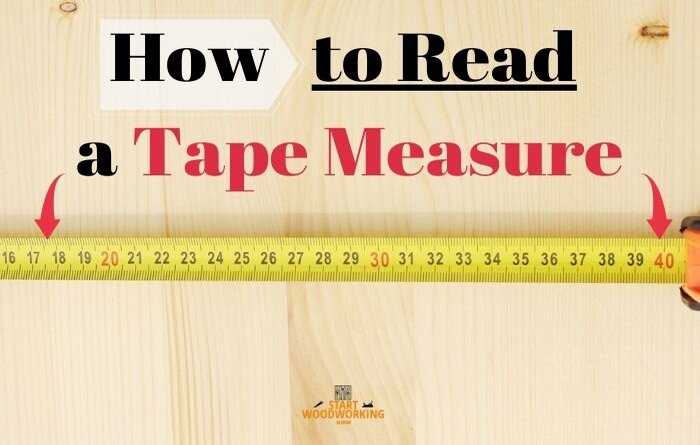
How to Read a Tape Measure [In a Easy Way]
When cutting wood or building a house, it’s important to read a tape measure accurately. However, when stretched out, a tape measure is a jumble of numbers, markers, diamonds, and other confusing symbols. We will show you how to read a tape measure in a very easy way.
For measurements on construction sites or in industry, tape measures made of steel or glass fiber plastic are mainly used. If the model is made of steel, the scale is not printed on, but is usually engraved – so it cannot wear out. Depending on the length, the scale shows units such as meters, decimeters, centimeters and millimeters.
Of course, tape measures are available in different lengths: While short versions between one and two meters are usually used for home use, tape measures between 20 and 50 meters in length are used in industry – depending on requirements.
Tape Measure Basics
Tape measures come in a variety of sizes, from 6 ′ to 40 ′ (and even larger). There are small tapes used for interior projects like hanging artwork or measuring furniture and longer tapes (25 ′ and above) are best for large-scale projects like framing, decking, and outdoor projects.
Parts of a tape measure
There are a few key parts to know about tape measures, so let’s start by identifying them first:
1. Tape
This is the most important part of this tape measure, since it is the one that contains all the numerical measurements that we will use to measure. We can basically define the tape as the yellow spiral rule that can be wide or thin.
A wider tape can be extended further without bending, and it will hold up better over time than a small, narrow tape. The tapes are also curved to maintain their structure, even when stretched to great lengths.
It is important to mention that depending on how wide the tape is, the harder it will be. In fact, it is depending on this feature that the tape can be extended far without bending.
2. Hook-shaped Pull Tab
This part of the tape measure is what allows it to hook onto the end of whatever you are about to measure. Basically it prevents the tape from staying a part outside the casing when backing up.
3. Case and Belt Clip
We know as a box the part of the tape measure that holds the tape, which can be made of plastic or metal. Its function is to prevent the spiral tape from expanding. On the other hand, at the back of the shell, we will find a clip that is used for the belt, which facilitates access while working.
4. Stop Button
To start the stop button is attached to a flat spring that is wrapped from a post inside the housing. Thanks to this spring, the tape can go back after it is extended. However, if we want to keep the tape stopped in place we can press the lock or stop button.
How to Read an Imperial Tape Measure
To know how to read a tape measure, you need to consider switching from long marks to short marks. The longest mark indicates one inch. The shorter the length of the markings, the shorter the dimensions. Markings range from 1 inch to 1/16 inch on most tape measures.
Here are the markings you need to know to get started: (Note that if you write inch or foot measurement as a number, you put “for feet and” inches).
- The foot (for example 1 ‘, 10’)
- One inch (1 “)
- Half inch (1/2 inch)
- Quarter inch (1/4 inch)
- Eighth inch (1/8 inch)
- Sixteenth inch (1/16 inch)
There are significantly more exact measurements that get even more precise – 1/32 “and so on, but for that in the tutorial we’re going to stick with those basics.
Step 1. Use the large number markings for the inches.
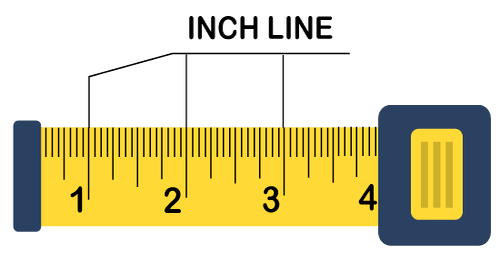
On a tape measure with imperial units, the largest marks are usually the 1-inch marks. These are usually marked with long, thin lines and fairly large numbers as you can see in the image above.
Usually (but not always) after every 12 inches you will find a one-foot mark. This usually has a different color from the other marks, it is usually red, unlike normal black marks. After each foot mark, the numbers following each inch mark will repeat from 1 to 11 again or follow the count. This can vary for each tape measure.
Note that the line next to the number marks every inch, not the number itself.
Step 2. Use the larger marks between the two-inch to half-inch marks.
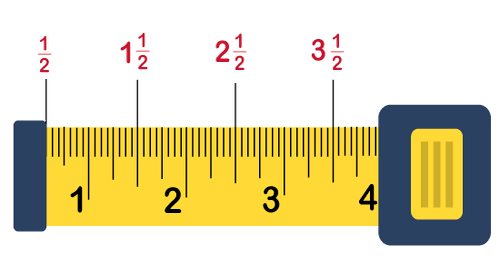
As you can see in the second image, a half-inch mark is always centered between the two one-inch marks. Almost every time it has the second longest marking (after the one-inch marks). There will be a half-inch mark between each one-inch mark, but there are two half-inch per inch.
Note that, starting with half-inch marks, not all lines can be labeled with numbers. In this case, you should use the marks on each side to guide you when reading. For example, the half-inch mark between three and four inches is synonymous with 3 1/2 inches, even though it is not labeled.
Step 3. Use the small lines between half an inch for a quarter inch.
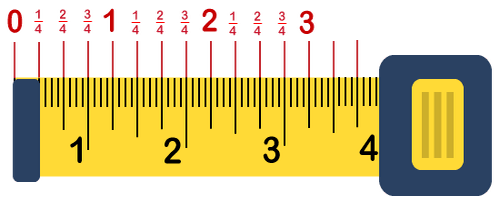
After half-inch, there will be a quarter inch. These markings are smaller (and sometimes leaner) by half inches but usually larger than the dense markings around them. They are equidistant between each half-inch mark and an inch mark. There are four quarter-inch to one-inch.
Note that the lines marking a quarter inch sometimes are not any different size from eighth-inch marks. In this case, remember that two-eighths of an inch make up a quarter. Count to the second eighth-inch mark after the inch mark – this is the quarter inch (and the right-over line on the other side of the half-inch mark is the three-quarter inch.)
Step 4. Use the small regular marks for the eighths of an inch.
The eighth-inch markings are even smaller than the quarter-inch markings. These marks are in the middle of the one-inch marks, the quarter-inch marks are between the quarter-inch and half-inch marks, and so on. There are eight-eighths of an inch in an inch.
Step 5. Use the tiny, dense marks for the sixteenths of an inch.

The first shorter lines on most measurement tapes are sixteenth-inch marks. There are 16 of these tiny dots per inch, four in every quarter inch.
Keep in mind that a few very precise measuring tapes will mark down to one-thirty of an inch or even sixty-quarter of an inch! Use the same pattern to recognize these tiny measurements.
Steps to Read the Imperial Tape Measure:
- Start with the nearest visible number. Next, determine which side of the “half” mark between the numbers your measurement sits on. Countdown or to the nearest fraction.
- Read the tape measure recognizing that an inch is broken down into smaller units of measure. The smallest unit is 1/16 of an inch, followed by 1/8 of an inch, then 1/4 of an inch, and finally 1/2 of an inch. Each unit of measurement is indicated by a hash mark. The 1/8 inch mark represents a 1/8 inch, but it also means 2/16 of an inch. Therefore, the smaller mark to the right of the 1/8-inch bar is 3/16 of an inch.
- Memorize the distance that each mark represents between the thumb marks. Each eighth line indicates 1/2 inch; every fourth line marks a 1/4 inch, every second line represents 1/8 of an inch, and each first line marks a 1/16 inch. Usually, the markings for the feet are larger or with color.
- Measure the weakest mark possible for maximum accuracy. The top of the tape measurement is divided into standard measurements of inches, feet and yards. Some tape measurements mark inches with large numbers, and others mark feet with red numbers. Always measure twice to ensure that the measurement is accurate and after that do the reading.
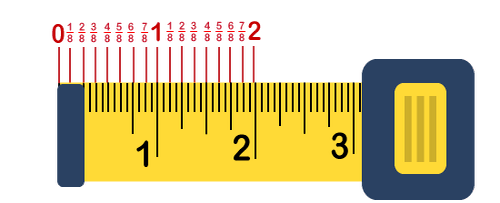
Remember: you want to read the measurement from larger to smaller. For example, take a look at these three images:

Looking at the image above, a series of large numbers marked 1, 2, 3, and 4 are displayed. These numbers are located next to long vertical marks representing whole inches. To put it simply 1 = 1 “, 2 = 2” ,etc.
Between those numbers there are shorter lines that represent fractions of an inch. The marking directly in the middle of the inch indicates a 1/2 “measurement, while the markings on either side represent 1/4” and 3/4 “measurements respectively. The smallest of the markings shows 1/8 and 1/16 of an inch (marked in red).
Now you know how to measure a cord of wood, but do you know how much wood is in a cord?
A 16-foot tape measure, for example, will have sixteen one-foot marks along its length and 192 one-inch marks (12 inches per foot). Each inch will have eight 1/8 inch marks and sixteen 1/16 inch marks. In many cases these measurements are abbreviated, so 6 ′ 4 1/4 ″ means six feet four and a quarter inches.
- 1 foot = 12 ”inches
- 1 inch = 16 x 1/16 inch, 8 x 1/8 inch, 4 x 1/4 inch, or 2 x 1/2 inch.
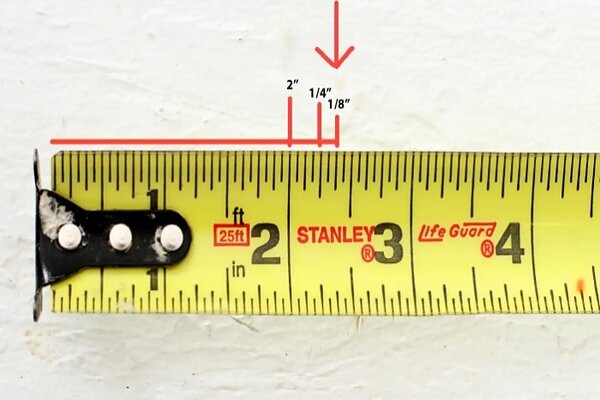
In the example above you will read first the 2 inch. We are not at the half-inch mark yet so we skip this. After each fourth line, we passed a 1/4 inch(quarter of an inch). Then we pass the eights line(eight of an inch). The read will be: 2 3/8″ (2 inches and 3 eights)
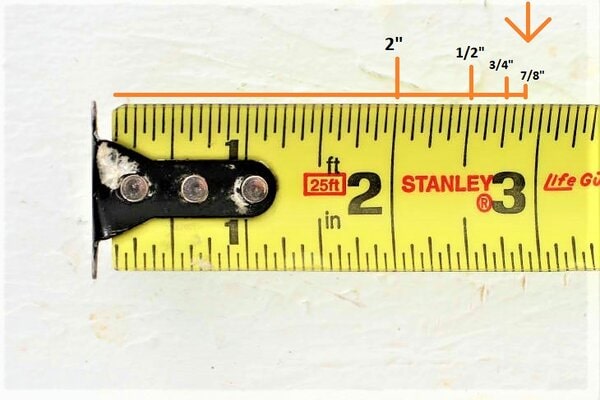
In this example, the read will be: 2 and 7/8″ (2 inches and 7 eights)
| Inch | How to read inches on the tape measure |
|---|---|
| 1/4″ | “One quarter of an inch” |
| 1/2″ | “Half an inch” |
| 3/4″ | “One eight of an inch” |
| 1/8″ | “Five-sixteenths of an inch” |
| 3/8″ | “Three eights of an inch” |
| 5/8″ | “Five eights of an inch” |
| 7/8″ | “Seven eights of an inch” |
| 1/16″ | “One sixteenths of an inch” |
| 3/16″ | “Three sixteenths of an inch” |
| 5/16″ | “Five sixteenths of an inch” |
| 11/16″ | “Eleven sixteenths of an inch” |
| 15/16″ | “Fifteen sixteenths of an inch” |
You can use a tape measure to cut melamine without chipping. Check this article here!
How to Read a Metrical Tape Measure
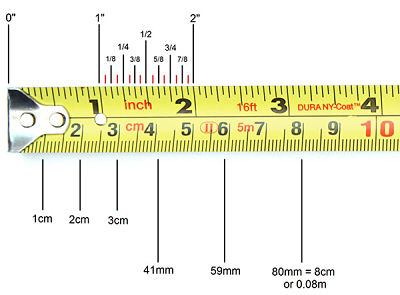
In the image below a pocket tape measure is presented, in which generally, they use the metric and imperial system on the same sheet. The measurements at the bottom of the tape are metric units, they are in centimeters (cm) and millimeters (mm). There are 10 mm in each centimeter (represented by the ten spaces between each cm) and 100 cm in each meter.
NOTE: While the centimeters are clearly numbered, so that the tape is easy to read, the millimeters are not numbered. Furthermore, although some tapes show “1m” to indicate 1 meter, most will show “100 cm”.
If we take a look at the image below, the first small mark after the 4 cm point denotes a measurement of 41 mm. The next little mark in the line would be 42mm, the next would be 43mm, and so on. 41mm can also be expressed as 4.1cm or 0.041m, but most people tend to use centimeter measurements.
Can you convert inches to centimeters?
Too easy. You just have to know the relationship between inches and centimeters. Don’t worry it’s always the same. Since 1956 the inch has been set at 0.0245 meters. So one inch equals 2.54 centimeters.
- To convert an inch to centimeters you just have to multiply the value by 2.54 centimeters. It is 2 inches x 2.54 is 5.08 cm
- To convert centimeters to inches. Divide the value by 2.54 cm. 2cm / 2.54 is 0.78740157480315 inches.
Conversion:
1 mil = 1/1000 inch = 0.00254cm = 0.0254mm
1 inch = 1000mil = 2.54cm = 25.4mm
In the English system, 12 inches (inches) is 1 foot (feet) and 36 inches is 1 yard
1 inch = 16 mm (digital sensor).
Step to read a measuring tape in cm:
- Press the end of the measuring tape onto one end of the item you are measuring. Make sure it eventually stays in a specific position and doesn’t move while the item is being measured.
- Unfold the measuring tape across the rest of the item you are measuring. Because you are using tape instead of a solid object like a ruler, you can measure awkward curves and angles.
- Verify that the tape is pressed flush against the item you are measuring, to get rid of any gaps between the item and the measuring tape, in order to take an accurate measurement.
- Read the measuring tape at the end of the item you are measuring. Since you started at the end of the tape (at 0) this will give you the length of the item you are measuring.
- As the measurement is in centimeters (cm), then simply read the small number on the measuring tape. However, if the measurement is expressed in millimeters (mm), then multiply the number by 10 to get the equivalent cm. If the measurement is in inches (in), then multiply the number by 2.54 to convert the measurement to centimeters.
What are the lines on a tape measure?
How to distinguish what are inches from centimeters? This is very simple, if your tool has both systems represented, it will be divided by a central line, one at the top and the other at the bottom.
An inch is 2.54 cm, so the numbers that are closer together will be centimeters and in the same section there will be a greater amount.
In both systems the cm and the inch are marked in the middle with the most prominent line , identifying it is important because it will give you great agility when it comes to reading accurately without having to count the smallest lines.
If you look a little more you will be able to distinguish that some lines are longer, occupying all the available space and have a number very close. These lines mark the point where the distance, from the beginning of the tape, equals the number of inches or centimeters (depending on the system) that the digit next to it represents.
Within each cm or inch, that is, between two complete long lines, you will see other smaller lines, representing the subdivisions in these units of measurement. Centimeters are divided into millimeters, while inches are divided into a half, a quarter, an eighth and other smaller partitions, each time with smaller lines.
The numbers on the tape measure are divided into two rows: the row below the tape is in cm and the upper one row is in inches. 1cm is approximately 0.3937 inch and 1 inch is approximately 2.54cm. Therefore, the shortest numerical unit is the centimeter. The longest is in inches and the digital font in centimeters is also smaller than inches, 100 centimeters = 1 meter. Usually the unit is used in centimeters.
Finally, you should know that every certain distance you will find a prominent mark , usually in red, that indicates the measurement of meters or feet. To read a tape measure is the first thing you should look at, when you know the meters or feet it is a matter of specifying their divisions (cm or inches, etc.), until you reach the exact measurement.
How to Read a Tape Measure in Inches
1. Extend the measuring tape and slide the switch over it to lock it in place.
2. Read only the top half of the tape. The bottom half measures half inches, while the top half measures inches.
3. Look at the numbers. Each represents one inch. Each 12 inches is one foot. These are usually marked with a different color or indicated differently. For example, you can say 12 x 1 inch at the mark of a foot.
4. Observe the small lines between the numbers. The smallest means 1/16 of an inch, the second smallest means 1/8 of an inch, then third-smallest means 1/4 inch and the largest means half an inch.
Do you know what tools besides a measuring tape a woodworker needs? This article will show you!
How to read a tape measure in tenths of an inch
Some carpentry and engineering jobs require material measurements in tenths of an inch. Standard measuring tapes are sixteenths increments, but there are no measuring tapes available in tenths of an inch.
Changing to a differently calibrated tape measure and reading that the exact measurement can be confusing as each mark is not labeled on a tape measure. Tape meters marked in tenths of an inch are available from some specialty retailers, such as surveyor-supply companies.
Step to read a tape measure in tenths of an inch:
1. Place the tip of the measuring tape on one end of the item and measure its length at the opposite end. In this example, the length of an axis is between 6 and 7 inches. The inch marks have numbers next to them and a line that extends across the entire vertical width of the measuring tape.
2. Count the marks between the 6-inch and 7-inch mark of the measurement on the tape measure before the center mark. Each mark is one tenth of an inch. The line in the middle of 6 and 7 inches is 5/10 of an inch, or 1/2 inch, and has a longer vertical line on the tape measure for quick reference. For example, if the measurement is four marks beyond the 6 inch mark, the measurement is 6-4 / 10 inches, or 6-2 / 5 inches.
3. Count the marks past the center mark if the measurement is past the center mark by 1/2 inch. For example, if the measurement is two marks beyond the 5/10 center mark towards the 7 inch mark, the measurement is read as 6-7 / 10 inches.
How to Read a Tape Measure in mm
12 inches make one foot. One inch is equal to 2.5 cm or 25 mm.
| Inch | Inch | millimeters |
|---|---|---|
| 1/4 | .25 | 6.35 |
| 1/2 | .50 | 12.7 |
| 3/4 | .75 | 19.05 |
| 1/8 | .125 | 3.17 |
| 3/8 | .375 | 9.52 |
| 5/8 | .625 | 15.87 |
| 7/8 | .875 | 22.22 |
| 1/16 | .06 | 1.5 |
| 3/16 | .18 | 4.76 |
| 5/16 | .31 | 7.93 |
| 7/16 | .43 | 11.11 |
| 16/9 | .56 | 14.28 |
| 11/16 | .68 | 17.46 |
| 13/16 | .81 | 20.24 |
| 15/16 | .93 | 23.81 |
What are the diamond markings for on a tape measure?
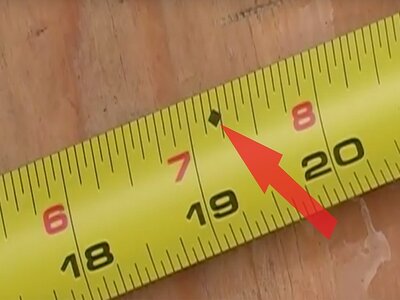
On most tape measurements, one can find tiny black diamonds marks on the tape’s inch scale at 19.2 inches. And these marks will appear again for every 19.2 inches.
This is what black diamonds mean:
It is designed to signify the central area between studs in a building or house. This measurement is used for the installation of the joists. The first symbol will always be in the same place on the ribbon, at 48.77 cm (19’2 “). To understand its advantage, one must understand the rule of (8 ‘).
A good tip to facilitate the work during the construction of a building is to have a template to reproduce a repeated measurement. As for the manufacture of studs in the walls of a house for example.
So to locate the center between studs (this is where black diamonds come in very useful). If you divide the space by 243.84cm, or (8 ‘X 5’) you will get 48.77cm (19’2 “). The black diamonds on the tape measure will represent these gaps. These diamonds will help you to make these marks for the manufacture of the uprights.
The 1st black diamond is 48.77 cm (19’2 “) and then the following ones will be at:
- 97.54cm (38’4 “)
- 146.30 cm (57’6 “)
- 195.07 cm (76’8 “)
- 243.84 cm (96 “) or (8 ‘)
This is one stud-less for every 243.84 cm (8 ‘) of wall added, counting the studs from start to finish.
They are for truss designs for 8 foot tape products, which is why they are also known as “black truss” markings, which provide a quick view for the user of the tape and speed up the measurement process.
Divide 5 into 96 inches (8 feet), you get 19.2 inches, which produces five trusses per sheet. The black diamonds on the tape measure represent that space.
Where are tape measures used?
Tape measures can be used in many areas, such as when cutting wood, when used on edges or on the construction site. Because the tool is as flexible and not as stiff as a folding rule, it can also be used very well in other areas, such as measuring the circumference of kitchen counters, measuring skirting boards or the like.
However: For the floor, the use of a tape measure is only recommended in certain cases, as longer distances are often measured imprecisely.