How to Cut a Notch in Wood [Using Simple Tools]
Making a notch in the wood is one of the essential skills in woodworking. You can cut notches using nothing more than a few simple hand tools, allowing you to add structural integrity to whatever project you are working on. In this article we will show you step by step how to cut a notch in wood.
If you need to cut a notch in the wood with your own hands, please be patient and use the necessary tools:
- A circular saw. The most practical tool, but, unfortunately, not everyone has it.
- A regular hacksaw for wood. It will take longer to work, but this tool can be found in every home.
- Electric drill. It is also quite accessible, but before making a notch in the board with a drill, it is advisable to practice on an unnecessary bar, practicing the skill.
| Tools to cut a Notch | Cutting Depth of a Notch [mm] | Cutting Depth of a Notch [inch] |
|---|---|---|
| Hand-held Circular Saws | 85 mm | 3.45″ |
| Circular saw | 80 mm | 3″ |
| Hand band saw | 300 mm | 11″ |
| Table saw | 90 mm | 3.5″ |
| Band saw | 80-240 mm | 3″ – 9.5″ |
Learn about these 32 Types of Saws and Their Uses [With Pictures]!!!
How to Cut a Notch in Wood
Here are the steps to cut a notch in wood:
Step 1: Measure and mark the notch on the wood
Determine the depth of notch that you need to cut into the wood. Measure with the measuring tape against the piece of wood that is going to cut the notch and mark the width of the notch.
Next, use your carpenter’s square to bring the wide marker lines down the side of the board, wood, or plank that are notched, and to bring the pencil lines down the side of the piece to use as a reference when cutting your first cuts. Optionally mark the final depth line across the board.
Step 2: Adjust the depth of the cut
Adjust the depth of the circular saw blade either using the tape measure and adjusting the depth guide of the saw, or hold the saw against the piece of wood to be cut and allow the weight of the saw to push the blade through the rip fence until it reaches the optional depth mark put into the wood before.
Step 3: Cut the notch in wood

Put on your goggles and work gloves. Push the saw firmly against the edge of the piece of wood you are cutting, using one of the outside width marks as a guide. Trigger and push the saw completely through the piece of wood. Repeat the process with the opposite width mark and then sawing across the wood at 1/8 inch intervals, leaving only the wood chips between the two width marks.
Step 4: Clean the notch
Apply force with a wood chisel and hammer to carve out the wood chips into the depth of the notch. Use a wide chisel suitable for the size of the notch. Smooth the bottom of the notch with one of the finished chisels to remove any wood burrs or bumps left after the roughness of the circular saw.
Here is a beginner guide how you can stain wood !
Cut a notch in Wood using a Hacksaw
A well-made markup will significantly help here.
Here are the steps to cut a notch in wood using a hacksaw:
- Choose a flat and durable hacksaw blade
- In order not to be mistaken, draw two lines along the length of the wood board, from opposite sides.
- The distance from the upper plane to them will be the depth.
- Fix the block securely and start cutting the notch. It is important to follow, referring to the lines, how much the canvas enters the wood.
- If the tool is skewed, you can ruin everything, so periodically watch the entry of the hacksaw into the material from side views.
- With a wide groove and a thin blade, it is more efficient to make two cuts, again along the inner sides of the drawn one.
- All excess wood is neatly removed with a chisel and cleaned.
Want to carve wood? Check this beginner step by step guide how you can carve wood!
How to Cut a Notch in Wood with a Circular Saw
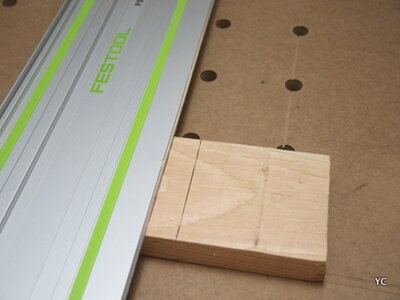
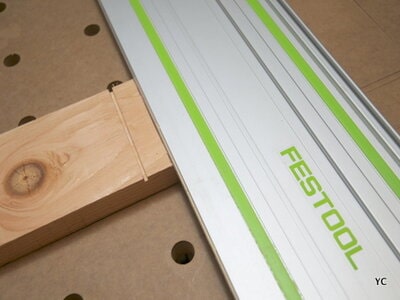
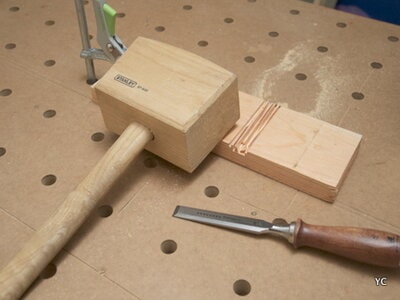
1. The circular saw can be used to cut a notch in the wood. The technique consists of making a series of parallel cuts to facilitate work with a wood chisel. Adjust the depth of the cut according to the thickness of the piece of wood (half-wood) and saw starting from both ends. The crop marks should be spaced approximately 1 cm apart. There is no need to use a cutting guide here. Choose a blade suitable for cross sawing.
2. Finish the work with a wood chisel. The saw left a series of strips of wood 1 cm wide, which the chisel removed one after the other without difficulty. Smooth out the bottom of the notch using a sander (circular or vibrating).
3. Put the two parts together using a mallet. The male part of the assembly was carried out using the circular saw according to the method used for the manufacture of the tenon. The assembly is here carried out at the end; but the same technique is suitable for half-timbered cross joints of large pieces of wood. The circular saw therefore has a real utility for the realization of various wooden constructions: frames, huts, fences.
You can treat and protect wood with these easy tips and tricks!
How to Cut a Notch in Wood with a Hand Saw
The necessary tools:
- A tape measure
- A pencil
- A handsaw or a Japanese saw
- A tab box (option)
- A support (workbench, table, etc.)
- A ruler or a square
- One or two clamps
- A wood file (optional)
- Gloves and goggles
Here are the steps how to cut a notch in wood using a handsaw:
- Take the measurements of the piece to be cut, mark the dimensions on the wooden piece, do not hesitate to check the measurements again, after cutting it will be too late.
- Use a ruler or a square to mark the notch cut to be made.
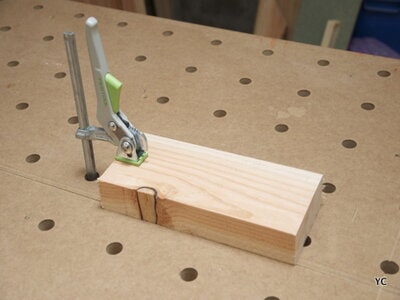
- Place the piece of wood on a stable support (for example, a workbench), the line must be in a vacuum, at least 10cm from the support.
- Secure the piece of wood to the support with one or two clamps, to prevent displacement during cutting.
- Put on protective gloves and glasses.
- Start with one of the angles of the piece of wood, the blade must be at 45 ° to the wood.
- Use your thumbnail to guide the blade, sawing gently to make a notch in the wood that will act as a guide.
- To saw, after removing your hand from the wood, push the blade forward, then pull towards you, sawing only occurs when you push the blade (direction of the teeth).
- Stay on your path and be careful to cut perpendicular to the wood.
- As you near the end, gently saw and hold the wood piece to avoid tearing the wood.
- Finish the notch in the wood with a wood rasp to remove the last chips of wood.
Give you furniture an original and vintage look by checking this article!
How to Cut a Notch in Wood with a Router
Step 1: Preparation
At the beginning, determine exactly where you want to notch. This determines the starting point for the rip fence, which makes it easier to guide the router parallel to the outer edge of the workpiece. Also determine the groove depth so that you can set the router and select the correct router.
Step 2: Set the router and notch correctly
Before routing, insert the router bit into the router and tighten it. The previously defined milling depth that was selected for the notch can then be set. Mount the rip fence.
Step 3: Cut the Notch in the Wood
Turn on the device and bring it to the desired speed. The following always applies: Mill hardwoods more slowly than soft wood. Now the milling cutter can be lowered onto the workpiece and the notch can be milled in several passes.
Step 4: Cleaning up the notch
After the notch has been completed, the milling cutter is moved away from the workpiece and the lock is released. Drain the device. For a particularly clean result, you can retract the cutter in the notch to free it of remaining chips and not have to scrape out by hand.
How to Cut a Notch in Wood with a Drill
You can use a bench drill to cut notches in wood. You should install side guides on the table so that you can move the piece of wood in a straight line. Place a Forstner bit in the drill and set the appropriate drill depth stop. To cut most of the notch you need to drill several overlapping holes. Then remove any blemishes with a chisel, file, and sandpaper.
Things you will need
- wood for drilling
- table for guide
- press
- drill
- drill press
- measuring tape
- pencil
- awl or nail and hammer (optional)
- chisel
- flat file
- sandpaper
Step 1 :Prepare the drill
1.Install a Forstner or tri-point bit in the drill. If you find a bit already installed in the drill and it is not the one you need, you must remove it. Choose a bit about 1/8 inch (3.2 mm) smaller than the width of the notch you want to make. For example, if you want your finished notch to be 1 inch (25 mm) wide, choose a 7/8 inch (22 mm) bit.
2.Adjust the depth stop. One way to do this is to put a mark on the edge of the piece of wood that indicates how deep you want to go. Next, align the bit with the edge of the part and lower the crank until it matches the mark you made.
The thickness of the wood you use and the depth of the notch you want to make determine the top of the drilling depth. If your drill does not allow you to set a depth stop, you will have to calculate it manually each time you drill.
3.Install a rip fence for the piece of wood you are cutting. With the drill disconnected, position the wood underneath so that the bit will fit it where the notch will be made. Make a guide with a board, fasten it to the table using clamps. A rip fence is a straight, fixed edge that allows you to drill a straight notch in the wood.
If you have a guide installed on your bench drill, adjust it to the proper position.
When you make the holes, you should slide the wood on the table. This is why it is important to have a guide that prevents the wood from leaving the place.
Step 2: Drill the starting notch
1.Mark the ends of the notch in the wood. Before you start drilling, measure the length of the notch in the wood. Mark the ends with a pencil. Then make a hole in the wood with an awl or a nail, with the help of a hammer. This will help you reach the correct points.
2.Pierce the ends first. Lay the wood on the table so that the bit is tea aligned at one end. Turn on the drill and lower it onto the wood. After drilling the first time, lift the drill. Carefully move the wood to the other end and align the bit. Drill again.
If you’ve adjusted the depth stop, lower the drill until you reach it. If you haven’t adjusted it, lower the drill to the depth you want.
3.Drill overlapping holes along the notch. Position the wood so that the bit is pointing inward at one end. Lower the drill to make a hole. Move the wood to make another hole superimposed on the previous one. Repeat this procedure until you’ve drilled enough holes to get a rough notch from end to end.
The holes do not need to overlap too much to reach half of the previous one. Just make sure you do it long enough to get a solid line.
Want to fill holes in wood and don’t know how to start? Check this easy tutorial I wrote for you!
Step 3: Smooth the notch
1.Use a sharp chisel to remove the bits that were left between the holes. When drilling, some chips and dust were left between the holes. Sharpen the chisel before beginning this step. Push it against the wood starting from the top of the tips. Wipe any excess from the edges of the notch until they are almost flat.
To begin this part of the process, you can remove the drilled wood from the bench drill and work it on another table.
2.Use a flat file to remove blemishes. The chisel removes the large bits that remain between the holes, but the notch edges are still rough. Use a file so that these are almost completely flat.
3.Complete the process with sandpaper. To get a notch with perfectly flat and smooth edges, there is no better option than sandpaper that will remove any remaining imperfections. Wrap a bit of sandpaper around a bit, place it inside the notch, and work it up and down along all edges until you are satisfied with the result.
Conclusion
For notching wood it is not necessary to buy ready-made expensive material. It is enough to devote a little free time and learn how cut the notch in the wood yourself.