How to Glue Glass to Wood [In 2 Effective Ways]
Do you know how to glue wood to glass? Sometimes you need to glue wood to glass for interior decoration purposes, but there is a challenge with glass showing the glue drops where it has dried.
To glue glass to wood you will need a specific glass glue as liquid nails or PVA glue. With the help of a degreased or primer, we clean the surface of the glass and wood. Apply one layer of glue to the glass. Press down on the two surfaces after gluing. Leave to dry for more than 24 hours.
It is important to ensure that no bubbles or streaks are created when gluing. The gluing of wood and glass works with assembly adhesive, but such adhesives are usually colored white, which leads to problems when gluing clear glass. So it is necessary to use a transparent (colorless) glue.
When gluing wood to glass is very important to have the following qualities: durability, reliability and aesthetics. To achieve this quality it is important to choose a specific glue (adhesive) that incorporates them.
| Type of glues used | Instructions |
|---|---|
| 2. PVA Glue | Offer the following advantages: availability and low price. You must buy good quality PVA glue used in carpentry work. Disadvantages: Doesn’t withstand moisture, so the objects glued cannot be used outdoors. |
| 3. Two-component adhesive | This is a special glue for glass and wood, which has very high properties: resistant to heating up to 150 degrees, shock-resistant, and able to withstand chemical influences without compromising strength. Two-component adhesive is very reliable and its suitable for gluing heavy objects. |
| 4. Double-sided tape 3M | This is a special glue for glass and wood, which has very high properties: resistant to heating up to 150 degrees, shock-resistant, and able to withstand chemical influences without compromising strength. Two-component adhesive is very reliable and it’s suitable for gluing heavy objects. |
| 5. Cyanoacrylate glue | Generally used for gluing glass to wood at home, for example for attaching small mirrors to wood surfaces. Glue a few strips of Double-sided tape on the back and press to the base. With this method of gluing, the glass should be opaque. |
| Special-designed liquid nails glue are made for gluing glass to wood. We can apply the mixture both on the whole surface and pointwise. The only disadvantage is that this type of glue is visible during gluing and it is recommended to be used when fixing opaque glass to wood. | It is the instant-setting glue and in a few seconds, it can glue many types of materials including rigid and non-porous materials such as wood, porcelain, and glass. It is very liquid and one or two drops are enough for very resistant gluing, but it is not filling so the surfaces to be attached must match perfectly. |
Because wood and glass have different porosity and composition, glues that are able to penetrate the material are suitable ( wettable glues). This category of glues includes cyanoacrylate glue but it requires a higher amount when you try to glue a wood component to the glass.
Steps to Glue Glass to Wood

Step 1: Check for cracks in the wood surface
If there are cracks, chips or noticeable irregularities on the surface, then it is best to putty them using a special compound. The work is simple, so we will not dwell on this, but if you have questions, then see what recommendations are given by the instructions on the packaging or in this article.
If the wood surface is in order, skip the crack-filling process.
Next, you need to clean the surface, this is done using sandpaper with medium or fine grain. This applies to both putty surfaces and wood coated with varnish or paint you need to process the base in order to improve the adherence of the adhesive.
Want to fill a crack in wood? Here are the best methods how you can fill a crack in wood!
Step 2: Clean the surfaces of glass and wood
The second step in all types of gluing, whether glass or not, is a good cleaning. Ideally, use a product that, in addition to cleaning, removes grease.
If the glass has traces of silicone from handling, the best way to remove the silicone is to use a solvent. If the amount of silicone is not much, you can first try with alcohol that is not so aggressive for the glass and is not toxic.
This is the cleanliness of the surface to be treated. It must be clean, without residue such as paint or wax. The glass should also be dry. A surface that is not properly cleaned may not adhere to the glue.
Of course, all surfaces must be clean, so if there are traces of old glue and other contaminants on them, then they must be removed, since they will not only interfere with a snug fit, but also significantly reduce the adhesion of the adhesive, which will negatively affect reliability.
The next important stage is surface degreasing, this is done either with the help of solvents or with the help of any other similar composition .
The step is simple: you simply moisten a cloth or napkin and use it to wipe both the wood and glass surfaces to which the glue will be applied.
Want to easily remove grease from wood? This step by step guide will show you how to do it!
Step 3: Prepare the adhesive for the gluing process
In the third step, the first thing to do will be to get a sticker. Choose an adhesive that is as resistant and invisible as possible, possibly resistant to water and to changes in humidity or temperature.
Remove all packaging and open your glass glue. The special glass glue has a safety cap. To puncture the tube, screw the cap fully clockwise. Then remove the cap in reverse order.
The long-range self-mixing nozzle makes it easy to prepare your glue. Cut off the ends of the glue delivery syringe. Turn the syringe over and press it lightly, pushing the air bubbles towards the tip.
If you work with a 2-component adhesive or use an adhesive that requires a certain amount of time to dry, it should now be joined or opened. Simply use the manufacturer’s information as a guide.
It is imperative that the glass and wood surfaces to be glued are perfectly clean. If they are dirty or there are traces of old adhesives on them, the dirt must be cleaned. Otherwise, the adhesion of the adhesive will be much worse.
Then, make sure that the gluing will be effective by checking whether the surface to be glued will absorb the glue well, that is to say that one of the two surfaces must be absorbent. To do this, do what is called the “drop of water test”
The drop of water test consists of placing a drop of water on a support and observing the result. If the material takes 1 minute to absorb the drop of water then the support is very absorbent if it takes between 1 and 4 minutes, the support is normally absorbent and if it takes 4 min then the support is not absorbent.
Step 4: Apply the Glue
After the preparation of the glass pieces, the real work now follows gluing.
In the next step, apply the adhesive to the glass edges or broken edges. It is sufficient to apply this in small amounts on only one side. It is important that the entire edge is covered with it to ensure a good hold and to avoid further cracking.
Now press the glass and wood together at their edges flush and hold them in position for about a minute so that the adhesive can dry on. Then fix the piece of glass for further drying if it does not hold together by itself. Rubber bands, adhesive tape or clips are suitable for this.
The application of glue depends on its type, if PVA glue or liquid nails glue are used, then the composition is applied to one of the surfaces, after which the elements are well compressed with each other and fixed for a certain time .
As for the two-component options, in them glue is applied to one surface, and an activator is applied to the second, after compression the components react with each other, and after a few minutes the glue hardens.
It is indicated to apply a small amount of glue ( recommended amount of glass glue is approximately one drop per square centimeter of surface) just to cover enough surface when the glass and wood are pressed together.
It is advisable to pour the glue in small drops. The recommended amount is approximately one drop per square centimeter of surface. You just need to pour it onto one of the two surfaces to be glued. Make sure that the amount of glue can cover just enough when the two pieces are put together.
Press the piece of wood to the glass to be glued immediately after applying the glue. Press firmly steadily for at least 60 seconds or until adhesion is created. For a strong bond, be careful not to move the parts.
For heavy pieces or pieces that will receive greater pressure, use a support (adhesive tape, wedge, etc.) and keep it fixed until the adhesive completely dries.
Step 5: Wait for the glue to dry
After the parts have been attached together, they must finally dry sufficiently so that the adhesive can work optimally. Depending on what type of adhesive you used, this may take longer or less.
As a rule of thumb, however, everything should be well cured after 24 hours at the latest. In addition, if you have used a UV glass adhesive, you must ensure that the glass is under a UV lamp or in sunlight so that the adhesive can take full effect.
Let the adhesive dry completely (usually the drying time is indicated on the package). For a lasting bond, it is better to let them sit overnight.
Step 6: Clean the glue residue
As soon as the glue has dried, the final fine work comes: cleaning the glued edges by removing any glue residue. This excess glue can easily be removed with a razor blade or a glass scraper, which makes the earlier break even less noticeable and the glass surface appears smooth again.
As a last step, it is worth cleaning the glass again with warm water and washing-up liquid to make the last traces of the bonding process disappear.
This last step is to bring aesthetics to your work. If you notice that any glue has hardened on the surface of the glass or that there is excess, you can attempt to remove it with a razor blade. Be careful not to scratch the wood surface, however do it with delicacy, because the glue is often easily removed with the right gestures.
Glue Wood to the Glass using Liquid Nails
There are two types of Liquid Nails Glue:
- Organic soluble. Adheres, dries well and withstands temperatures up to -40° Celsius.
- Water soluble. Good for joining porous surfaces but not recommended for water exposure.
Steps using “Liquid nails” for gluing glass and wood are:
- Clean the glass and wood surface from dirt and dust.
- Use a degreaser to treat both surfaces.
- Apply glue to both surfaces using a pattern like: stripe or dots.
- Attach glass to wood using small pressure on each other. You can use a small weight.
- Check the time required for the gluing process to complete by reading the glue label instruction.
- Remove the excess glue residue.
- Don’t move the object until complete drying.
For working with liquid glue, it is convenient to use a hair dryer. If the product is in a small tube, no heating is needed. When working with Organic soluble Liquid Nails glue safety precautions must be followed.
Glue Wood to the Glass using PVA Glue
With reasonable price and good quality, PVA Glue is the most popular choice when it comes to gluing and can be bought at any hardware store.
Follow these steps when gluing wood to glass using PVA glue:
- Prepared the glass and wood surfaces by cleaning them out of dirt and dust.
- Pre-treat the wood and glass with alcohol or acetone.
- Using a brush, apply the glue evenly to both surfaces: wood and glass.
- If necessary, apply a second layer of glue, but only after the first has dried.
- Pressed the glass and wood tightly against each other.
- Wait for the glue to be absorbed and dry.
- On average, wait a day for a strong adhesion. It is advisable to put a small weight at the connection points.
Attach Glass to Wooden Table
When it comes to how to fix a glass table top to wood, the most important thing is, of course, to have the right glass .
It should have the right dimensions when using glue, it is best if its length and width will be exactly the same as that of a wooden worktop, in the case of strips or connectors a bit smaller will be useful.
It is also important that our glass is made of tempered glass, it is necessary to increase both the strength and reliability of the furniture.
If, when thinking about how to attach the glass table top to the table, we decided to use glue, let’s choose the appropriate variant. For aesthetic reasons, transparent ones, of course with a sufficiently high bond strength, will work best.
So let’s make sure when buying that the specificity we choose is suitable for joining glass with wood . It is also important to organize a workplace so is best if it is a bright and spacious room.
Let’s start by carefully examining the tabletop that we are going to use. It is essential that it is intact and has smooth, sanded edges. Before we move on to how to attach the glass to the wood table, let’s also wipe it thoroughly, especially on the underside, later it will be difficult to fix any negligence in this regard .
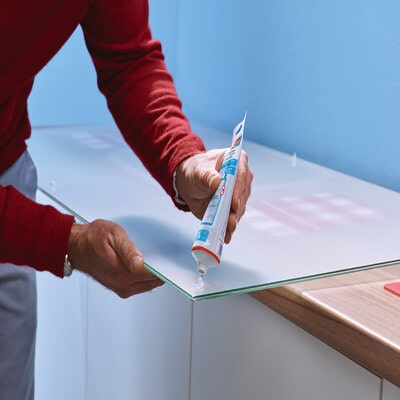
In the case of glue, then we put it on the table top and carefully put on the glass. If, after careful adjustment, the excess of the binder we used spills out on the sides, we immediately collect it, e.g. with a paper towel.
After all, it is worth to load the furniture for a few hours with a weight or even books, so that the binding takes place in optimal conditions.


