
How to Bend Wood (Fast and Effectively) [3 Best Methods]
Bend wood can be a new and original element in a carpentry project, it adds a unique touch, different from regular wood. However, bending wood is not an easy operation to perform. Let us find out the main methods how to bend wood.
Wood bending is a special technological process for the production of curved blanks, based on the physical properties of wood, allowing it to change its shape under the influence of humidity, temperature and other external temporary factors, as well as to maintain the resulting shape after these factors cease to work.
There are several ways how to bend wood :
- Layer wood bending
- Steam wood bending
- Water wood bending
- Chemical impregnation bending
- Kerf-Cut Bending
How to Bend Wood
Bend Wood with Steam
First method is steam bending. With this method, the wood is treated with steam and then clamped in a mold. The wood is then allowed to dry in the device. This process requires a steam chamber with a temperature of 100 ° C.
Want to treat wood and don’t know where to start? Then this easy guide will help you step by step!
First head off to prepare the steam box. It is possibly made by hand. Its main task is to keep the wood that needs to be bent. There should be an opening in it to allow steam pressure to escape. In another case, it will explode.
The steam outlet should be placed in the bottom of the box. In addition, a removable lid should be provided in the box, through which it will be possible to pull out the bent tree, after it finishes buying the desired shape.
In order to keep the wooden bent part in the desired shape, go apply clamps. They can be made independently from wood or purchased in a specialized store.
Of wood, it is necessary to carry out round trimming – a couple of pieces. Drilled off-center holes are drilled into them.
Then you need to put the bolts through them, and then drill another hole through the sides in order to push them tightly.
Such simple crafts can become excellent clips. Now it is time to steam the wood, for this, go to take care of the heat source and close the wood blank in the steam box.
For every 2.5 cm of wood thickness, steaming takes about an hour. At the end of time, the wood must be removed from the box and bent to give it the desired shape.
Steaming time depends on the thickness of the wood. So, for example, for steaming a preform (with an initial humidity of 30% and an initial temperature of 25 ° С) with a thickness of 25 mm, reaching a temperature in the center of the preform of 100 ° С takes 1 hour, and with a thickness of 35 mm :1 hour and 50 minutes.
The steam wood bending should be carried out very quickly. The wood bends gently.
Bend the wood in the steam box
- Place the steam box on stable trestles. Insert the boards to be bent inside by placing them on the shims. Close the box.
- Insert the pipe about 3 cm into the hole provided for the plug.
- Connect the hose to a pressure cooker or a steam generator and heat on a gas tripod. You can use a hose clamp to hold the hose.
- Place a container below, at the drain hole, to collect the water.
- Wait about 1 hour for 2 cm of wood thickness, trying to maintain a constant temperature of about 100 ° C inside the box.
- Put on a pair of thick gloves and take the wood out of the box, immediately bend it according to the desired curve, adding 5% and hold it in place using a tightening strap.
- Leave to dry in a dry, ventilated place for about a week.
You can dry wood in an efficient and easy way. I have written an detailed and easy guide how you can dry wood! Click here to see it!
How to Bend Wood using Chemical Impregnation
In order to destroy the lignin bonds between the wood fibers, it is possible to bend the wood with chemicals, and to perform this at home, you need to use ammonia.
The wood piece is soaked in a 25% aqueous solution of ammonia. At the end of which it becomes very obedient and elastic, which allows you to bend, twist it and squeeze relief forms in it under the press.
The longer the wood is in the ammonia solution, the more plastic it becomes. At the end of soaking the wood and shaping it, it is necessary to leave it in such a curved form.
This is necessary to fix the form, and so that ammonia evaporates. Again, the bent wood should be in a ventilated room. It is noteworthy that at the end of the evaporation of ammonia, the wood fibers will gain their former strength, and this will allow the wood piece to retain its shape!
Bend Wood with the Kerf-cutting Method
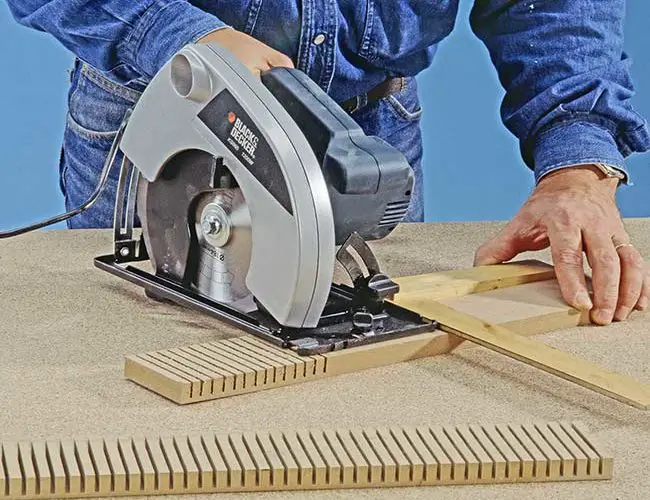
The prepared wooden cut needs to be sawn. Saws are made 2/3 of the thickness of the wood piece. They should be on the inside of the bend. You should be extremely careful, because rough cuts can break a wood.
The key to success when cutting is to keep the distance between the cuts as even as possible. Ideally 1.25 cm.
We use a table saw to make notches on the wood and allow bending:
- Prepare your template on a sheet of paper.
- Use a cross-sawn wooden board to do this type of bending.
- Make very regular notches 1 cm apart on three-quarters of the thickness of the wood at the location of your future hanger.
- Fill each groove with wood glue.
- Use a tightening strap to bring the two ends of the board together.
- Place your hanger on the template to check that it matches the desired shape.
- Increase the tightening very slightly to have a slightly larger broken arc than desired, the wood tending to want to regain its shape and lose a little of its curvature.
- Immediately wipe off the back-up glue using a well-wrung sponge.
- Let dry 4 to 5 days before removing the strap.
Layer wood bending
First, it is necessary to carry out the harvesting of wood, which will be bent. It is necessary that the boards are slightly longer than the length of the required part.
This is because the bend will shorten the wood lamellas. Before you start cutting, you need to draw a diagonal line with a pencil.
This must be done across the lower side of the wood piece. This will make it possible to maintain the sequence of lamellas after moving them
The boards are cut with a straight edge, in no case with the front side. So, they can be put together with the smallest change.
A cork layer is applied to the mold,which helps to avoid any unevenness in the shape of the saw and makes it possible to make a more even bend. In addition, the cork will hold the bundle in shape.
Now glue is applied to the upper side of one of the wooden slats.
The glue is applied to the lamellas with a roller.
It is best to use a two-part urea-formaldehyde adhesive. It has a high level of adhesion, but it takes a long time to dry.
You can also use epoxy resin, but such a composition will be very expensive, and not everyone can afford it.
The standard glue for wood in this case will not work. Although it dries quickly, it is very soft, which is not welcome in this case.
How to bend wood with Water
The simplest technique, widely used in model making and in DIY projects where the thickness of the material is relatively modest, is that of bending wood with water , preferably carried out when hot.
It is a question of using a pipe or a gutter element into which a strip to be bent is inserted (usually it is bundles of strips) and is left to soak for 24 to 48 hours.
When the wood is softened by water , the folding becomes easy and it is possible to avoid breaking the fibers ; once dried, it has the same strength as the material before bending.
When bending a lath or a table it is necessary to have a shape, a kind of rigid mold on which the actual bending is performed by resting the material and fixing it so that the curve is followed in its arc, which usually does not never exceeds 180 degrees.
The best technique is to perform a fold in overlapping layers. This consists in putting on a template, shaped at will, several layers of veneer, gluing them with vinyl glue, until reaching the desired thickness.
In this way, by removing the piece from the template when the glue dries, a rigid element is obtained which faithfully reproduces our shape.
When we need to make bends on materials of rather short length and rather considerable thickness, it becomes a little more complicated, as it is easy to imagine, therefore it is necessary to resort to a simple trick: with a circular saw you make a series of parallel cuts , let’s say at a distance of 10 mm from each other, on one side of the table.
What is the best wood for bending?
The most important point is the wood itself, because not every wood is suitable for bending.
The wood must have a certain elasticity. Frequently used types of wood include: oak, beech, yew, ash, elm, walnut.
When choosing wood, it should be noted that woods with a high tannin content can change color when bent.
Before the wood can be bent, the wood moisture should be checked. There are special measuring instruments available for this purpose, which are available from specialist dealers.
The ideal moisture is approx. 20 – 30%, but depends on the type of wood and the bending process. Freshly cut wood can be used as a starting value, which has a moisture value of approx. 70%. If the wood has already been “burned” or if its moisture is less than 10%, it is no longer suitable for bending.
The softer the wood becomes, the more difficult it is to bend. Species of wood that contain a lot of tannins tend to dark, reddish discoloration at the bend. The following woods are particularly well suited:
- Beech
- Oak
- Ash
- Elm
It would be harder to bend cherry or maple, but also tropical woods, although eucalyptus and bamboo are relatively easy to bend.
How do you bend wood without breaking it
Since the main problem is the rupture of the fibers from the outer radius, it is this surface of the workpiece that needs to be stabilized somehow.
One of the most common methods is to use a laid on tire. The tire is a steel strip with a thickness of half a millimetre to two millimetres, which covers a bar or board along the outer radius and bends on the template with wood.
The elastic strip absorbs part of the energy during stretching and at the same time redistributes the breaking load along the length of the workpiece.
Thanks to this approach, combined with humidification and heating, the permissible bending radius is reduced significantly
Cold wood bending
This cold bending method does not bend solid wood, but only sheets of wood or bendable plywood.
However! It is the simplest to implement and it gives excellent results.
The cold bending technique is simple, we stick several thicknesses of bendable plywood (depending on the desired thickness) on a mold.
The main drawback is that you cannot use solid wood, which means that you have to ply the plywood with a sheet of wood in order to obtain a nice final appearance.
Some people prefer to replace plywood with thin layers of solid wood (called glulam, these will be flexible enough to bend on a mold).
Conclusion
Before you start on difficult projects like wood bending, you should first familiarize yourself with the material and the working techniques. In hardly any other area of craftsmanship, experience is as important as when bending wood.
After all, every tree trunk within the same type of wood is an individual wood, as many other aspects and even the time of hitting differ according to region, weather, age, density.
If you have the chance to look over the shoulder of a real professional, you should definitely accept this offer. Softwoods have a clear difference in density compared to hardwoods and must therefore be bent across the grain.
Which wood bending method is used depends on the type of wood, the thickness of the wood and the shape to be bent. The moisture of the wood must be taken into account, especially when using water and steam. If this becomes too moist, it can be strongly reshaped after bending and drying.
Of course, wood moisture also plays an important role.
Conventional (construction) wood, as you get it in the hardware store, usually has a moisture that is adapted to the environment and is called air dry (lutro) between 20 and 30 percent.
In the interior of houses, the water content can drop to 6 to 10 percent (central or stove heating).
The most plastic, and therefore more suitable wood for bending, are deciduous species of wood, such as birch, beech, oak, hornbeam, ash, maple, linden, poplar, alder.
Coniferous species are used less often.
(pine, cedar and larch). For the manufacture of bent glued blanks, birch veneer is best suited
Even heating in steam is likely to be a problem for many craftsmen.
The minimum temperature must be 93 degrees Celsius, otherwise the lignin will be insufficiently softened.
The optimal temperature of the hot steam is exactly 100 degrees.
Accordingly, your steam chamber must be very well insulated.
But: Under no circumstances may pressure be created by the steam in the steam container.
That means you have to keep the exact temperature of 100 degrees while avoiding excess pressure.