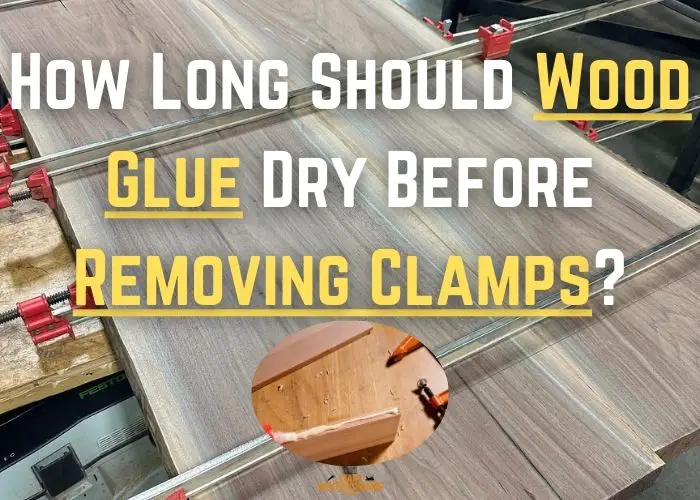
Optimal Wood Glue Drying Time Before Clamp Removal
In the realm of precise and enduring woodworking, I’m accustomed to asking myself, “How long should I allow the wood glue to dry before I can confidently remove the clamps?”
The optimal drying time for removing clamps when using wood glue varies depending on the type of glue and the conditions, but typically ranges from 30 minutes to several hours. Titebond III, for example, recommends a clamping time of about 30 minutes to an hour before clamp removal.
In my practice, I regularly turn to well-known adhesives like PVA glues, specifically those such as Titebond II which is favored for its strong bond and ease of use.
| Type of Wood Glue | Recommended Clamping Time | Optimal Temperature Range | Full Cure Time |
|---|---|---|---|
| Titebond II (PVA) | Approximately 4 hours | 68-80°F (20-27°C) | 24 hours |
| Titebond III (Waterproof PVA) | 30 minutes to 1 hour | 68-80°F (20-27°C) | 24 hours |
| Polyurethane Wood Glue | 1 to 2 hours | 55-75°F (13-24°C) | 24 to 48 hours |
| Epoxy | 30 minutes to 2 hours | 68-80°F (20-27°C) | 6 hours to several days |
| Cyanoacrylate (Superglue) | 20 to 30 seconds | Room temperature | 8 to 24 hours |
| Hide Glue (Animal-Based) | 24 hours | Room temperature | 7 days |
| Hot Hide Glue | 1 hour | Above 150°F (66°C) when applying | 7 days |
| Carpenters Wood Glue (PVA) | 30 minutes | 68-80°F (20-27°C) | 24 hours |
| Gel Wood Glue (PVA) | 1-2 hours | 68-80°F (20-27°C) | 24 hours |
| Resorcinol Wood Glue | 4-6 hours | 75-90°F (24-32°C) | 7 days |
| Aliphatic Resin Glue | 1-2 hours | 68-80°F (20-27°C) | 24-48 hours |
https://startwoodworkingnow.com/is-wood-glue-stronger-than-super-glue/
https://startwoodworkingnow.com/is-wood-glue-stronger-than-epoxy/
Notably, Titebond II, as a PVA-based adhesive, generally suggests a clamping time of around 4 hours. This duration ensures the glue has sufficiently set to maintain the structural integrity of the wood joint.
On that note, it’s also crucial that the temperature is maintained between 68 and 80 degrees Fahrenheit to achieve the best results. However, depending on the tension within the joint, I have found that the clamping time can sometimes be reduced without compromising the bond’s strength. This flexibility can be beneficial when working under time constraints or when handling non-structural joins.
Furthering my understanding of the nuances in wood glue properties, Titebond III offers a waterproof solution, making it ideal for outdoor woodworking applications. It recommends a clamping time of 30 minutes to an hour, underscoring the glue’s rapid setting properties.
Yet, for full strength and longevity, it is advisable not to stress the joint for at least 24 hours, providing the necessary time for the adhesive to fully cure.
I can’t stress enough how essential it is to respect these drying times, as they are the foundation for creating durable and high-quality wood joinery.
How Long Should Wood Glue Dry Before Removing Clamps?
My consistent focus on manufacturer recommendations has led me to understand that these times can vary considerably based not only on the glue used but also on environmental factors and the nature of the woods being joined.
I’ve noticed in my practice when using Gorilla wood glue, a minimum wait time of about 2 hours before considering clamp removal is often suggested. This precaution aids in achieving a preliminary bond that should be allowed a full 24 hours to completely cure and develop its maximum strength.
Yet, there are scenarios where these guidelines might shift. For example, working with quick-setting adhesives or certain wood assemblies under low tension could permit clamp removal in as little as 30 minutes.
To ensure precise instructions related to specific products, I frequently refer to a comparison chart similar to the one below:
| Glue Type | Clamping Time | Full Cure Time |
|---|---|---|
| Gorilla wood glue | Approx. 2 hours | 24 hours |
| Rapid-set glue | 30 minutes to 1 hour | 6 hours |
| Standard PVA glue | 30 minutes | 18-24 hours |
However, these time frames serve as initial estimates; I make it a point to adjust based on my workshop’s temperature, the wood species, and even the project’s design constraints.
These factors are significant and can influence how long to clamp Gorilla wood glue before it is safe to release and allow the bond to mature without support.
Essential Factors Influencing Wood Glue Drying and Curing
Any craftsman knows that working with wood glue requires patience and precision. My own woodworking triumphs and mishaps have proven that several critical factors determine the drying and curing success of wood adhesive.
| Factor | Effect on Drying Time | Optimal Conditions |
|---|---|---|
| Temperature | PVA glues take longer to dry in cold conditions | Keep above 50°F for PVA, continued moisture for polyurethane. |
| Humidity | High humidity extends PVA glue drying, accelerates polyurethane glue curing | Adequate ventilation for PVA, maintain humidity for polyurethane. |
| Wood Moisture Content | Moist wood delays drying; overly dry wood impacts polyurethane adhesive bonding | Even, moderate pressure until the initial set, then reduce or remove. |
| Clamping Pressure | Excessive pressure can cause glue starvation and joint failure | Even, moderate pressure until the initial set, then reduce or remove. |
1. Temperature and Humidity Considerations
Temperature has a marked effect on wood glue drying time. Specifically, wood glues like PVA are sensitive to cold environments. Below 50 degrees Fahrenheit, wood glue becomes less effective, resulting in longer drying times or weaker bonds.
High humidity can also slow the curing process, demanding adjustments like increased airflow or heat to maintain optimal drying conditions.
In contrast, polyurethane glues react to moisture, actually requiring a damp environment for the strongest bond. Hence, mastering the interplay between temperature, humidity, and glue type is key to my success.
2. Moisture Content within Wood
The inherent moisture content of wood plays a significant role in the glue drying process. Wood is a hygroscopic material, meaning its moisture content fluctuates based on the ambient humidity.
The type of wood is also a major factor; softwoods tend to bond faster than hardwoods due to their porosity. This variegation affects the strategy I employ for clamp timing to ensure each project benefits from adequate pressure during the critical phases of glue drying.
3. Clamping Pressure and Its Impact
Appropriate application of clamping pressure is paramount in wood glue application. While too little pressure can result in a weakened bond, excessive force can squeeze out too much glue and starve the joint, or cause the wood to distort.
Therefore, I always strive for balance, applying enough tension to seal the bond without introducing undue stress on the workpiece.
Once I detect the initial drying stage, usually when the glue forms a skin, I consider it safe to lessen or remove the clamps to carry the joint through to full curing.
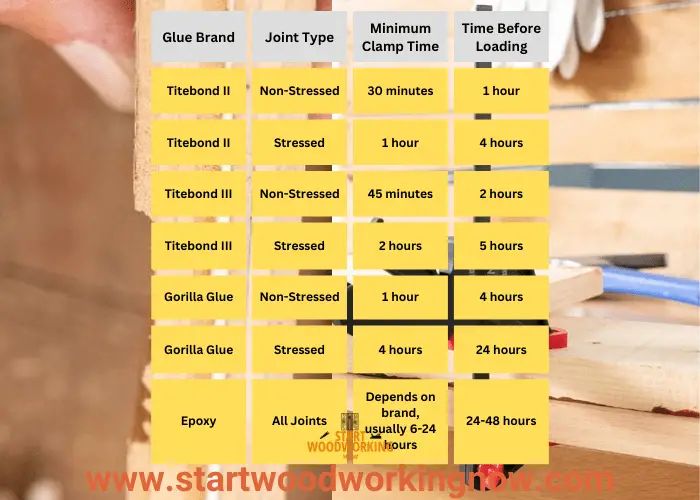
| Glue Type | Unstressed Joint Clamp Time | Stressed Joint Clamp Time |
|---|---|---|
| Titebond I/II/III | 30 minutes – 1 hour | 8-24 hours |
| Gorilla Glue | 1-2 hours | 24 hours |
| Elmer’s Carpenter’s Glue | 30 minutes | 8-24 hours |
| Liquid Hide Glue | 30 minutes | 8-24 hours |
| Epoxy | Set time (15-30 min) | 24 hours or more |
| Polyurethane | 1-2 hours | 24 hours |
Practical Tips for Efficient Woodworking with Wood Glue
Here’s an overview of the tools I find indispensable for gluing tasks:
| Tool Type | Purpose | Usage Tips |
|---|---|---|
| Parallel Clamps | Applying even pressure across a large area | Best for cabinetry and panel glue-ups |
| F-Clamps | Versatility for a variety of project sizes | Useful for localized pressure; avoid overtightening |
| Spring Clamps | Quick application and removal for less intensive tasks | Perfect for light-duty applications and temporary holds |
| Cauls | To distribute clamping pressure and prevent bowing | Ensure cauls are straight and slightly wider than the glue-up for best results |
Over time, I’ve honed my techniques to maximize efficient woodworking with wood glue, which includes both the amount of glue used and the methodologies for clamping.
Let’s delve into some practical considerations for effective assembly:
1. Applying the Right Amount of Glue
When joining two pieces of wood, the goal is not to drench the material but to create a bond that will last. A common question I come across is how much glue is ideal. The secret lies in the ‘Goldilocks’ amount—a thin layer that fully covers the surface without causing excessive ‘squeeze out.’
Here is the process I follow for optimal results:
- Prepare both surfaces by ensuring they are clean and free from dust or oils.
- Apply a consistent, thin coat of wood glue to one surface. If dealing with end-grain or highly absorbent woods, pre-gluing may be necessary.
- Join the pieces together, applying gentle pressure to spread the glue, but avoiding too much force that will push all the adhesive out of the joint.
- Immediately remove any excess with a damp cloth, to decrease clean-up after the glue dries.
2. Use of Clamps and Cauls for Even Pressure
Here are the steps I take to ensure an even and strong bond:
- Position clamps at appropriate distances, usually every 6 to 12 inches, depending on the project size and the clamp type.
- Employ cauls as necessary across the joint to distribute the pressure evenly and prevent any deformations. Utilizing cauls for glue drying is essential for flat panel glue-ups.
- Maintain a balance between adequate pressure and over-tightening; too much force can starve a joint of glue or cause damage to the wood.
- Refer to glue manufacturer specifications for ideal clamp time to ascertain that pressure is maintained for the right duration.
Yes, different types of wood glue, such as PVA, polyurethane, and epoxy, have varying recommended drying and curing times. Titebond II, for instance, has about a 4-hour clamping time for optimal bonding.
You should clamp Gorilla Wood Glue for approximately 2 hours before removing the clamps, though the glue fully cures in 24 hours.
Clamping pressure is crucial. Too much pressure can extend drying time and weaken the bond. It’s important to apply just enough pressure to hold the joint together and reduce it once a skin forms on the glue surface.
Cauls help distribute pressure evenly across the joint, preventing warping or bowing due to uneven clamping, which can affect glue drying and ultimate joint strength. Following the manufacturer’s clamp time recommendations is essential for the best results.
It is recommended to clamp Titebond 3 for at least 30 minutes to 1 hour, but avoid stressing the joint for a full 24 hours to ensure it reaches its full strength.