How to Tell if Wood is Treated Before You Buy: 11 Pro Tips!
Unsure if that lumber is treated or not? With just a few simple checks, you can determine if wood has been pressure treated. Keep an eye out for the visible stamps or end tag—it’s a giveaway. Notice the hue; treated wood often sports a unique greenish tint. Trust your nose too; a chemical or oily aroma is a strong indicator.
Methods to Tell if Wood is Pressure Treated
#1. Look for Tags, Stamps, or Markings
When I need to determine if wood is pressure-treated, one reliable method I use is to look for tags, stamps, or markings. This is how I approach the process:
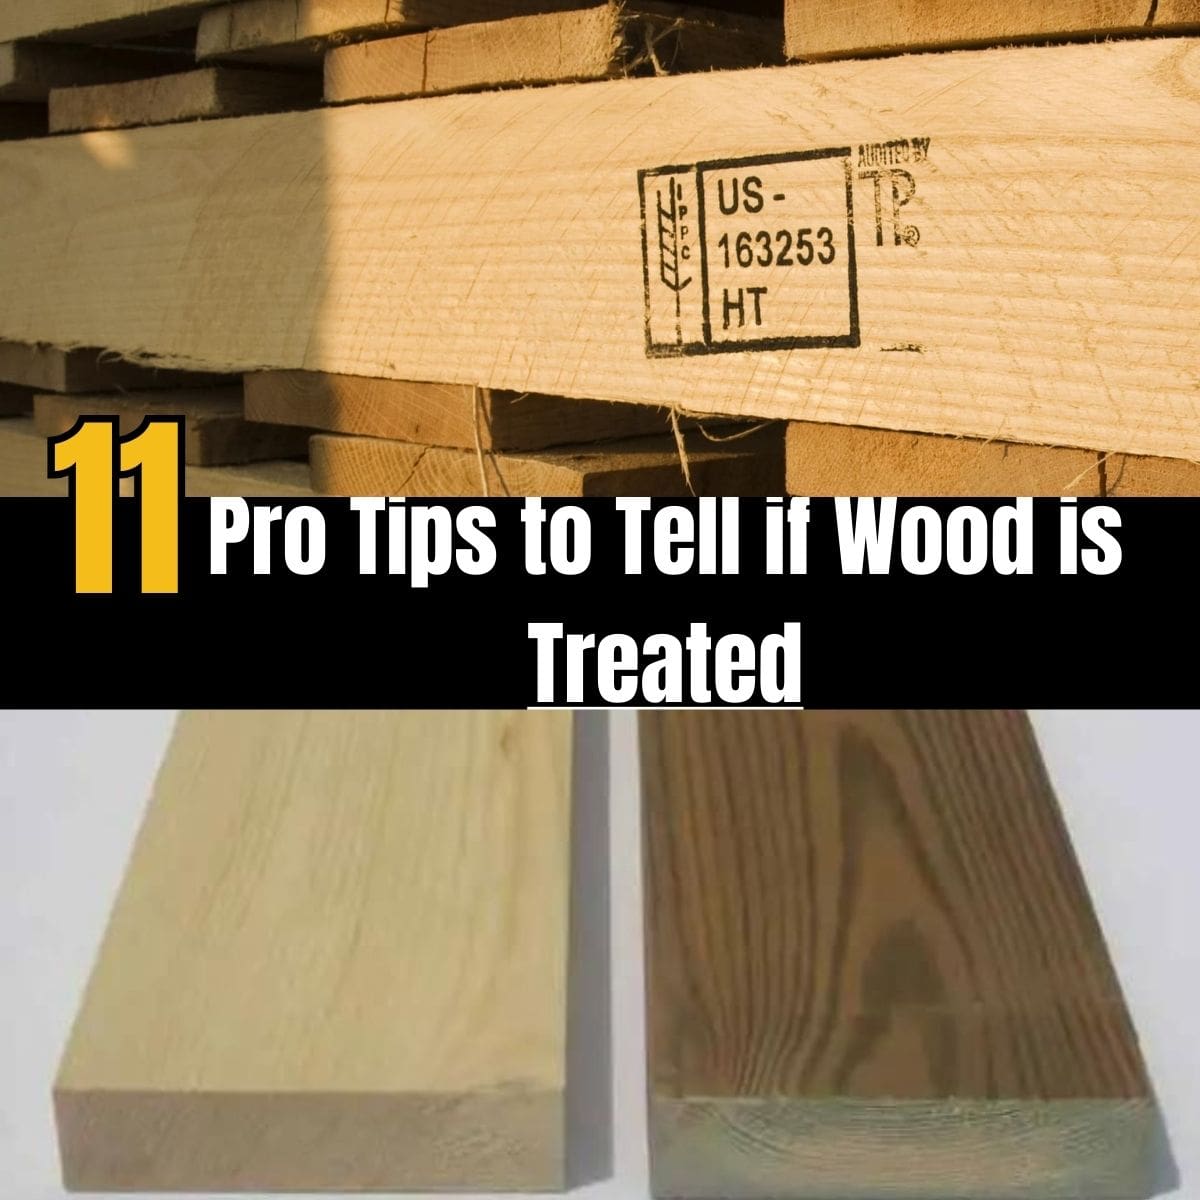
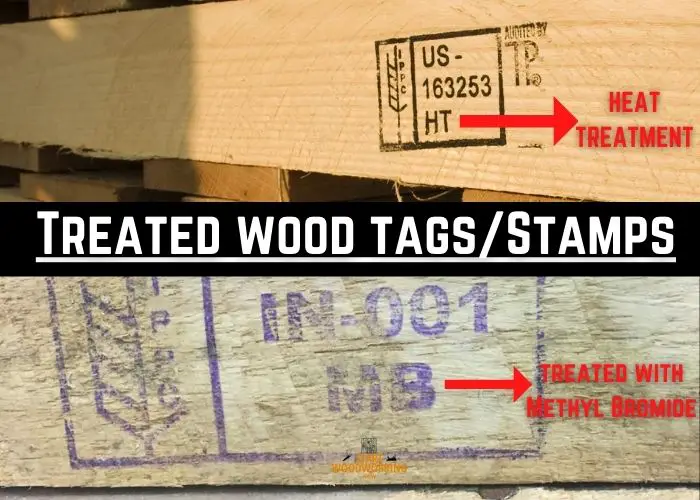
Examine the End Tags: I start by checking the ends of the lumber for tags. These tags are typically stapled onto the end of pressure-treated boards and contain valuable information about the treatment process. If the tag is intact, it will tell me the type of preservative used and other treatment details.
Identify the Stamp: If the end tag is missing, I look for a stamp along the length of the wood. These stamps are inked onto the wood and can usually be found on one of the broader faces of the board or sometimes on the edges. The stamp includes a wealth of information that I need to interpret.
Decipher the Information: The stamp typically includes the following:
- The lumber grade, such as “Premium” or “Number 2.”
- The species of the wood, like “SPF” for spruce-pine-fir.
- The treatment type, with abbreviations like “ACQ” for Alkaline Copper Quaternary.
- The preservative retention level, which indicates how much preservative the wood has absorbed.
- The identification of the quality control agency, such as “TP” for Timber Products.
Understand the Codes: I take a closer look at the codes within the stamp. For instance, if I see “UC4A,” it tells me that the wood is suitable for ground contact with a high exposure to moisture and decay. The retention level, such as “0.15” or “0.40,” indicates the amount of preservative in pounds per cubic foot.
| Feature | Treated Wood | Untreated Wood |
|---|---|---|
| End Tags | Commonly present, indicating treatment type, retention level, and end-use category (e.g., Above Ground, Ground Contact). | Rarely present, as there is no treatment information to convey. |
| Stamp Markings | Often includes an abbreviation such as “PT” for Pressure Treated, along with other codes for the preservative used and the treating company. | No specific markings; stamps, if present, would only indicate mill, species, or grade. |
| Ink Stamps | May include a stamp with the American Wood Protection Association (AWPA) standards, treatment code, and wood grade. | May have a mill stamp or grade stamp but no treatment code. |
| Color Indicator | Sometimes dyed a greenish or brownish tint to indicate treatment (though not a reliable identifier as color can fade). | Natural wood color, no treatment-related discoloration. |
| Third-Party Certifications | May have stamps or tags indicating certification by third-party organizations like the International Code Council (ICC). | Typically no third-party treatment-related certifications. |
In addition to tags, lumber is often stamped with markings that can tell you about its treatment status. The stamp might include various codes and symbols, but what I look for specifically is an indication of treatment.
If the lumber stamp includes the letters “PT,” it signifies that the wood has been pressure treated. Sometimes, you might also see other abbreviations like “GC,” which can indicate that the wood has been treated for ground contact.
#2. Check the Color
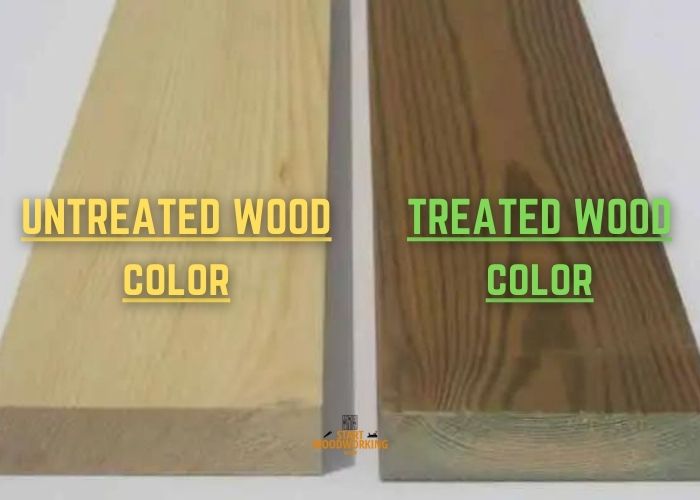
Look for a Greenish Tint: I begin by examining the overall color of the wood. Pressure-treated wood often has a greenish tint or hue due to the chemicals used in the treatment process. This green color can be quite pronounced on freshly treated lumber, but it can fade to a more subtle tint over time.
Compare with Untreated Wood: If I have a piece of known untreated wood, I compare the color of the two side by side. This can help accentuate any greenish tint in the treated wood, making it more noticeable.
| Wood Type | Treated Wood Color | Untreated Wood Color |
|---|---|---|
| Pine | Greenish tint due to copper-based preservative | Light yellow to white, depending on the species |
| Douglas Fir | Light brown or tan with a slight greenish hue | Light brown to reddish-brown |
| Hemlock | Olive green to dark brown, depending on treatment level | Light tan to a light reddish-brown |
| Cedar | Darker than natural, often with a greenish cast | Light tan to a pinkish-brown, weathers to silver-gray |
| Redwood | May have a darker, somewhat greenish tint | Reddish-brown, weathers to a soft gray |
Examine for Unusual Brown Color: Some types of pressure-treated wood might have an unusual brown color instead of green. This can be due to different treatment chemicals used that impart a brownish hue to the wood.
Assess the Uniformity: I also look at the uniformity of the color. Pressure treatment typically results in a more consistent color throughout the wood because the treatment chemicals are absorbed uniformly. Untreated wood might have more variations in color due to natural differences in the wood grain and knots.
Consider the Age and Exposure: It’s important to keep in mind that the color can be less reliable in older wood, as exposure to the sun and elements can cause the color to fade. If the wood has been stained or painted, this can also mask the true color of the wood.
Check for Other Signs: Since color alone can sometimes be misleading, I usually use it in conjunction with other methods, like looking for tags, stamps, or markings, to confirm if the wood is treated.
#3. Assess the Weight
Pressure-treated wood is typically heavier than untreated wood due to the preservatives that are impregnated into the wood fibers.
Here’s how I assess the weight:
- Feel the Weight by Hand: I start by lifting the wood and gauging its heft. Having handled many different types of wood, I can often tell by the weight in my hands if it’s heavier than a similar piece of untreated wood.
- Compare with Untreated Wood: If I have a similarly sized piece of untreated lumber, I lift both to compare their weight directly. The pressure-treated piece should feel noticeably heavier due to the added weight of the chemicals.
Consider the Wood’s Dryness: It’s important to consider the moisture content of the wood. Pressure-treated wood can feel heavier if it’s still wet from the treatment process. As it dries, it will lighten somewhat, but it should still be heavier than dry untreated wood.
| Wood Type | Weight per Cubic Foot (approx.) | Weight per Board Foot (approx.) |
|---|---|---|
| Treated Wood (wet) | 40-50 pounds | 3.33-4.17 pounds |
| Treated Wood (dry) | 35-45 pounds | 2.92-3.75 pounds |
| Untreated Wood (softwood) | 25-35 pounds | 2.08-2.92 pounds |
| Untreated Wood (hardwood) | 30-55 pounds | 2.50-4.58 pounds |
- Cubic Foot: This is a measurement of volume (12 x 12 x 12 inches).
- Board Foot: This is a measurement of volume as well (12 x 12 x 1 inch).
Use a Scale for Precision: If I need to be more precise, I use a scale to weigh the wood. I can then compare the weight per cubic foot to known standards for both treated and untreated wood. This can be particularly helpful if I’m working with wood species that I’m less familiar with.
Factor in Wood Species: Different species of wood have different base weights, so I take into account the species when assessing the weight. A dense hardwood that’s untreated might naturally weigh more than a piece of treated softwood.
| Board Size | Treated Wood Weight (per cubic foot) | Untreated Wood Weight (per cubic foot) |
|---|---|---|
| 2×4 | Approximately 4.5 lbs | Approximately 2 lbs |
| 2×6 | Approximately 6.75 lbs | Approximately 3 lbs |
| 2×8 | Approximately 9 lbs | Approximately 4 lbs |
| 2×10 | Approximately 11.25 lbs | Approximately 5 lbs |
| 2×12 | Approximately 13.5 lbs | Approximately 6 lbs |
Check for Other Indicators: Since weight alone can sometimes be misleading, I always look for other indicators of pressure treatment, such as the presence of tags, stamps, or the characteristic greenish tint of treated wood.
#4. Smell the Wood
Pressure-treated wood has a distinct chemical odor due to the preservatives used in the treatment process. Here’s how I typically go about it:
- Identify the Natural Wood Scent: I start by smelling a piece of known untreated wood to remind myself of the natural scent of the wood species I’m examining. Each wood species has its own characteristic scent, which can range from sweet to sour or even spicy.
- Smell the Suspected Treated Wood: Next, I take a good whiff of the wood in question. If the lumber is pressure treated, it often emits an oily or chemical smell that is quite distinct from the natural wood scent. This smell can be particularly strong if the wood is new or has been kept in a closed space.
- Compare with Known Treated Wood: If possible, I compare the smell of the suspected treated wood with a piece of wood that I know for certain is pressure treated. This helps me to identify the specific chemical odor associated with the treated wood.
| Wood Type | Treated Wood Smell | Untreated Wood Smell |
|---|---|---|
| Pine | Chemical or oily smell, sometimes similar to gasoline | Fresh, sappy, or pine-like aroma |
| Douglas Fir | Can have a chemical or slightly sweet preservative odor | Earthy, slightly sweet or resinous scent |
| Hemlock | Chemical or oil-based treatment scent | Mild, woody smell |
| Cedar | May have a slightly muted cedar smell with chemical overtones | Characteristic spicy, pleasant cedar aroma |
| Redwood | Chemical odor if recently treated | Distinctive redwood scent, somewhat similar to cedar |
Check for Freshness: The intensity of the chemical smell can diminish over time as the wood ages and the preservatives leach out or break down. Therefore, I consider the age of the wood and whether it still has a fresh treatment smell.
Note the Smell After Cutting: Sometimes, if the wood doesn’t have a strong smell at first, I make a fresh cut. Cutting into the wood can release more of the chemical odor, making it easier to detect.
Use Other Methods for Confirmation: Relying solely on smell can be subjective and not entirely foolproof, especially in cases where the wood has been exposed to other substances that might mask the smell. Therefore, I always use this method in conjunction with other identification techniques, such as looking for tags, stamps, or assessing the color and weight of the wood.
#5. Check for Surface Incisions
I start by examining the surface of the wood closely, looking for small, uniform marks or slits. These incisions are generally found across the entire surface of the wood and are a good indicator that the wood has been treated.
Run My Hand Over the Surface: To get a better feel for these incisions, I run my hand gently over the surface of the wood. If it’s been treated, I can usually feel the roughness of the incisions, even if they are not immediately visible to the eye.
Look for a Pattern: The incisions on pressure-treated lumber are typically made in a regular pattern. I look for this pattern as it distinguishes purposeful incisions from random marks or damage that might occur during handling or transportation.
Check All Sides: I make sure to inspect all sides of the lumber because the treatment process aims to treat the entire piece of wood, not just one side. If incisions are present, they should be on all faces of the lumber.
Consider the Depth: The incisions in pressure-treated wood are usually shallow and do not compromise the structural integrity of the wood. If I find deep gouges or cuts, these may be the result of damage rather than the treatment process.
#6. Examine the Wood End Grain
As a professional woodworker specializing in pressure-treated wood, examining the wood’s end grain is a technique I often use to determine if the lumber has been treated. The end grain can reveal a lot about the treatment process because it shows how the preservatives have been absorbed through the wood fibers. Here’s my process:
- Inspect the End Grain Coloration: I start by looking at the color of the end grain. Pressure-treated wood typically has a darker coloration on the end grain where the preservative chemicals have penetrated the wood. This contrast can be quite noticeable compared to untreated wood.
- Look for Penetration Depth: Next, I assess how deep the preservative has penetrated by observing any changes in color from the outer edge inward. Pressure treatment is designed to impregnate the wood deeply, so I expect to see a gradient of color showing the treatment depth.
- Check for a Uniform Pattern: I also examine the pattern of the treatment in the end grain. Pressure-treated wood should show a relatively uniform treatment pattern, as the pressure process distributes the chemicals evenly.
- Compare to Untreated End Grain: If possible, I compare the suspected treated wood’s end grain to that of a piece of known untreated wood. This comparison can help highlight the differences in coloration and penetration that are indicative of treatment.
- Consider the Wood’s Age: It’s important to consider the age of the wood, as over time, the visual indicators on the end grain may become less pronounced. Weathering and exposure to the elements can alter the appearance of the end grain in both treated and untreated wood.
#7. Look for Unusual Weathering
I start by looking for signs of rot or decay, which are common in untreated wood when exposed to moisture over time. Pressure-treated wood resists these issues much better, so a lack of decay can be indicative of treatment.
Check for Insect Damage: Similarly, I check for signs of insect damage. Pressure-treated wood is less susceptible to termites and other wood-eating insects, so minimal damage can suggest that the wood has been treated.
Assess the Rate of Weathering: I consider how quickly the wood has weathered compared to its exposure to the elements. Pressure-treated wood generally weathers at a slower rate due to the protective chemicals.
Examine the Surface Texture: I feel the surface of the wood. Untreated wood often becomes rough and splintery after being exposed to the elements, while pressure-treated wood tends to retain a more intact surface texture.
Look for Warping and Cracking: I also look for warping and cracking, which can be more pronounced in untreated wood. While pressure-treated wood can still warp or crack, it usually does so to a lesser extent due to its enhanced durability.
#8. Nail Corrosion
Pressure-treated wood contains chemicals that can be corrosive to certain metals, which means that the fasteners used with this type of wood need to be specifically designed to resist corrosion.
- Examine the Nails or Screws: I start by closely inspecting the nails, screws, or other metal fasteners that have been used in the wood. If the wood is pressure-treated, I would expect to see signs of corrosion such as rust or discoloration, particularly if the fasteners are not made from corrosion-resistant materials.
- Look for Accelerated Corrosion: I compare the rate of corrosion on the fasteners in the wood to those in a known untreated piece of wood. Fasteners in pressure-treated wood often corrode more quickly due to the presence of corrosive chemicals used in the treatment process.
- Check for Corrosion Patterns: I look for patterns of corrosion that suggest it’s coming from within the wood, rather than from external sources. Corrosion that seems to originate from the point of contact between the nail or screw and the wood can be a sign that the wood is pressure-treated.
#9. Use a UV Light
Some types of pressure-treated wood, particularly those treated with certain preservatives, can exhibit a fluorescent glow when exposed to UV light.
- Prepare a UV Light Source: I start by ensuring I have a reliable UV light source, such as a handheld UV lamp or a black light. The light must be strong enough to produce the necessary UV rays to detect any fluorescence in the wood.
- Conduct the Test in a Dark Environment: I perform the test in a dark or dimly lit environment to ensure that the UV light’s effects are visible. Natural sunlight or bright artificial light can make it difficult to see the fluorescence.
- Shine the UV Light on the Wood: With the UV light in hand, I shine it directly onto the surface of the wood. I move the light over the wood slowly to observe any changes in how the wood responds to the UV light.
- Look for Fluorescence: I’m looking for any glowing or fluorescence that may indicate the presence of pressure-treatment chemicals that react to the UV light. A bright green or bluish glow is often a telltale sign of certain types of pressure-treated wood, as some preservatives used in the treatment process contain additives that fluoresce under UV light.
#10. Use a Home Test Kit
Before using the kit, I clean the wood surface to remove dirt, debris, or any other substances that might interfere with the test results. I typically use a clean cloth or brush to ensure the area is ready for testing.
- Prepare the Wood Surface: Before using the kit, I clean the wood surface to remove dirt, debris, or any other substances that might interfere with the test results. I typically use a clean cloth or brush to ensure the area is ready for testing.
- Collect a Wood Sample: Depending on the test kit’s requirements, I might need to shave off a small sample of the wood or collect sawdust from drilling into the wood. I follow the kit’s instructions carefully to ensure an accurate sample is collected.
- Apply the Chemicals: I apply the chemicals provided with the test kit to the wood sample as directed. This usually involves placing a drop of the testing solution onto the wood and waiting for a color change, which indicates the presence of pressure-treatment chemicals.
- Interpret the Results: I carefully observe any color change that occurs after applying the chemicals. The test kit will include a color chart or guide that helps me interpret the results. For instance, a change to a certain color might indicate the presence of copper-based preservatives.
- Confirm the Findings: If the initial test shows a positive result for treated wood, I might repeat the test to confirm the findings. It’s important to have consistent results to ensure accuracy.
#11. Ask for a Product Fact Sheet
A product fact sheet, also known as a technical data sheet or specification sheet, is a document that provides detailed information about the wood’s treatment process, the type of preservatives used, and the intended use of the product.
Request the Fact Sheet: When purchasing pressure-treated lumber, I always ask the supplier for the product fact sheet. If the wood is already on-site and the fact sheet is not available, I contact the manufacturer directly or visit their website to obtain it.
Review the Treatment Details: Once I have the fact sheet, I review it carefully to understand the specific treatment the wood has undergone. The fact sheet should clearly state if the wood is treated, the type of preservative used, and the retention level of the chemicals.
Check for Usage and Safety Information: The fact sheet also typically includes information about the recommended uses of the treated wood, such as whether it’s suitable for ground contact, freshwater contact, or above-ground applications. Additionally, it may provide safety information regarding handling, cutting, and disposal.
Verify the Wood Matches the Fact Sheet: I compare the information on the fact sheet with the physical characteristics of the wood in question. For example, the fact sheet may describe the appearance of the treated wood, which could include a greenish tint or a particular pattern of incisions from the treatment process.
Treated Wood vs Untreated Wood
| Feature | Treated Wood | Untreated Wood |
|---|---|---|
| Chemical Preservatives | Contains chemical preservatives to resist rot, insects, and decay | No chemical preservatives; more susceptible to rot and insects |
| Durability | Generally lasts longer due to resistance to environmental factors | Less durable in outdoor environments |
| Usage | Ideal for outdoor use such as decks, fences, and landscaping | Best suited for indoor uses where exposure to elements is limited |
| Cost | Typically more expensive due to the treatment process | Less expensive compared to treated wood |
| Maintenance | May require less maintenance due to increased durability | May require more maintenance to protect from elements |
| Environmental Considerations | Chemicals used can be harmful to the environment and require careful disposal | More environmentally friendly and can be easier to dispose of or recycle |
| Safety Precautions | Requires safety precautions when cutting or handling | Fewer safety concerns when handling |
| Weight | Heavier due to the absorption of treatment chemicals | Lighter since it doesn’t contain added chemicals |
| Appearance | May have a greenish tint and end tags indicating treatment | Natural appearance without chemical coloration |
| Workability | Can be more difficult to cut and work with due to the chemicals and density | Easier to cut and work with due to its natural state |
If there are no stamps or tags, you can look for other visual cues. Pressure-treated wood may have a slight green or brown hue and may also appear more oily or have a slight sheen when compared to untreated wood. Over time, the color may fade to a more natural tone, but freshly treated wood often has these distinguishing features.
Yes, pressure-treated wood often has a distinct chemical smell due to the preservatives used, especially when it’s new or has been recently treated. This odor can resemble that of oil or gasoline. In contrast, untreated wood typically has a natural, woody scent that can vary depending on the species but won’t have the chemical undertones
Treated wood can be heavier than untreated wood because it has absorbed the preservative chemicals. The wood’s density increases due to the added weight of these chemicals. If you’re comparing two pieces of the same species and size, the treated piece will generally feel heavier. However, this can be subjective and should not be the sole method of identification.