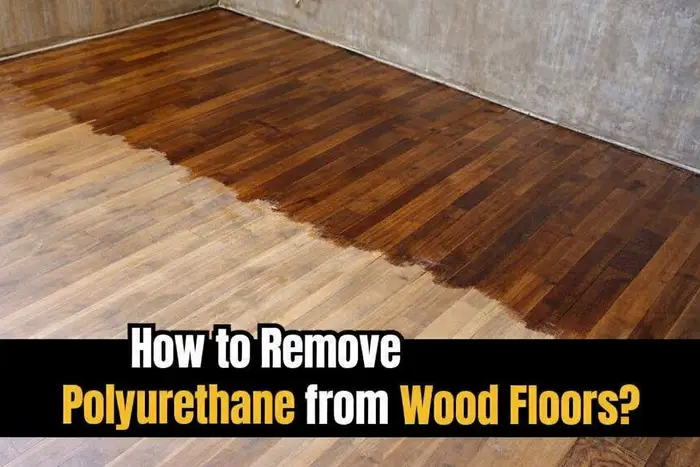
How to Remove Polyurethane from Wood Floors?
Removing polyurethane from wood floors requires stripping a cross-linked polymer film from a large horizontal surface using chemical strippers, mechanical floor sanders, or a combination of both, depending on the floor type, the number of polyurethane layers present, and the ventilation available in the room. The process differs from furniture stripping in scale, tool requirements, preparation time, and the risk of damaging the floor’s wear layer if sanding depth is not controlled precisely.
This guide covers the complete removal process for solid hardwood floors, engineered wood floors, and parquet, with exact product dwell times, sanding grit sequences, cost estimates per m², and a floor-type comparison table so you can select the correct method before you begin.
→ For removing polyurethane from wood furniture and smaller surfaces, see the complete guide: How to Remove Polyurethane from Wood
What Are the Key Specifications for Removing Polyurethane from Wood Floors?
The table below centralises the entity–attribute–value pairs that determine the correct removal process for each floor type and product scenario. Review these values before selecting a method or renting equipment.
| Method | Attribute | Value |
|---|---|---|
| Water-based stripper (floors) | Dwell time | 10–30 minutes |
| Chemical stripper (methylene chloride) | Dwell time | 10–15 minutes |
| Gel stripper (2-component polyurethane) | Dwell time | Up to 12 hours |
| Drum floor sander | Starting grit (heavy poly) | 36 grit |
| Drum floor sander | Final grit before finishing | 80–100 grit |
| Edge sander | Coverage area from walls | 20–30 cm border |
| Solid hardwood floor | Minimum wear layer for sanding | 3 mm remaining |
| Engineered wood floor | Maximum sanding depth | 1–2 mm (veneer thickness) |
| Parquet (2-component poly) | Stripper type required | Gel stripper only |
| Post-strip water wash | Drying time before sanding | 24 hours minimum |
| Room preparation | Section size per application | 3–4 m² maximum |
| Ventilation requirement | Fan positioning | Exhausting air out of room |
| Cost — chemical stripping (DIY) | Per m² | £4–£8 / $5–$10 |
| Cost — drum sander rental | Per day | £50–£90 / $60–$110 |
| Cost — professional strip & sand | Per m² | £20–£45 / $25–$55 |
Why Does Removing Polyurethane from Wood Floors Differ from Furniture?
Removing polyurethane from wood floors follows the same chemical principles as removing it from furniture — a stripper dissolves the cross-linked polymer film, which is then scraped or sanded away — but the process differs in four critical ways that affect every decision from product selection to tool choice.
Surface area. A typical room floor is 15–25 m². Working in sections of 3–4 m² at a time is mandatory to prevent the stripper from drying before it can be scraped. Furniture stripping works on sections as small as 0.25 m².
Wear layer depth. Wood floors have a finite sanding depth — the wear layer above the tongue-and-groove joint. Solid hardwood typically allows 3–5 mm of cumulative sanding over its lifetime; engineered wood allows only 1–2 mm because the surface veneer is thin. Oversanding a floor destroys it. Oversanding a chair leg does not.
Tool requirements. Floor stripping uses a metal floor scraper and a drum floor sander — tools not used on furniture. The drum sander covers large flat areas rapidly but removes material aggressively; controlling grit selection and sanding direction is critical.
Ventilation scale. Stripping a room floor releases significantly more solvent vapour than stripping a single piece of furniture. Room ventilation — open windows, fan exhausting outward — is not optional.
Which Removal Method Should You Use for Each Wood Floor Type?
The correct removal method depends on the floor construction. Using the wrong method — particularly sanding engineered wood floors with the same aggression as solid hardwood — causes irreversible damage. The table below maps floor type to recommended method and the key constraint for each.
| Floor Type | Recommended Method | Key Constraint |
|---|---|---|
| Solid hardwood (oak, maple, pine) | Chemical stripper + metal scraper + drum sander | Check wear layer depth before sanding — minimum 3 mm required above tongue joint |
| Engineered wood (hardwood veneer over plywood) | Chemical stripper + plastic scraper — minimal sanding | Veneer is 1–2 mm thick — drum sanding is high risk; hand-sand only with 80–120 grit |
| Parquet (solid wood blocks, 2-component poly) | Gel stripper (dwell up to 12 hours) + metal scraper | 2-component polyurethane requires long dwell gel stripper; standard strippers are ineffective |
| Parquet (oil-modified poly) | Water-based or chemical stripper + drum sander | Diagonal sanding pattern required on block parquet to avoid grain tear-out |
| Laminate flooring | Do not strip — replace affected boards | Laminate has no wood veneer — strippers dissolve the decorative layer and swell the substrate |
What Tools and Materials Do You Need to Remove Polyurethane from Wood Floors?
Gathering all tools and materials before starting prevents mid-process interruptions that force you to leave stripper on the floor longer than the recommended dwell time. The following items cover both the chemical stripping and mechanical sanding phases of a complete floor polyurethane removal.
- Water-based stripper — for most interior floor applications; low fume, safe for overnight ventilation
- Chemical stripper (methylene chloride) — for thick multi-layer polyurethane in well-ventilated spaces only
- Gel stripper (paste form) — required for 2-component polyurethane parquet; standard liquid strippers are ineffective
- Natural bristle brush or paint roller — for applying stripper evenly across floor sections
- Metal floor scraper — long-handled, for scraping softened polyurethane off horizontal surfaces
- Plastic drop sheet — to cover doorways and protect adjacent rooms from fumes
- Drum floor sander (rental) — for solid hardwood floors after chemical stripping
- Edge sander (rental) — for the 20–30 cm border area near walls unreachable by the drum sander
- Sandpaper for drum sander: 36, 60, 80, 100 grit sheets
- Sandpaper for edge sander: 40, 80, 100 grit sheets
- Shop vacuum — to remove all sanding dust before applying new finish
- Tack cloth — for final dust removal after vacuuming
- Mineral spirits or nitro thinner — for surface wash after stripping
- KN95 respirator mask — mandatory for all chemical strippers and during drum sanding
- Safety glasses or goggles
- Chemical-resistant rubber gloves (not latex)
- Knee pads — for scraping work at floor level
- Fan positioned to exhaust air outward through an open window
How Do You Remove Polyurethane from Wood Floors Step by Step?
The six steps below follow the correct sequence for a complete polyurethane removal from solid hardwood or parquet floors. Steps 1 through 4 cover chemical stripping and scraping; steps 5 and 6 cover sanding and surface preparation for refinishing.
Do not skip the chemical stripping phase and sand directly — this embeds polyurethane residue into the wood grain and clogs sandpaper rapidly, making the sanding phase take three to four times longer.
STEP 1- Clear the Room and Prepare the Space
Remove all furniture, rugs, and objects from the room before beginning. Move items to a different room — not to a hallway adjacent to the work area, as fumes will travel. Cover all doorways with heavy plastic sheeting taped firmly to the door frame to prevent solvent vapour from entering adjacent rooms.
Open all windows in the work room fully. Position a fan pointing outward through one window to draw air out of the room. Do not position the fan to circulate air back into the room — this concentrates vapour around your work area rather than evacuating it.
Remove all floor-mounted heating vents or cover them with plastic sheeting. Chemical strippers and their vapours are flammable — ensure no open flames or electric ignition sources (including gas pilot lights in adjacent rooms) are active during the stripping phase.
STEP 2 – Apply Stripper to the Floor in Sections
Work in sections of 3–4 m² at a time. Applying stripper to the entire room floor at once allows the first sections to dry out before you can scrape them — the stripper must remain wet and active for it to work. Mark your section boundaries mentally before starting.
Apply the stripper with a natural bristle brush or a short-nap paint roller. For liquid strippers, apply an even coat approximately 2–3 mm thick. For gel strippers on parquet, apply a generous layer — gel does not run, so you can apply it thicker than liquid. Spread in one direction only; do not brush back and forth as this thins the application unevenly.
If the working environment is warm (above 22°C) or the room has unavoidable air movement, cover the applied stripper with a sheet of waxed paper or plastic wrap immediately after application. This slows evaporation and keeps the stripper active for its full dwell time.
Allow the stripper to dwell for the time specified for your product type:
- Water-based stripper: 10–30 minutes — surface is ready when the polyurethane visibly bubbles or wrinkles
- Chemical stripper (methylene chloride): 10–15 minutes — do not exceed 15 minutes; re-apply if needed rather than extending dwell time
- Gel stripper (2-component parquet polyurethane): up to 12 hours — check at 6 hours; if the finish has not fully softened, allow the full time
STEP 3 – Scrape Off the Softened Polyurethane
Use a long-handled metal floor scraper held at a low angle — approximately 20–30 degrees to the floor surface. Push the scraper along the wood grain direction. On solid hardwood, the grain direction is consistent across the floor; on parquet, scrape along the grain of each individual block rather than across the whole panel.
The loosened polyurethane will come away in sheets, ribbons, or a gel-like mass depending on the stripper type used. Deposit all stripped material directly into a plastic bag or onto a rag. Do not allow it to dry on untreated sections of the floor, as it will re-adhere and require a second stripper application to remove.
If polyurethane residue remains in the grain after scraping, do not sand at this stage. Apply a second coat of stripper to the residue, allow the full dwell time again, then scrape a second time. Sanding between stripper applications embeds the loosened material back into the grain and reduces the effectiveness of the next application.
Move section by section across the room in the same direction as your initial application. Complete stripping of each section before moving to the next.
STEP 4 – Clean the Surface After Stripping
Once all visible polyurethane has been scraped away from the entire floor, clean the surface to neutralise the stripper chemistry and remove any remaining residue before sanding.
For chemical and gel strippers, wipe the surface with a rag dampened with mineral spirits. Work in the grain direction across the entire floor. Replace the rag frequently — a saturated rag re-deposits dissolved polyurethane rather than removing it.
For water-based strippers, clean with plain water using a damp mop or a sponge. Do not flood the surface — wood floors absorb water and swell; use the minimum water needed to clean the residue.
If water was used for cleaning, allow the floor to dry for a minimum of 24 hours before sanding. Water raises the wood grain and swells the fibres; sanding a damp floor creates uneven material removal, clogs sandpaper immediately, and produces a rough surface that is difficult to level before refinishing.
STEP 5 – Sand the Floor with a Drum Sander
After the floor is completely dry, sand to remove microscopic polyurethane residue from the grain and to restore a smooth, even surface for the new finish. For solid hardwood floors, rent a drum floor sander for the main field area and an edge sander for the border zone within 20–30 cm of the walls.
Progress through grits in sequence — do not skip grits, as each successive grit removes the scratch marks left by the previous one:
| Grit | Stage | Purpose |
|---|---|---|
| 36 grit | Initial pass | Removes thick residue and levels uneven areas from scraping |
| 60 grit | Second pass | Removes 36-grit scratches and remaining poly residue in grain |
| 80 grit | Third pass | Smooths surface and levels any cross-grain scratches |
| 100 grit | Final pass | Prepares surface for finish — produces open grain without deep scratches |
Sand in the direction of the wood grain on straight-plank floors. On parquet, use a diagonal sanding pattern (45 degrees to the block grain) on the first two passes, then finish with passes parallel to the longest run of blocks. This prevents grain tear-out at the block joints.
After each grit change, vacuum the entire floor thoroughly with a shop vacuum and wipe with a tack cloth before proceeding. Sanding dust left on the surface acts as an abrasive layer that accelerates wear on the next sanding pass and creates uneven scratch depth.
STEP 6 – Inspect and Prepare the Surface for Refinishing
After the final sanding pass, inspect the floor surface thoroughly before applying any new finish. Walk the room in raking light — position a lamp near floor level and look at the surface at a low angle. Any remaining shiny spots indicate polyurethane film still present in those areas. Mark shiny spots with painter’s tape and re-sand locally with 80 grit before the final 100-grit pass.
Vacuum the entire floor a final time, including all corners, edges, and any cracks between boards. Follow with a tack cloth wipe across the entire surface. The floor is ready for refinishing when the surface is uniformly bare, smooth to the touch, free of visible scratches from the 100-grit pass when viewed in raking light, and contains no shiny areas.
Allow 24 hours after the final sanding before applying any water-based finish — floor sanding can release residual moisture from the wood. Oil-based finishes can be applied after a 4-hour rest at room temperature.
How Much Does It Cost to Remove Polyurethane from Wood Floors?
The total cost of polyurethane removal from wood floors depends on whether you hire a professional floor finishing company or undertake the project yourself. The table below compares DIY and professional costs per m² across all cost components for a typical 20 m² room.
| Cost Component | DIY Cost (per m²) | Professional Cost (per m²) |
|---|---|---|
| Chemical stripper | £1.50–£3.00 / $2–$4 | Included in labour rate |
| Drum sander rental (day rate ÷ area) | £2.50–£4.50 / $3–$6 | Included in labour rate |
| Edge sander rental (day rate ÷ area) | £1.00–£2.00 / $1.50–$3 | Included in labour rate |
| Sandpaper (all grits) | £0.80–£1.50 / $1–$2 | Included in labour rate |
| PPE (mask, gloves, glasses) | £0.50–£1.00 / $0.75–$1.50 | N/A |
| Labour | Your time (6–10 hours for 20 m²) | £15–£35 / $20–$45 |
| Total per m² | £6–£12 / $8–$16 | £20–£45 / $25–$55 |
| Total for 20 m² room | £120–£240 / $160–$320 | £400–£900 / $500–$1,100 |
How Does Removing Polyurethane Differ Across Solid Hardwood, Engineered Wood, and Parquet?
Solid Hardwood Floors
Solid hardwood floors — typically 18–22 mm thick — offer the most flexibility in removal method. The wear layer above the tongue-and-groove joint is usually 6–9 mm on a new floor, reducing with each sand-and-refinish cycle. Before beginning, check the floor thickness with a probe at a floor vent or threshold gap to confirm at least 3 mm of wear layer remains. If less than 3 mm remains, chemical stripping without sanding is the only safe option.
Use a drum sander starting at 36 grit if multiple polyurethane layers are present, or 60 grit if only one or two layers exist. Solid oak, ash, and maple all respond well to drum sanding. Softer species such as pine dent more easily — reduce drum contact time and increase forward speed slightly.
Engineered Wood Floors
Engineered wood floors have a real-wood veneer of 1–4 mm bonded over a plywood substrate. The polyurethane finish sits on this veneer, and the veneer itself cannot be sanded aggressively. A single pass of a 36-grit drum sander removes 0.5–1 mm of material — enough to sand through a 1 mm veneer in one pass.
For engineered wood, use a water-based chemical stripper applied with a brush, allowed to dwell for 15–25 minutes, and scraped with a plastic floor scraper. If polyurethane residue remains after two chemical applications, hand-sand lightly with 80–120 grit on a flat sanding block. Do not rent a drum sander for engineered wood floors unless you have confirmed the veneer is at least 3 mm thick.
Parquet Floors
Parquet floors — solid wood blocks laid in geometric patterns — are most commonly finished with two-component (2K) polyurethane, which is significantly more chemically resistant than standard oil-modified or water-based polyurethane. Standard liquid strippers applied at normal dwell times are ineffective on 2K polyurethane. Use a gel stripper with a dwell time of 6–12 hours.
After gel stripping and scraping, sand parquet with the drum sander at a 45-degree angle to the block grain on the first two passes. This prevents the sander from following individual block grain lines and creating an uneven surface at the block joints. Finish with passes parallel to the longest run of blocks.
For a complete overview of all wood finish removal methods, see: [How to Remove Wood Finishes →]
Frequently Asked Questions About Removing Polyurethane from Wood Floors
Can you remove polyurethane from wood floors without sanding?
Yes. Chemical stripping alone can remove polyurethane from wood floors without mechanical sanding if all layers are dissolved and scraped cleanly. This approach is the only safe option for engineered wood floors with thin veneers, floors with insufficient wear layer for sanding, and surfaces where sanding equipment is not available. The limitation is that chemical-only removal may leave slight grain roughness or micro-residue that affects how the new finish adheres. A light hand-sanding pass with 120 grit after chemical removal addresses this without the risk of a drum sander.
How many times can you sand a hardwood floor before it needs replacing?
A standard solid hardwood floor with a 6–9 mm wear layer can be sanded 4–6 times over its lifetime, depending on how much material each sanding cycle removes. Each complete sand-and-refinish cycle typically removes 1–1.5 mm of material. When the wear layer drops below 3 mm, further sanding risks exposing the tongue-and-groove joint. At that point, chemical-only stripping and refinishing is the correct approach until the floor is replaced.
How long does it take to remove polyurethane from a 20 m² wood floor?
A complete DIY removal — chemical stripping, scraping, drying, and full sanding sequence — takes 2–3 days for a 20 m² room. Day 1: chemical stripping and scraping (4–6 hours). Day 2: 24-hour drying period after water-based cleaning. Day 3: drum sanding through 36, 60, 80, and 100 grit (3–4 hours) plus edge sanding and dust removal. If chemical stripping is skipped and sanding alone is used, the 36-grit pass takes significantly longer because the drum sander must remove the full polyurethane film rather than just the residue.
What is the difference between removing oil-modified and water-based polyurethane from floors?
Oil-modified polyurethane (oil-based poly) forms a harder, more chemically resistant film than water-based polyurethane. It requires either a methylene chloride stripper or a longer dwell time (up to 30 minutes) with a water-based stripper to dissolve fully. Water-based polyurethane responds to standard water-based strippers within 10–20 minutes. Oil-modified poly is also more likely to require a 36-grit starting pass during sanding; water-based poly often allows starting at 60 grit if only one or two layers are present.
Should you hire a professional or remove polyurethane from floors yourself?
DIY removal is appropriate for solid hardwood floors in good structural condition, rooms up to 30 m², and situations where you have 2–3 days available and are comfortable operating a drum floor sander. Hire a professional when the floor is engineered wood, when the wear layer depth is unknown, when 4 or more previous finish layers are present, or when the floor has significant surface damage that requires levelling before refinishing. The professional cost premium — typically £14–£33 per m² more than DIY — is justified by the risk of irreversible damage from incorrect drum sander use.