How to Sharpen a Hand Saw [Easy Guide]
Today’s hand saws are hardly sharpened. The blades of your hand saws must be regularly sharpened or changed to keep the cutting job optimal. In this article I will show you how to sharpen a hand saw.
Many have exchangeable saw blades, which are simply replaced by a new saw blade after they become blunt. But there are also hand saws whose saw blades cannot be easily exchanged, such as hand saws, precision saws or, in older models, such as a clamping or heel saw.
How to Sharpen a Hand Saw
To sharpen a hand saw you must insert a screwdriver between and bend them outwards. There is no easier way than to sharpen a hand saw from the outside and part its teeth. Make sure the hand saw blade is level. Clamp the handsaw in the vice between the two boards: one in front and one behind the hand saw. This keeps the handsaw in place and prevents it from moving and vibrating while filing. You can finish sharpening a hand saw when the cut surface is half the width of the saw.
So that you continue to have a sharp and always ready hand saw in the workshop, we show you in our latest guide how to sharpen a hand saw.
How to Sharpen a Hand Saw Step by Step
Required tools:
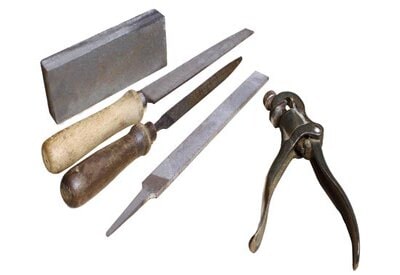
Tools are required to sharpen a hand saw:
- Flat file : it forms a flat rectangle in cross section.
- Triangular file : its cross-section is triangular.
- Arching pliers or arching irons : A special pair of pliers (or iron) that is used to bend the saw teeth.
- File clip : A special clamping device that is used to hold the saw blade in place when sharpening.
- Honing or sharpening stone : A natural or artificial stone that is used to sharpen a burr .
Step 1: Clamp the hand saw blade properly
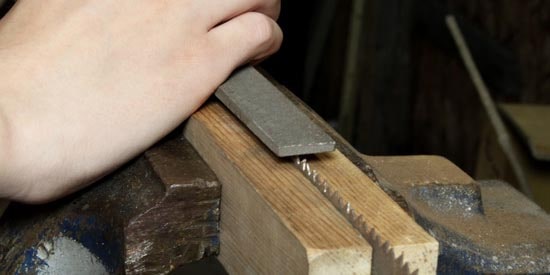
First, the hand saw blade is clamped in a file clip, i.e. in a clamping device. Or you can clamp the sheet between two wooden blocks in a vice. The saw blade is stretched lengthways in a file clip. Alternatively, you can clamp the saw blade between two smooth strips with two clamps or a vice.
The tips of the teeth must be in a horizontal line. In addition, the distance between the teeth and the clamping device should be as small as possible. This prevents annoying vibrations during filing, which can impair the sharpening process.
In any case, the teeth should point upwards. Otherwise, of course, they cannot be sharpen. They should also form a line that is as horizontal as possible.
Third, the teeth should not protrude too high from the clamping device, only as much as is necessary for vibration-free sharpening.
Step 2. Check the tooth height of the hand saw
If the saw blade is slightly worn, steps 1, 2 and 3 can be skipped and step 4 can be started directly.
First we need to check the tooth height from the handsaw blade. This should be identical for all.
However, if this is irregular, the first thing to do is to adjust the height of the teeth. This process is called saw teeth filling.
In doing so, you file with the previously prepared flat file over the tips of the saw teeth until a small but visible surface has formed on them. The teeth should then be of the same height.
Step 3: Leveling hand saw tooth evenly with a triangular file
The handsaw to be sharpened must be carefully inspected. What angle is there between the saw teeth? A triangular file is selected accordingly:
| Teeth per inch (TPI) | Tooth spacing in mm |
|---|---|
| 32 | 0,8 mm |
| 24 | 1,1 mm |
| 18 | 1,4 mm |
| 16 | 1,6 mm |
| 10 | 2,5 mm |
| 8 | 3,2 mm |
| 5 | 5,1 mm |
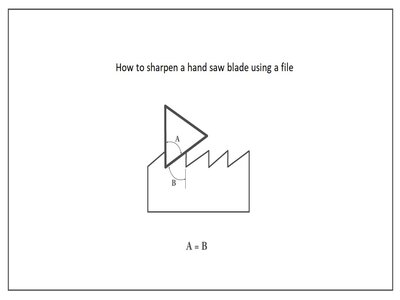
After setting the saw, it is filed. It is important that you use the correct file. In most cases, files with a corner angle of 60 ° will fit. The problem is more of the right size.
Before filing, I color the teeth with a waterproof pencil. This helps me to see where I have already filed. The file is inserted into the tooth. You can tell immediately whether it is really firmly in the tooth or not.
The first stroke of the file is only made when the file is correctly positioned. Each tooth is filed the same number of times. As a rule, two, at most three, file strokes are sufficient.
Because the larger the files, the more rounded the corners. For sharpening hand saws, however, the file must neither be very sharp-edged nor too rounded. As a rule of thumb, the file should be twice as thick as the teeth of the saw. With a tooth height of two millimeters, a file with four millimeters would be fine.
The teeth are now filed evenly with a triangular file until they have a sharp point again. It should be noted that the angles of the teeth must be adhered to.
To do this, every second tooth gap is first filed out. Then the hand saw blade is turned and the step is repeated for the remaining gaps. It is important, however, that you only file until the tooth tip surfaces just disappear.
Filing a saw for cross-cuts is a little more difficult. With such saws, the teeth are not filed at right angles to the saw blade, but alternately, usually at an angle of around 15 ° – 20 °.
If you are not sure, take a close look at the teeth of your saw beforehand with a magnifying glass and file them again like this. This type of filing creates cutting edges on the saw tooth, which cleanly cut through the wood fiber when cutting.
Step 4: Bend the hand saw teeth

The setting, i.e. the mutual bending of the saw teeth apart, is carried out with setting pliers. This is necessary so that the hand saw blade does not jam or stall while sawing. The set must be the same on both sides, otherwise the saw blade will run in the direction of the more set teeth. A straight cut would therefore no longer be possible.
When setting it, make sure that the tooth is only bent in the direction in which it was bent before. If the teeth are bent in the opposite direction, the tooth can break off.
The set width (the bend of the teeth) should be around 1.5 to 1.7 times the hand saw blade width. The set depth should be about 1/3 of the tooth height to achieve the best result.
As in the previous step, every second tooth is bent first. Then the hand saw blade has to be turned to bend the remaining teeth.
Just bend the teeth in their original direction. Otherwise they may break off. They should stick out about one and a half times as much as the sheet is thick. In addition, only the upper third of the teeth should be set.
Precision saws can neither be processed with arching pliers. Her teeth are too delicate for that. But you can fix the sheet on a piece of wood and carefully lower the teeth, for example with a hammer. Of course, it shouldn’t be too big.
In any case, uniformity is also important when it comes to cupboards. Here also an even alternation of the bends to the left and right. So proceed in two steps as well. At first, only bend every other tooth in the same direction. Then repeat the process with the remaining teeth on the other side.
Maybe you want to know how to bend wood? Here is an easy step by step guide!
How to sharpen different types of hand saws
| Types of Hand Saws | How to Sharpen Each Type of Hand Saw |
| 1. Fine-toothed saws | They seem impossible to sharpen, but a magnifying glass in a fixed position will allow you to saw fine toothed saws using the same technique presented above. |
| 2. The veneer saws | This saw, having a very specific use, its sharpening is a bit special. It has neither setting nor toothing relief. 1) Starting from the center, sharpen the right part, then the left, without forgetting to respect the symmetry. 2) Using an extra-soft file, bevel the teeth at 45 ° on the upper side, wooden handle side. 3) Lightly stone the underside of the hand saw blade to remove any remaining burrs. |
| 3. Saws with hardened teeth | Difficult to sharpen. However, it is possible to prolong the use using a small diamond file. |
| 4. Japanese saws | Despite their very particular teeth, Japanese saws can be sharpened. A precise observation of the shape of the teeth will make it possible to define the shape and the position to be given to the sharpening file. To keep the tool fully accurate, it is best not to increase it. |
Do you know that are more than 32 types of saws? Check here to see how many of them do you know!
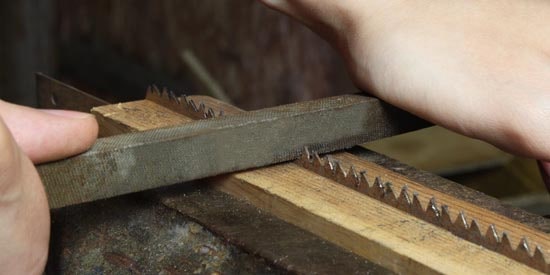
Step 5: Sharpen the hand saw
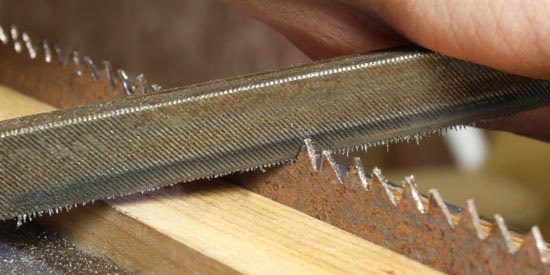
Now we come to the actual sharpening of the hand saw, where a triangular file is used for this.
In order to get a clean and efficient sharpening of a hand saw blade you should work at a comfortable height. To do this you must press at the base of the blade but if it’s starts to protrude more then the blade will vibrate or we will sharpen the hand saw teeth a lot more than necessary. The handle of the hand saw that we have attached must be to our right, leaving the tip on the left.
With rip saws, the file is guided horizontally and at right angles to the blade in the tooth gap. With cross-sectional saws, place the file diagonally and horizontally to the saw blade in the respective tooth gap. In the case of rip saws, right-angled and horizontal.
After the teeth are secured in place we will start to sharpen the hand saw. To do this, we will need a triangular file that fits at the same angle as the tooth. With precision, we file from left to right one tooth after another (towards the handsaw handle).
It is important to carry the file decisively, without rocking or tilting that can ruin the shape of the tooth, using it from back to front. The movement must be perpendicular to the blade and horizontal with the ground.
The chest and back (the two sides of a tooth) must be worked on at the same time. The file should only be removed when moving forward; when moving backward, it must be lifted slightly.
Also, start with the tooth that the hand saw cuts with first. That means, it is best to file against the direction of the cut. Because then each filing process lengthens the burr.
Here you do not sharpen every second tooth, but all one after the other. Use only light pressure on the hand saw blade with the file. It is best to file each gap equally long. This also ensures uniformity in this work step.
We will make 3 or 4 passes of the file , depending on the degree of wear on the table saw teeth, without applying too much pressure. The shapes and dimensions of the teeth will depend on the type of hand saw and its dimensions.
If we scroll down to the table we will see that in a hand saw blade with transverse teeth we must respect the shape, alternating the position of the file. In the case of a rip saw blade, the filing will be in the same position, respecting the degree of inclination.
This is a thin extension at the tip of the tooth along the back. This means the longer side of the tooth in the gap between two teeth.
As you can see, sharpening a hand saw is, in principle, fairly easy as long as you are sharpening a hand saw that is just blunt. Over time, however, you can venture into more difficult tasks, such as filing a saw to suit your own needs.
Do you want to sharpen your table saw also? Then this step by step tutorial will help you a lot!
I also wrote a guide how to sharpen a circular saw in a few easy steps!
For example, if you change the angle when filing, the hand saw will behave differently when cutting. Such experiments are of course not carried out on expensive saws. Buy a cheap saw, but not a cheap one.
A fine saw in the price range around twenty euros is very well suited for such experiments. You will be surprised what you can get out of such saws with a little cupboard and files.
How to sharpen hand saw according to the teeth type:
| TYPE OF HAND SAW TEETH | DIRECTION OF SHARPENING |
|---|---|
| Universal teeth | One-sided sharpening. |
| Isosceles teeth | Sharpening on two sides. |
| Jetcut teeth | Sharpening on three sides: front, back and tip bevels. |
| Reverse toothing ( Japanese saw ) | Sharpening on three sides: front, back and tip bevels. |
Step 6: Finish the sharpening of the hand saw
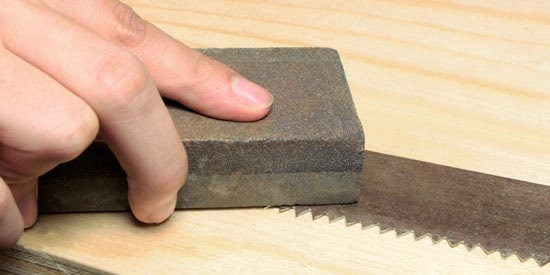
To do this, get the saw blade out of the clamping device. Place the hand saw blade on the smoothest possible surface. Then run the whetstone flat over the sheet and slide it over it. Not too strong, of course. Repeat the process for the other side of the sheet.
Next, the sharpening stone is placed flat on one side of the whetstone and gently moved over it. Then the saw blade is turned and the step is repeated. In addition, it has the advantage that the set of the teeth is more even.
The resulting ridge when filing is then treated with a fine grinding stone or a coarse honing subtracted. With this we manage to eliminate any burrs from the metal and obtain a smooth and uniform sharpen.
Nowadays hardly a hand saw blade is sharpened. Because of the disposable blades, the manual knowledge of sawing and sharpening is being forgotten more and more.
The lengthening of the burr serves the later sawing result. It’s not about the ridge itself. It’s basically undesirable. As a result, it can be honed with a grindstone, for example.
With slightly worn saw blades, a triangular file is enough.
If the hand saw blade is more worn, a little more work has to be invested, but it is worthwhile. Setting the saw teeth in particular requires a lot of patience. But here too, practice makes perfect and who doesn’t like to learn something new?
A jigsaw blade is very easy to change if you follow my step by step guide!
Tips for sharpening a hand saw
- Before you start sharpening, clean your blade with a rag and then install the saw in a vise;
- In order to properly sharpen your saw it is necessary that the spacing of the teeth in relation to the thickness of the blade is approximately the same everywhere. If necessary, restore balance by pushing a screwdriver between the teeth;
- Sharpen the blade of your hand saw with a third-point file, respecting its sharpening direction.
- You will proceed tooth by tooth, using the file inversely to the direction of the blade.
CONCLUSION
Knowing how to sharpen a hand saw is good for the wallet as well as the environment. Of course, there are a few things to consider. Not all saw blades can be sharpened this way.
Furthermore, the teeth must be treated as evenly as possible. Otherwise the table saw cannot cut cleanly. You should also always proceed cautiously and with care. A triangular file, like many other tools, needs to be used carefully.
Observing these points when sharpening handsaws is not least for your own safety. Both when processing the blade and later when sawing it.