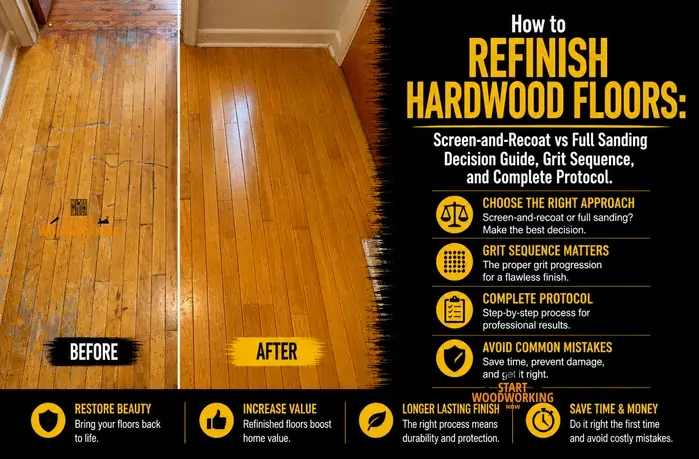
How to Refinish Hardwood Floors: Screen-and-Recoat vs Full Sanding Decision Guide, Grit Sequence, and Complete Protocol
Refinishing hardwood floors is not a single process, but a choice between different methods depending on the floor’s condition, structure, and existing finish. The most common mistake is applying the wrong method to a floor that does not meet its requirements, which leads to premature failure or irreversible damage.
The correct approach depends on identifying the floor type, remaining wear layer, finish condition, and finish chemistry before any sanding or coating begins. This guide explains how to make that decision first, and then apply the correct refinishing method step by step.
How Do You Refinish Hardwood Floors?
- Identify floor type and measure wear layer. Remove a floor register and measure the wood above the tongue-and-groove joint: ≥ 6mm indicates solid hardwood (multiple refinishes), while 2–5mm indicates engineered wood (1–2 refinishes). If the layer is under 2mm or 2.4mm (3/32″) on solid wood, no more sanding is possible.
- Identify finish type to determine refinishing options. Test with denatured alcohol (dissolves shellac) or lacquer thinner (softens lacquer). If there is no reaction, the finish is polyurethane. Check for aluminum oxide with 80-grit sandpaper; if it barely marks the surface, a bonding agent is required for recoating.
- Decision: screen-and-recoat OR full sanding. Choose screen-and-recoat if the finish is intact but dull with no deep scratches or desired colour changes. Opt for full sanding for deep scratches, pet stains, water damage, or if you want to change the wood colour.
- Full sanding grit sequence: 36→60→80→100→120. Starting at 80 grit is often insufficient for floors with multiple coats. Begin at 36–40 grit for heavy or old oil-based finishes and progress through each grit, vacuuming completely between every pass.
- Apply finish at 35–55% relative humidity, 18–24°C. Operating outside this range can cause water-based finishes to “blush” (cloud) or oil-based finishes to develop a grey haze. Maintain at least 35% RH with a humidifier or AC during application.
- Follow the move-back-in timeline for a successful cure. Wait 24h for walking, 72h for furniture, and 14 days for rugs. Placing rugs too early traps solvent outgassing, which can lead to permanently matte areas under the rug backing.
→ Identify existing finish before starting: How to Identify Wood Finish — Sequential Solvent Tests
→ Remove polyurethane from floors specifically: How to Remove Polyurethane from Wood Floors
→ After refinishing — prepare for staining: How to Prepare Wood for Staining
→ Hub: How to Remove Wood Finishes — Complete Guide
How to Decide Between Screen-and-Recoat and Full Sanding
Before any method: three disqualifying conditions mean neither screen-and-recoat nor drum sanding should proceed without professional assessment:
- Floor is bouncy or has significant flex when walked on
— subfloor issue, not a refinishing issue - Boards have gaps over 3mm that have appeared recently
— active moisture movement - Multiple boards are severely cupped (edges visibly higher
than centres) — moisture problem must be resolved first
The correct refinishing method is determined before any sanding begins. This decision depends on verifying four conditions in sequence: whether the floor can be sanded, whether the existing finish allows adhesion, whether the damage is surface-level or structural, and whether a colour change is required.
Step 1 — Floor Type and Wear Layer: What Can Be Sanded and How Many Times
The wear layer — the amount of solid wood above the tongue-and-groove joint — determines every subsequent decision. This measurement must be taken before any work begins. The most reliable method is to remove an HVAC floor register or a floor vent grate. The register opening exposes the edge profile of the floor plank, where you can see and measure the wood thickness above the interlocking joint with a ruler or digital caliper.
Typically 19mm (3/4″) total thickness. Wear layer above tongue-and-groove: 6–10mm. Can be sanded 7–10 times over the floor’s lifetime. Check: if you can see nail heads in the surface or if the wear layer at the register is under 3/32″ (2.4mm), no more drum sanding — options are screen-and-recoat only or chemical stripping to avoid mechanical material loss. All refinishing methods applicable.
Total thickness 10–20mm with a real wood veneer layer of 0.6–6mm over plywood or HDF. Wear layer under 2mm: screen-and-recoat only — sanding risks penetrating to the plywood core, which cannot be finished. 2–3mm wear layer: one conservative refinish with a random orbital sander (not drum) possible. 3mm+: one full refinish with drum sander cautiously. Maximum 1–2 full refinishes over the floor’s lifetime.
Factory-finished floors frequently have aluminum oxide ($Al_2O_3$) added to the finish for scratch resistance. Mohs hardness 9 — nearly as hard as diamond. Standard screening pads cannot abrade it. Standard polyurethane cannot bond to it without a chemical adhesion promoter. Test: hand-sand a hidden area with 80-grit — if almost no material comes off and the paper barely marks the surface, aluminum oxide is present.
The HVAC register measurement — how to do it precisely: Remove the register grate by unscrewing or lifting the frame. Shine a flashlight into the register opening at floor level. The floor plank edge is visible. The tongue is the protruding horizontal ridge on the lower half of the plank edge. Measure from the top surface of the plank down to the top of the tongue with a ruler. This measurement is the remaining wear layer. If this measurement is under 3/32″ (2.4mm) on solid hardwood: no drum sander. If you cannot access any register, look at doorways where flooring meets tile or carpet — the edge profile is sometimes visible there.
Step 2 — Will a New Finish Bond to the Existing Surface?
If the floor can be preserved, the next condition is adhesion compatibility.
Test the existing finish in a hidden area:
- Apply denatured alcohol → softens = shellac
- Apply lacquer thinner → softens = lacquer
- No reaction → likely polyurethane or aluminum oxide
For aluminum oxide finishes:
- Standard screening does not create sufficient abrasion
- A bonding agent or full sanding is typically required
If adhesion cannot be ensured, screen-and-recoat will fail regardless of surface preparation.
Step 3 — Is the Damage in the Finish or in the Wood?
The type of wear determines whether the wood must be exposed.
- Surface-level wear (dullness, light scratches, uneven sheen)
→ screen-and-recoat is typically sufficient - Damage into the wood (visible scratches after wiping with mineral spirits, pet stains, water damage, grey weathering)
→ full sanding is required
If the existing finish is peeling or delaminating, it cannot support a new coat — full sanding is required.
Step 4 — Is a Colour Change Required?
Screen-and-recoat does not alter the wood itself — it only refreshes the existing finish.
- If the goal is restoration of the current look → screen-and-recoat
- If the goal is changing stain colour or tone → full sanding to bare wood is required
Screen-and-Recoat vs Full Sanding — The Decision Matrix
2. Aluminum oxide finish — screening doesn’t abrade it without a bonding agent.
3. Finish is peeling or delaminating — screening lifts more finish.
4. Deep pet urine stains — screening doesn’t remove black iron-tannate discolouration.
How to Screen and Recoat Hardwood Floors – When screen-and-recoat is the right choice
The floor needs screen-and-recoat when the finish is worn (dull, showing high-traffic patterns, minor surface scratches) but has not failed (not peeling, not delaminating, not cracking through to wood). The test: run a thumbnail lightly across the floor surface in a high-traffic area.
If you feel a slight roughness but the wood beneath is smooth and intact — screen-and-recoat. If you feel the wood grain under your nail or can see bare wood — full sanding.
STEP 1 Clean — not optional
Screen-and-recoat adhesion depends entirely on surface cleanliness. Clean with a wood floor cleaner (Bona Cleaner, Loba Clean) — not Murphy Oil Soap, which leaves a residue that prevents adhesion. Spray, mop, allow to dry completely. Any wax, oil, grease, or cleaning product residue on the floor will prevent the new polyurethane from bonding.
This is the most common cause of screen-and-recoat failure — not the process, but an uncleaned surface.
STEP 2 Screen with buffer
Attach a 100-grit or 120-grit screen pad to the floor buffer. Work in overlapping passes, keeping the buffer moving — a stationary buffer burns the finish in the same way a stationary drum sander burns wood. Screen the entire floor, including the perimeter using a hand screen pad.
The floor should appear uniformly dull and matte after screening — any glossy areas that remain will be visible as darker patches after finish is applied because they did not accept the new coat uniformly.
STEP 3 Vacuum and tack
Vacuum the entire floor thoroughly. Wait 10 minutes for dust to settle. Vacuum again. Wipe with a microfibre tack cloth in one direction — not back-and-forth. Any screening dust left on the floor becomes visible inclusions in the dried finish.
STEP 4 Apply finish — maintain wet edge
Use a T-bar or wide applicator pad, not a roller (rollers introduce bubbles). Start at the far corner of the room and work toward the exit door. Apply in the direction of the wood grain in smooth, even passes, maintaining a wet edge — each pass should slightly overlap the previous while the previous is still wet.
At the wall edges: apply with a 4″ brush, feathering into the T-bar area while both are wet. Allow to dry per manufacturer instructions (water-based: 2–4 hours; oil-based: 8–12 hours).
STEP 5 Second coat — screening between coats
After the first coat is fully dry, use the buffer with a fresh 150–180 grit screen pad to lightly abrade the dried first coat. This creates adhesion for the second coat and removes any dust nibs or bubbles from the first application. Vacuum and tack cloth as before.
Apply second coat in the same direction as the first. Two coats minimum for screen-and-recoat; three coats for high-traffic areas.
📝The most instructive screen-and-recoat failure I encountered was a 1990s prefinished oak floor in a kitchen where the client had previously applied three coats of Minwax Hardwood Floor Reviver (a water-based topcoat marketed as a no-sand restorer). The existing finish had aluminum oxide and the Reviver had been applied over it without any adhesion promoter — when I screened, the entire Reviver layer came off in sheets, leaving the original aluminum oxide underneath. I used Bona Prep adhesion promoter, applied per instructions without screening, and applied two coats of Bona Traffic HD water-based. The result was durable and the floor looked refinished without losing any wear layer. The lesson: identify the finish chemistry before choosing any method.
How to Sand and Refinish Hardwood Floors — Complete Protocol
PHASE 1: Preparation
Remove all furniture. Remove shoe moulding or quarter-round at baseboards (do not pry off the baseboards themselves — pry off only the small trim piece at the floor). Nail down any loose boards — squeaks and movement under a drum sander can cause uneven sanding.
Set any nail heads that protrude — a drum sander that hits a nail head tears the sandpaper and can cause a jerk that throws the machine. Seal doorways with plastic film and painter’s tape. Cover HVAC registers. Turn off HVAC system during sanding (dust contamination in ductwork).
PHASE 2: Drum sanding — grit sequence
The grit sequence below is for a solid hardwood floor with multiple coats of old polyurethane. Adjust starting grit based on finish thickness: thin single coat = start at 60 grit. Heavy build-up or old oil finish = start at 36 grit.
screen Between coats
Drum sander technique: load the correct grit and position the machine at the start of the first board row. Hold the machine back with the drum raised. Begin walking forward at a steady pace, then lower the drum smoothly.
Maintain consistent walking pace — slower pace removes more material; faster pace removes less. At the far wall, raise the drum while still moving, back up (still keeping machine moving), then lower drum again for the return pass. Overlap each pass by 5–7 cm.
PHASE 3: Edge sanding
Edge sander at the same grit sequence as the drum sander — work through all grits at the perimeter before moving to the next grit with the drum sander. Edge sander moves in a circular pattern — work in grain direction as much as possible.
The edge sander does not reach the last 2–5 cm at baseboards. For this area: hand scraper to remove finish, followed by a sanding block at 120 grit finishing grit.
PHASE 4: Blending pass — random orbital
Run a random orbital sander at 120 grit through the 30–40 cm transition zone between drum sander area and edge sander area. This blends the different scratch pattern directions and prevents the “halo effect” under finish. Cover the entire transition zone in overlapping circles. Vacuum completely.
PHASE 5: Fill gaps and nail holes
After final sanding is complete, fill nail holes with stainable wood filler matched to the floor species and stain colour (test on scraps first — filler stains differently than wood).
Fill gaps between boards with flexible wood filler if desired — rigid fillers crack as the floor expands and contracts seasonally. Allow to dry, sand flush at 120 grit.
PHASE 6: Staining (optional)
Water-based stain: apply, allow 4–8 hours, light screen with 220 buffer pad, apply finish. Oil-based stain: apply, allow minimum 72 hours (check cloth test for colour transfer), then first coat of finish.
Do not apply water-based polyurethane over oil-based stain at less than 72 hours — haze will develop as the water-based finish seals in residual solvent from the stain before it has fully evaporated.
PHASE 7: Finish application — humidity confirmed
Check room humidity and temperature before opening any finish container. Target: 35–55% RH, 18–24°C. Apply finish with a T-bar applicator at the far end of the room, working toward the exit door in grain direction. Maintain wet edge. Allow to dry completely, screen with buffer at 220-grit screen pad, vacuum, tack cloth, second coat. Minimum 2 coats; 3 coats for kitchens, hallways, and high-traffic areas.
Complete Refinishing Timeline — Realistic Duration
AM
Room preparation and drum sanding
Furniture out, trim removed, holes nailed down. Drum sanding through all grits (36→60→80→100→120) typically takes 4–6 hours for a 25m² room. Edge sanding concurrent after each drum grit. Blending pass and fill at end of day.
PM
Final vacuum and stain (if used)
Three vacuum passes, tack cloth. Apply oil-based stain if colour change desired. If no stain: apply first finish coat. Room must be completely sealed — no foot traffic until first coat is dry.
Oil stain drying (mandatory 72h) OR first finish coat drying
If oil-based stain was applied: wait Day 3 before first finish coat (72h). If no stain or water-based stain used: screen first coat with buffer at 220-grit screen, vacuum, tack cloth, apply second coat. Water-based: can apply 2 coats on Day 2 (2–4 hours between coats).
Second finish coat (oil-based after stain drying) + third coat screening
Apply second coat of oil-based polyurethane (8–12 hours between coats). Screen first coat of water-based finish applied yesterday, apply third coat if desired.
Third coat (oil-based) if needed
Screen second oil-based coat, apply third if high-traffic area. Allow 24 hours before any foot traffic in socks.
Light foot traffic in socks only
No shoes. Do not clean the floor — finish is still curing. Keep windows open for ventilation to help oil-based polyurethane off-gas.
Furniture with felt pads — oil-based
Lift furniture into position — do not drag. Felt pads under all legs. Water-based finish: furniture safe from Day 3 (72h).
Area rugs — oil-based only restriction
Oil-based: no area rugs before 14 days. Rugs trap outgassing solvents, producing permanently soft and matte areas under the rug that require re-sanding to correct. Water-based: rugs safe from Day 7. Full mechanical cure for oil-based: 30 days.
The rug timing failure is the one I see most frequently — clients who refinish their living room floor on a weekend, walk on it carefully for three days, move the sofa back with felt pads, and roll out the area rug on Day 5 because it “feels hard.” Three weeks later, the rug shape is permanently visible on the floor as a matte rectangle with soft spots at the corners where the rug backing concentrated the trapped vapour. With oil-based polyurethane, I now mark “no rug” as a specific instruction in writing with a date on the invoicing. The chemistry is straightforward: the polyurethane continues to cross-link and off-gas solvents for 14–30 days regardless of surface feel — surface hardness is not an indicator of cure completion.
What Are the Key Specifications for Refinishing Hardwood Floors?
| Entity / Variable | Attribute | Value and Detail |
|---|---|---|
| Drum sander — critical technique rule | Never stop moving while drum is down | The drum sander’s rotating abrasive drum removes approximately 1mm of wood per second when stationary. If the machine stops moving forward while the drum is in contact with the floor, it burns the wood in 2–3 seconds — creating a permanent concave gouge that is visible through any finish. Technique: start moving forward before lowering the drum, and raise the drum before stopping. Never let the machine pause mid-floor. Practice the raise-and-lower motion on a small section before beginning the main floor area. |
| Full sanding grit sequence | Floor-specific sequence from coarse to fine | 36 grit (first pass on floors with 3+ old finish coats or heavy polyurethane build-up) → 60 grit → 80 grit → 100 grit → 120 grit. Note: starting at 80 grit as commonly recommended loads the paper within minutes on heavily finished floors and produces an inefficient cut. The 36 and 60 grit passes cut through finish aggressively; subsequent grits remove scratch marks from previous grits. Each grit removes the marks from the previous. Skip a grit and you cannot remove the previous scratches with the next finer grit — the valleys are too deep. For lightly worn floors with thin finish coats: start at 60 grit. |
| Screen-and-recoat — inter-coat screening | Buffer + screen pad vs. sandpaper | Between topcoats (not before first coat), use a floor buffer with a 220-grit screen pad — a round mesh abrasive disc that produces micro-scratches uniformly across the floor without removing the finish coat. This is fundamentally different from sanding with sandpaper. Screen pad between coats: creates adhesion surface for next coat while leaving all applied finish intact. Sandpaper between floor coats: removes more material than intended and can create low spots. After screening: vacuum all dust, wipe with tack cloth specifically made for floors (water-dampened cloth is not appropriate — introduces moisture). Apply next coat within 2 hours of screening. |
| Aluminum oxide finish — identification and protocol | Test and treatment options | Identification: hand-sand hidden area with 80-grit paper 10 strokes. Minimal dust, paper barely marks the surface = aluminum oxide present. Significant sanding dust = standard polyurethane or wax, not Al₂O₃. Treatment options: (1) Bona Prep or Loba Lobasol adhesion promoter — apply per manufacturer instructions, do not screen, apply polyurethane directly over the chemically prepared surface. (2) Drum sand completely through the Al₂O₃ layer, requiring more aggressive initial grit (36–40) and extended passes. Option 1 is preferred for engineered floors and any floor where minimising material removal is important. |
| Humidity and temperature — finish application window | Required conditions for all finish types | Optimal: 35–55% relative humidity, 18–24°C. Water-based polyurethane at >65% RH: dries slowly, may cloud (blushing) — white haze that does not clear. At <30% RH: dries too fast, brush marks and lap marks visible. Oil-based polyurethane at >65% RH: amine blush — grey haze in the finish surface. At <30% RH: drying accelerated, may not self-level before skinning. Check RH with an inexpensive hygrometer before applying any finish. In summer: AC helps. In winter with forced-air heating: RH can drop to 15–20%, requiring a humidifier to reach 35% minimum. |
| Drum sander — direction first pass | With grain vs. diagonal | Standard floors (good condition, 1–2 coats of finish): sand with grain direction on all passes. Heavily damaged floors (severe cupping, crowning, or extreme finish build-up): first pass at 45° to grain — the diagonal cut removes material faster and levels high spots more efficiently than grain-direction sanding. Immediately follow the diagonal pass with grain-direction passes at the next grit — diagonal scratches must be removed or they show through finish. Parquet and herringbone patterns: first pass at 45° to the dominant direction, then with the dominant direction, then light random-orbital pass to blend. |
| The “halo effect” — edge blending | How to prevent visible transition lines | Drum sander covers the centre of the room. Edge sander covers the perimeter (15–20 cm at baseboards). The transition zone between these two tools has different scratch patterns and can appear as a visible band under the finish. Prevention: after completing all drum and edge sander passes, run a random orbital sander with the same final grit (120) through the 30–40 cm transition zone, blending the scratch directions from both tools. This step adds 30–60 minutes per room but eliminates the halo effect. Skip it and the halo is typically visible after finish is applied. |
| Move-back-in timeline — oil-based polyurethane | Specific thresholds per activity | 24 hours: socks or bare feet only. No shoes. 48 hours: soft-soled shoes. 72 hours: light furniture with felt pads — do not drag, lift and place. 14 days: area rugs. Rugs placed before 14 days trap solvent vapour that oil-based polyurethane continues to off-gas during cure — the vapour cannot escape through rug backing, producing soft, permanently matte areas under the rug that require re-sanding. 30 days: full mechanical cure — safe for high-traffic, heavy furniture, and area rugs permanently. |
| Move-back-in timeline — water-based polyurethane | Specific thresholds per activity | 24 hours: normal foot traffic with shoes. 72 hours: furniture with felt pads. 7 days: area rugs (water-based cures faster than oil-based — less outgassing risk). 14–21 days: full mechanical cure. Water-based polyurethane has a shorter outgassing period due to water as the carrier solvent — once water evaporates, curing is primarily cross-linking rather than solvent evaporation. |
| Oil-based stain + water-based finish compatibility | Minimum wait time between stain and topcoat | Oil-based stain applied under water-based polyurethane: minimum 72 hours drying for the stain before first polyurethane coat. At 48 hours: residual mineral spirits in the stain contaminate the water-based polyurethane layer, producing a permanent white haze. Test: press clean white cloth firmly on stained area — if any colour transfers to cloth, stain is not fully dry. Some oil stains require 96 hours in humid conditions. Water-based stain under any finish: 4–8 hours drying sufficient. |
| Pet stain treatment before refinishing | Whether refinishing removes pet stains | Surface pet urine stain (penetrated finish only, not wood): full sanding removes. Wood pet stain (black iron-tannate discolouration in the wood fibres): sanding does NOT remove — the black compound is in the wood, not in the finish. Treatment: oxalic acid wood bleach (available at hardware stores as deck brightener or wood bleach) applied to bare wood after sanding — follow the product label for contact time and neutralisation instructions, dry, re-sand light pass. If stain penetrated to subfloor: board replacement is the only option. |
The protocol requires 60 g of oxalic acid crystals per litre of water — use the calculator below to get the exact dose for your container size, plus the correct amount of baking soda for neutralisation after treatment.
Oxalic Acid Concentration Calculator
Exact doses for wood stain removal — acid, neutraliser, and contact times
Which is better for floors — water-based or oil-based polyurethane?
| Attribute | Water-Based Polyurethane | Oil-Based Polyurethane |
|---|---|---|
| Colour when dry | Clear, no amber — preserves the natural or stained colour of the wood exactly | Warm amber-golden tint. Deepens slightly with each coat. Deepens further over time. |
| Drying time between coats | 2–4 hours. Two coats can be applied in one day. | 8–12 hours. One coat per day maximum. Cannot rush. |
| Total project time | 3–4 days for 3 coats | 5–6 days for 3 coats (due to drying between coats) |
| Durability | Good. Water-based polyurethane has improved significantly since 2010. Commercial-grade (Bona Traffic, Loba 2K) matches oil-based on commercial floors. | Slightly more self-leveling. Traditional choice for floors. No meaningful durability advantage in modern formulations. |
| Grain raising | Yes — raises grain on first coat. Screen with 220-grit screen pad after first coat, vacuum, apply second coat. | No grain raising. First coat dries flat. |
| VOC and smell | Low VOC, minimal smell. Rooms can be reoccupied sooner. Lower solvent concentration during and after application. | High VOC, strong solvent smell during application and curing. Room ventilation required during and after application. |
| Compatibility with stain | Works over water-based stain immediately. Works over oil-based stain only after 72+ hours full dry time. | Works over both stain types. More forgiving of stain not being fully dry. |
| Area rug restriction | 7 days before area rugs | 14 days before area rugs — outgassing continues longer due to solvent-based carrier |
Frequently Asked Questions About Refinishing Hardwood Floors
How many times can hardwood floors be refinished?
Solid hardwood (3/4" thick): 7–10 times over the floor's lifetime, depending on how much wood is removed per sanding cycle. The limiting measurement is the wear layer above the tongue-and-groove joint — when this falls below 3/32" (2.4mm), no more drum sanding is possible. Check at the HVAC floor register. Floors that have visible nail heads at the surface have already been sanded to the limit. Engineered hardwood: 1–2 times maximum depending on veneer thickness. Under 2mm veneer: zero full sandings — screen-and-recoat only.
Why is my newly refinished floor cloudy or hazy?
Four causes. First: humidity during application was above 55% RH — water-based finish blushed (white haze) or oil-based amine-blushed (grey haze). Second: oil-based stain not fully dry (under 72h) before water-based polyurethane was applied — residual mineral spirits contaminated the finish. Third: surface not completely clean before screen-and-recoat — cleaning product residue prevented adhesion. Fourth: area rug placed before 14 days — solvent vapour trapped under rug produced soft matte areas. Of these, only humidity blushing in mild cases resolves as the finish finishes curing. Stain incompatibility and rug marks require re-sanding.
Can you refinish floors without moving out?
Technically yes, room by room, but practically difficult. Dust from drum sanding is extremely fine and migrates throughout the house through gaps in sealed doorways. Oil-based polyurethane fumes are strong and require maximum ventilation. The realistic scenario for living in the house during refinishing: complete one room, wait minimum 48 hours before using it, move to next room. Kitchen and bathroom floors present an access problem — the floor cannot be wet for 5–7 days during the process. The most practical approach: plan the sequence so the kitchen is done last, completing all other rooms first.
Summary: Key Values for Refinishing Hardwood Floors
Measure wear layer at HVAC register before anything: under 2mm = screen-and-recoat only; under 3/32" above tongue-and-groove on solid wood = no drum sanding. Identify aluminum oxide (hand-sand test at 80 grit — minimal dust = Al₂O₃) before screen-and-recoat — requires bonding agent, not screening. Screen-and-recoat fails in four specific scenarios: waxed floors, aluminum oxide without bonding agent, peeling finish, and deep pet stains in wood.
Full sanding grit sequence: 36→60→80→100→120 (not starting at 80 as commonly recommended — inadequate for heavily finished floors). Drum sander rule: never stop moving while drum is down — 2–3 seconds stationary burns the floor permanently. Random orbital blending pass at 120 grit in transition zone between drum and edge sander prevents the halo effect.
Apply finish at 35–55% RH, 18–24°C — outside this range produces haze that may be irreversible. Oil-based stain needs 72h drying before water-based finish — at under 72h, white haze develops. Move-back timeline for oil-based polyurethane: 24h socks, 72h furniture with felt pads, 14 days area rugs (rug blushing is permanent), 30 days full cure. Inter-coat preparation: buffer with 220-grit screen pad, not sandpaper.
→ Identify existing finish: How to Identify Wood Finish
→ Remove polyurethane from floors: How to Remove Polyurethane from Wood Floors
→ Prepare for staining: How to Prepare Wood for Staining
→ Hub: How to Remove Wood Finishes