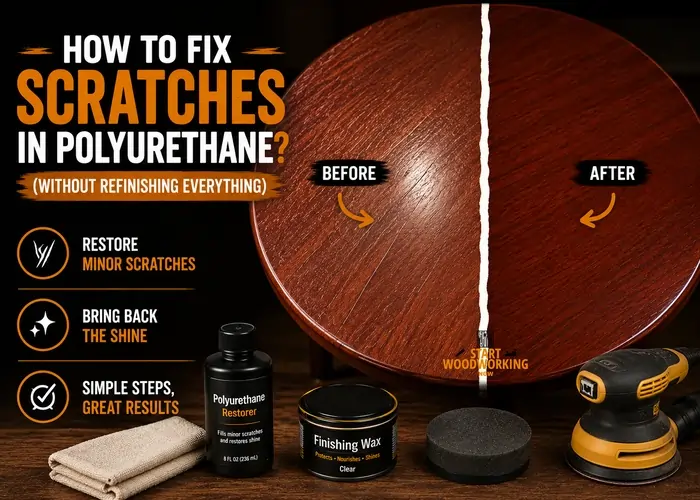
How to Fix Scratches in Polyurethane
Fixing scratches in polyurethane requires identifying whether the scratch is in the finish only or through the finish into the wood. A scratch confined to the polyurethane film repairs without touching the wood. A scratch that reaches bare wood requires a different protocol — and a different outcome expectation.
Applying polyurethane directly to a scratch without surface preparation produces adhesion failure — the new finish does not bond to the existing cured film. Preparation method determines whether the repair blends invisibly or remains visible as a patch with a different sheen.
This article is part of the part of the wood finishing guide — covering all finish failure types, repair protocols, and full refinishing procedures.
Three scratch depths require three different repair approaches:
- Surface scratches in the top layer only — micro-abrasions and light scuffs that catch light but have no tactile depth; repaired by burnishing with 0000 steel wool and paste wax
- Scratches through finish layers, not reaching wood — visible grooves with white or opaque edges; repaired by spot sanding and recoating the affected area
- Scratches through to bare wood — the wood fibre is exposed and the scratch floor feels rough; requires cleaning, filling if deep, and a multi-step recoat sequence
Navigate to your scratch type
→ Scratch only visible in certain light, no depth to touch? → How Do You Fix Light Surface Scratches in Polyurethane? ↓
→ Scratch visible at all angles, white or opaque edges, not at wood? → How Do You Repair a Scratch Through Polyurethane Layers? ↓
→ Scratch floor feels rough, wood fibre exposed? → How Do You Fix a Deep Scratch Through Polyurethane to Wood? ↓
→ Many scratches across a large area or whole surface? → When Should You Sand and Recoat the Whole Surface? ↓
Applying polyurethane over an unsanded scratch produces adhesion failure within weeks. The new finish does not bond to a cured polyurethane film without mechanical abrasion first.
How Do You Know How Deep a Scratch in Polyurethane Is?
Two tests identify scratch depth in under one minute. The fingernail drag test identifies whether the scratch has depth or is a surface micro-abrasion. The white edge test identifies whether the scratch has reached bare wood or remains within the finish layers.
How Do You Fix Light Surface Scratches in Polyurethane?
Light surface scratches in polyurethane — micro-abrasions with no tactile depth — repair with 0000 steel wool and paste wax. No recoating is required. The steel wool removes the fractured surface layer and the wax fills the micro-scratches, restoring the original sheen level.
Surface micro-abrasions [occur when] fine debris or abrasive contact [fractures] the outermost molecular layer of the cured polyurethane film. The fracture [scatters] light at the surface and [produces] a dull streak. The finish below [remains] intact and continuous — no structural repair is needed.
0000 steel wool [cuts] at approximately 600–800 grit equivalent. It [removes] the fractured surface layer [without] cutting into the body of the finish. Paste wax [fills] the remaining micro-valleys left by the steel wool [and] restores the light-reflective continuity of the surface.
Surface Scratch Repair Protocol
- Wipe the scratched area clean with a dry cloth. Remove all dust and debris from the scratch path.
- Tear a piece of 0000 steel wool to palm size. Rub with the grain using light, even pressure. 8–10 strokes covering the scratch and 2–3 cm on each side.
- Wipe away steel wool residue with a tack cloth. Steel wool fibres left on the surface will rust under topcoat if you later decide to recoat.
- Apply a small amount of paste wax (any carnauba or beeswax-based paste) with a clean cloth. Work in circular motion over the repair area and 5–10 cm beyond.
- Allow wax to haze — 3–5 minutes. Buff with a clean cloth using circular motion until the surface matches the surrounding sheen.
- Check in raking light. If scratch remains visible: repeat 0000 steel wool pass and re-wax. If scratch is still visible after two cycles: the scratch has more depth than a surface micro-abrasion — proceed to Depth 2 protocol.
Important
The paste wax applied in this repair prevents polyurethane adhesion if you later decide to recoat the surface. If you apply wax as a repair and then decide to recoat, the wax must be fully removed with mineral spirits before any new polyurethane is applied. Wax contamination produces hazy, non-adhering polyurethane — the same failure mechanism as wax left on wood before the original finish.
How Do You Repair a Scratch Through Polyurethane Layers?
A scratch through finish layers — visible at all angles, with white or opaque edges — requires mechanical abrasion of the surrounding area before applying new polyurethane. Sand the repair zone with 320-grit to create adhesion surface, clean with a tack cloth, and apply one or two thin coats thinned 10%. The repair area will be visible until the sheen difference between old and new finish ages out.
The white edges along the scratch walls [are] fractured finish particles. Light [scatters] from fractured edges in multiple directions [instead of] reflecting uniformly as it does from the intact flat surface. Sanding [removes] the fractured edges and [creates] a feathered transition between the damaged area and the surrounding intact finish.
📝In furniture repair work, the most consistent result I achieve on depth-2 scratches on oil-based polyurethane is: 320-grit sanding extending 3–4 cm beyond the scratch on all sides, tack cloth, one coat thinned 15% with mineral spirits. The thinner first coat penetrates the sanded edges and bonds to the existing finish more reliably than a standard-thickness coat. On high-gloss oil-based finishes, the repair patch takes 4–6 weeks of curing before it matches the gloss of the surrounding surface.
Depth 2 Scratch Repair Protocol
- Sand with 320-grit dry paper. Sand the scratch and extend 3–4 cm on all sides. Sand with the grain. The goal is a dull, uniform scratch pattern across the entire repair zone — not just inside the scratch.
- Wipe with a tack cloth. Check: all white scratch edges must be gone. If any white edges remain, the fractured finish is still present — sand again.
- Check temperature (65–75°F) and humidity (below 55% RH). Spot repairs on small areas are more vulnerable to humidity blush than full-surface coats — the repair area cools faster than the surrounding surface.
- Thin the repair coat 10–15% with mineral spirits (oil-based) or water (water-based). Apply with a small brush in the direction of the grain. Feather the edges of the coat — do not stop the brush stroke abruptly at the edge of the repair zone.
- Allow the full 24-hour dry time for oil-based, 4–6 hours for water-based. Do not assess the result at 2–3 hours — the sheen of a partially cured spot coat does not match the surrounding finish until fully cured.
- If sheen difference is still visible after full cure: sand the patch lightly with 400-grit, clean with tack cloth, apply one more thin coat. For oil-based finishes, match the original sheen level — apply semi-gloss over semi-gloss, not gloss over semi-gloss.
Sheen Matching
New polyurethane [is] shinier than aged polyurethane of the same product, because the sheen flattening agents in the finish [continue to] migrate to the surface during the first 4–6 weeks of curing. A repair patch applied today on a 2-year-old finish [will appear] slightly shinier than the surrounding surface until it ages to the same level.
On high-gloss finishes, this difference [is] minimal because gloss finishes [contain] few or no flattening agents. On satin and matte finishes, the patch [remains] noticeably shinier for several weeks. Applying satin or matte in a single thin coat [produces] a faster sheen match than applying gloss and waiting for it to dull.
Wet sanding the area around the repair to blend new and old polyurethane is the same technique as restoring high-gloss surfaces — the full wet sand polyurethane protocol with polishing compound.
How Do You Fix a Deep Scratch Through Polyurethane to Wood?
A scratch reaching bare wood requires cleaning, optional filling for deep grooves, sanding the repair zone to 220-grit, and applying two to three thin coats with full dry time between each. The repair is visible on close inspection until the new finish fully cures and ages to match the surrounding sheen.
Bare wood at the scratch floor [absorbs] the first coat of polyurethane differently than the sanded cured finish surrounding it. The wood [absorbs] most of the first coat into the grain — the result [is] a flat, non-shiny area at the scratch floor even after the first coat cures. A second coat [builds] the film to a thickness where sheen begins to develop. A third thin coat [brings] the patch sheen within range of the surrounding finish.
Deep Scratch Repair Protocol
- Clean the scratch. Wipe with mineral spirits on a cotton swab inside the scratch groove. Removes oil, wax, and debris from the exposed wood. Allow 15 minutes to evaporate.
- Fill if deeper than 1mm. For gouges and deep scratches: fill with a colour-matched wood filler or a drop of shellac stick in a matching tone. Allow filler to cure fully — oil-based filler: 2 hours minimum; shellac stick: 10 minutes. Sand the filled area flat with 220-grit before proceeding.
- Sand the repair zone. Sand with 220-grit extending 4–5 cm on all sides of the scratch. The sanded zone [must] include all areas that will receive new polyurethane — unsanded cured finish adjacent to the repair [will not] accept the new coat without preparation.
- Wipe with tack cloth. Inspect for white fractured finish edges and dust. Both must be absent before applying any new finish.
- Apply first thin coat, thinned 15%. The thinned first coat [penetrates] the exposed wood grain before building film. Apply only to the prepared zone — feather the edges.
- Allow full dry time. Sand lightly with 320-grit. The first coat [will appear] flat at the scratch floor — this is normal. Sand lightly with 320-grit across the patch, wipe with tack cloth.
- Apply second coat, standard thickness. The second coat [builds] the film to a sheen-producing thickness. Allow full dry time.
- Assess and third coat if needed. If the sheen difference is still prominent after the second coat: sand lightly with 400-grit, wipe clean, apply a third thin coat. Three coats [are sufficient] for almost all depth-3 scratch repairs on furniture-weight polyurethane applications.
| Repair Type | Abrasive | Product | Coats |
|---|---|---|---|
| Depth 1 — Surface micro-abrasion | 0000 steel wool | Paste wax | No recoating |
| Depth 2 — Through finish only | 320-grit then 400-grit | Matching polyurethane, thinned 10–15% | 1–2 thin coats |
| Depth 3 — Through to wood | 220-grit, then 320, then 400 | Matching polyurethane, first coat thinned 15% | 2–3 thin coats with sanding between |
On hardwood floors, the deep scratch repair is part of the broader floor maintenance protocol — the hardwood floor maintenance protocol with screen-and-recoat sequences for film finishes.
When Should You Sand and Recoat the Whole Surface Instead of Spot Repairing?
Sand and recoat the whole surface when scratches cover more than 20% of the total surface area, when the existing finish has worn through in multiple locations, or when the sheen difference between repaired patches and surrounding finish is unacceptable. Spot repairs on heavily scratched surfaces produce a patchwork result that looks worse than the original damage.
A full screen-and-recoat [requires] 150-grit sanding across the entire surface, tack cloth, and one to two fresh coats of polyurethane. This [produces] a uniform sheen across the whole surface [and] eliminates the colour and sheen mismatch that spot repairs inevitably create on aged finishes.
The screen-and-recoat option [is available only] when the existing finish has good adhesion and no peeling, flaking, or moisture damage. Confirm with the cross-hatch test before proceeding: score a 2×2 cm grid through the finish with a utility knife, apply masking tape firmly, peel sharply. Zero finish on the tape confirms adhesion — full stripping to bare wood is required if any finish lifts on the tape.
| Condition | Recommended Approach |
|---|---|
| 1–3 scratches, under 10 cm each, finish otherwise intact | Spot repair |
| Multiple scratches across 20%+ of surface | Full screen-and-recoat |
| Finish worn through in traffic areas, scratches in worn zones | Full screen-and-recoat |
| Peeling, flaking, or delamination present anywhere on surface | Full strip to bare wood |
| Cross-hatch test shows lifting finish | Full strip to bare wood |
Will a Repaired Scratch in Polyurethane Still Be Visible?
A spot-repaired scratch is always visible on close inspection immediately after repair. The sheen difference between new and aged polyurethane takes 4–6 weeks to reduce on satin finishes and 6–12 weeks on matte finishes. On gloss finishes, the repair patch becomes nearly invisible within 2–4 weeks.
Oil-based polyurethane [changes colour] as it ages. Fresh oil-based polyurethane [is] clear with a slight amber tint. Two-year-old oil-based polyurethane [has] a noticeably warmer amber tone from continued oxidation. A fresh repair patch [applied to] aged oil-based finish [appears] lighter and clearer than the surrounding finish until the new coat [undergoes] the same oxidation process — which takes 12–18 months on average.
Water-based polyurethane [does not] undergo the same amber oxidation. Water-based repairs [on] water-based aged finish [produce] a closer colour match immediately. Sheen difference [remains] the primary visibility factor rather than colour difference.
How Do You Protect Polyurethane from Scratching?
Polyurethane scratch resistance depends on the number of coats, the cure state, and the surface maintenance routine. A fully cured three-coat polyurethane finish resists normal use scratches significantly better than a two-coat finish at 50% cure.
- Allow full cure before heavy use — oil-based polyurethane reaches full hardness at 30 days, not at surface dryness. Light use is safe after 72 hours. Heavy use, dragging objects, and placing hard items directly on the surface [requires] the full 30-day cure window.
- Apply paste wax after full cure — paste wax [creates] a sacrificial surface layer above the polyurethane. Scratches [occur in] the wax layer first [rather than] the finish. Reapply wax every 6–12 months.
- Use felt pads under all objects — hard feet on furniture, objects dragged across surfaces, and grit tracked underfoot [produce] the majority of depth-1 and depth-2 surface scratches in normal use.
- Apply a fresh thin coat every 3–5 years — light 320-grit scuff across the entire surface, tack cloth, one thin coat of matching polyurethane. This screen-and-recoat [restores] film thickness lost to micro-abrasion and [prevents] wear-through in high-traffic areas before it reaches bare wood.
Frequently Asked Questions
Can you apply polyurethane directly to a scratch to fill it?
No. Polyurethane applied to a scratch without prior sanding does not bond to the cured finish surrounding it. The result is a raised, fish-eye prone patch that peels within weeks. Mechanical abrasion of the surrounding surface with 320-grit is required before any new polyurethane adheres correctly. The sanding step is not optional — it is the adhesion mechanism.
Can you use toothpaste or car scratch remover on polyurethane scratches?
Toothpaste (mildly abrasive, approximately 200-grit equivalent) and car scratch removers (polymer filler compounds) work on depth-1 surface micro-abrasions and are an effective alternative to 0000 steel wool and paste wax. They do not fill or repair depth-2 or depth-3 scratches with tactile depth. Both products are safe to use on cured polyurethane — they do not damage or dissolve the finish.
Why does my polyurethane scratch so easily?
Polyurethane that scratches easily is either still within its 30-day curing window, was applied too thinly (under two coats), or is water-based with a lower abrasion resistance than oil-based. Water-based polyurethane reaches approximately 60–70% of the hardness of oil-based at equivalent film thickness. Both products require the full cure period before their rated hardness is reached — surface dryness at 24 hours is not an indicator of scratch resistance.
How do you fix white scratches in polyurethane?
White edges along a scratch are fractured finish particles scattering light. This is a depth-2 scratch — through finish layers but not to wood. Sand the repair zone with 320-grit until all white edges disappear, wipe with tack cloth, apply one thin coat of matching polyurethane thinned 10–15%, allow full cure. The white appearance is eliminated by sanding away the fractured edges — not by filling the scratch.
Does oil-based or water-based polyurethane scratch more easily?
Oil-based polyurethane is harder and more scratch-resistant than water-based at equivalent cure state — typically 300–500 Taber abrasion cycles for oil-based vs 200–350 for water-based at 2 mils dry film thickness. Water-based has improved significantly with crosslinker additives in professional-grade products. For high-wear surfaces (floors, tabletops, kitchen cabinets), oil-based remains the more durable choice at standard consumer product quality.
Can cat scratches in polyurethane be fixed?
Yes. Cat scratches on furniture typically fall into depth-1 or depth-2 categories — surface abrasions and shallow grooves through finish layers, rarely reaching bare wood. Depth-1 cat scratches repair with 0000 steel wool and paste wax. Depth-2 cat scratches with visible white edges repair with 320-grit sanding and one thin polyurethane recoat. The repair approach is identical to other scratch sources — scratch depth, not cause, determines the protocol.