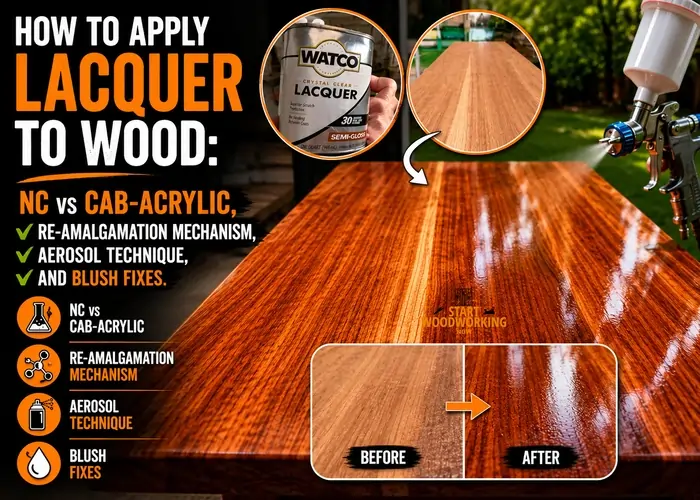
How to Apply Lacquer to Wood: NC vs CAB-Acrylic, Re-Amalgamation Mechanism, Aerosol Technique, and Blush Fixes
Lacquer is the fastest-drying wood finish and the one most used in professional furniture and cabinet production — not because it is the most durable or the easiest to apply, but because it is the most efficient: a complete three-coat finish can be applied in under an hour. It dries so fast that brush application is nearly impossible for beginners. Aerosol cans are the practical entry point for DIY lacquer work.
This article is part of the complete wood finishing guide. For finish comparison, see Varnish vs Lacquer.
Navigate to your question
→ NC, CAB-acrylic, catalyzed — which type? → Types comparison ↓
→ Why does lacquer bond chemically between coats? → Re-amalgamation mechanism ↓
→ What prep is needed — sanding sealer? → Sanding sealer system ↓
→ How do I apply with an aerosol can? → Aerosol technique — 8-10 inch distance ↓
→ My lacquer turned white/hazy — what happened? → Blush cause and fix ↓
→ How long to dry and when is it fully cured? → Dry times and 30-day rub-out rule ↓
Lacquer has one unique property that no other common wood finish shares: each new coat partially re-dissolves the previous coat through its lacquer thinner solvents, creating a chemical bond between layers rather than a mechanical one. This re-amalgamation means lacquer builds a unified multi-layer film with excellent intercoat adhesion — which is why it does not require sanding between coats for adhesion (though sanding for surface quality is still recommended for the best result).
⚠ Fire and Explosion Risk — Read Before Opening Any Lacquer Tin
Lacquer vapour is explosive at concentrations of 1.0–7.5% in air. The vapour is heavier than air and accumulates on the floor, spreading silently across the workspace. A single electric motor — shop vacuum, air compressor, light switch — can ignite the vapour from across the room. After any spraying: turn off ALL electric equipment before you start, leave it off until the space is fully ventilated (minimum 30 minutes after completion), and never close the workshop while lacquer vapour is present. No open flames, no smoking, no electric heating elements.
For small aerosol can jobs, spray outdoors or in a fully open workspace. For HVLP spray application, use a dedicated spray booth with explosion-proof exhaust fan and lighting.
⚠ Toxic Fumes — Correct Respirator Required
Lacquer fumes damage the liver, nervous system, and brain with repeated exposure. A dust mask or P100 particulate respirator provides zero protection against lacquer vapour — you need a NIOSH-approved half-face respirator with organic vapour (OV) cartridges. Cartridges must be rated for ketones and esters (lacquer thinner components). Cartridge service life: replace immediately if you detect any odour through the mask. Work in maximum ventilation: cross-ventilation with inlet and outlet airflow, not just an exhaust fan alone.
What Are the Different Types of Lacquer for Wood?
Nitrocellulose (NC) lacquer is the standard woodworking lacquer — fast drying, re-amalgamating, and available in gloss, satin, and matte sheens. CAB-Acrylic lacquer (cellulose acetate butyrate) is a non-yellowing alternative: it stays clear over light-coloured species indefinitely, while NC lacquer shifts toward amber within years.
Water-based “lacquers” sold at retail are often acrylic or polyurethane-acrylic hybrids — they do not re-amalgamate, do not spray or brush like true lacquer, and are better classified as water-based topcoats.
| Type | Re-amalgamates | Yellowing | Best For | Examples |
|---|---|---|---|---|
| Nitrocellulose (NC) | Yes | Amber shift over time | Warm-toned species: oak, walnut, cherry; antique/traditional furniture; instruments | Deft Clear Wood Finish, Watco Lacquer, Rust-Oleum Lacquer |
| CAB-Acrylic | Yes | Crystal clear — no yellowing | Maple, birch, painted cabinets — any application where amber toning is unacceptable | ML Campbell Clawlock, Sherwin-Williams CAB-Acrylic, Target Coatings |
| Water-based “lacquer” | No — acrylic chemistry | No yellowing | Low-VOC applications; better for brush application than true lacquer | General Finishes Enduro, Minwax Water Based Lacquer (these are acrylic, not true lacquer) |
How Does Lacquer Cure and Why Does It Re-Amalgamate?
Lacquer cures entirely by solvent evaporation — there is no chemical cross-linking or oxidative reaction. As the lacquer thinner evaporates, the solid resin particles dissolved in it are deposited on the surface and bond together as the solvent leaves. Because cured NC lacquer remains soluble in lacquer thinner, fresh lacquer applied over a cured coat re-dissolves the surface of the previous coat — the two coats merge into one unified layer, not two separate layers bonded together.
This is the defining characteristic of thermoplastic film finishes. Polyurethane and varnish cure by cross-linking — the molecules form permanent chemical bonds and can never be re-dissolved by their original solvents. Lacquer remains thermoplastic: the same lacquer thinner that dissolved it before application can re-dissolve it after cure.
This re-amalgamation [produces] intercoat adhesion stronger than the mechanical bond produced by sanding. It also [makes] lacquer the most easily repaired common finish — a fresh coat welds invisibly into damaged areas.
📝Re-amalgamation has a practical implication beginners often miss: you can apply a second lacquer coat without sanding as long as the first coat is still within its re-amalgamation window (usually within 1 hour for NC lacquer at normal shop temperature). Once the first coat fully cures — typically 2+ hours after application — the second coat still bonds chemically, but sanding with 320-grit first removes surface irregularities and produces a noticeably smoother final result. After 3 or 4 coats built this way, a final light sand with 400-grit and a rub-out with polishing compound produces a glass-smooth surface that shows off figured grain better than any other common finish.
How Do You Prepare Wood Before Applying Lacquer?
Sand bare wood to 150–180-grit. Apply one coat of lacquer sanding sealer as the first coat — not lacquer directly. Sanding sealer contains stearate lubricant and higher solids content than topcoat lacquer: it seals and fills the wood grain in one pass and sands flat easily without clogging the sandpaper. Sand the sealer coat with 320-grit, wipe with a tack cloth, then apply the lacquer topcoats.
Dewaxed shellac is the correct sealer beneath NC lacquer on tannin-rich species — the natural wax in standard shellac causes lacquer delamination — the wax migration mechanism and the SealCoat solution.
How Do You Apply Lacquer — Aerosol Can and Brush Methods
Aerosol lacquer is the practical method for most DIY woodworkers — it requires no equipment beyond the can, produces consistent thin coats, and dries fast enough that 3–4 coats can be applied in a single session.
The key technique variables are distance (8–10 inches from the surface, not closer) and movement (continuous sweeping motion with consistent overlap — never stop the can over the surface while spraying).
Aerosol Can Protocol
- Shake for 2 full minutes. Not 30 seconds — 2 minutes. The mixing ball in the can must fully disperse the resin that settles during storage. Under-shaking produces a thin, uneven first coat with poor solids content.
- Test spray on cardboard before hitting the piece. Aim the first second of spray at a cardboard scrap — the first burst from an aerosol can often contains concentrated resin from the valve seat and produces a spot rather than a spray pattern. The test spray clears the valve before you reach the piece.
- Hold 8–10 inches from the surface. Farther than 10 inches: solvent evaporates in air before the lacquer reaches the wood — the droplets arrive partially dried and produce “orange peel” texture. Closer than 8 inches: too much product in one area, causing runs and sags.
- Keep the can moving throughout each pass. Begin the spray motion before you reach the piece and release the valve only after the can has passed the piece. Never stop the can while holding the valve down — this deposits a wet concentrated spot that sags.
- Apply in light coats with 50% overlap. Each pass overlaps the previous by half its width. This equalises film thickness across the surface — the centre of each spray pass is thicker than the edges; overlapping averages the thickness. Three to four light coats build adequate film.
- Invert and spray clear at the end of every session. Hold the can upside down and spray until only clear gas comes out. This clears the valve of lacquer resin. Skip this step and the valve clogs — the next session starts with an uneven first burst regardless of shaking.
- Between coats: wait until dry to the touch, sand 320-grit, tack cloth. NC lacquer: dry to recoat in 15–30 minutes at 65–75°F. Do not sand until fully dry and non-tacky. Scuff the entire surface uniformly — the sheen becomes uniformly dull, confirming even sanding coverage.
Aerosol lacquer is appropriate for small repairs and touch-ups — for full furniture finishing, the choice between brush and spray depends on solvent type — the full lacquer chemistry and types comparison.
Brush Application Protocol (Brushing Lacquer Only)
Important: Use Brushing Lacquer, Not Spraying Lacquer
Standard spraying lacquer is formulated for fast evaporation — it dries before a brush can level it, leaving severe brush marks. Brushing lacquer contains retarder additives that extend the open time to allow levelling. If the label does not say “brushing lacquer” or “brushable,” it is formulated for spray only.
- Use a high-quality natural-bristle brush. Ox-hair or badger-hair produces the smoothest application. Foam brushes introduce micro-bubbles. Synthetic brushes are acceptable for water-based lacquer but natural bristle performs better with solvent-based brushing lacquer.
- Flow on — do not scrub. Load the brush fully and apply with long, straight strokes in the grain direction. Let the lacquer flow from the brush onto the surface. Back-brushing over areas that have begun to set tears the partially dried surface and produces drag marks that cannot be levelled.
- Tip off immediately. After each stroke, lightly drag just the bristle tips across the wet surface at 30° to level any ridges. Work quickly — brushing lacquer levels and skins faster than varnish.
- Sand between each coat with 320-grit after full dry. Brushing lacquer typically requires 30–60 minutes between coats. Sand all surfaces uniformly dull. Wipe with tack cloth before the next coat.
What Is Lacquer Blush and How Do You Fix It?
Lacquer blush is a white or milky haze that appears in the wet or drying lacquer film when humidity is above 65% RH. The rapid evaporation of lacquer thinner chills the film surface below the local dew point — moisture condenses in the wet lacquer and becomes trapped as the film skins over. The fix differs depending on whether the lacquer is still wet or has dried.
Lacquer blush is a humidity-condensation problem unique to fast-evaporating solvents — polyurethane has a similar but mechanistically different cloudy failure — the polyurethane cloudy diagnosis for the contrasting case.
How Long Does Lacquer Take to Dry and When Can You Use the Surface?
NC lacquer is dry to the touch in 15–30 minutes and ready to recoat in 30–60 minutes at 65–75°F — the fastest of all common wood finishes. However, surface dryness does not equal full hardness. The complete solvent system — lacquer thinner contains multiple solvents with different evaporation rates — takes 30 days to fully outgas from the film. Rubbing out or polishing before 30 days produces a surface that re-swirls because the film is still soft enough to move under abrasive compounds.
| Stage | NC Lacquer | CAB-Acrylic | What You Can Do |
|---|---|---|---|
| Touch dry | 15–30 min | 20–40 min | Nothing — surface is dry but not strong |
| Recoat | 30–60 min | 45–90 min | Apply next coat (with or without sanding for adhesion) |
| Light use | 24 hours | 24 hours | Handle carefully, no dragging objects |
| Rub-out / polishing | 30 days minimum | 21 days minimum | Safe to use polishing compounds, steel wool, or buffing compounds — film is fully hardened |
Frequently Asked Questions
Can you apply lacquer over polyurethane?
Not recommended — lacquer thinner can wrinkle and lift polyurethane film. Polyurethane is a cross-linked thermoset finish; lacquer solvents partially attack the urethane chemistry without being able to re-amalgamate it, causing it to swell and separate from the wood. If you need to apply lacquer over a previously finished surface, strip the polyurethane first. Lacquer over scuffed, well-cured alkyd varnish is more acceptable but should still be tested on a hidden area first. Check all finish compatibility →
How many coats of lacquer do you need?
Three coats is the standard for a complete lacquer finish: one sanding sealer coat plus two topcoat coats. This builds approximately 2–3 mils of dry film — adequate for furniture that is handled but not heavily used. For surfaces that receive harder use (desks, dining tables) or for a rub-out finish, four to five coats with progressive sanding between coats builds more film and allows finer final sanding without cutting through to the previous coat. More than six coats is rarely needed and risks adhesion problems if coats are applied too heavily.
What is lacquer thinner used for?
Lacquer thinner serves four functions: thinning lacquer to the correct spray viscosity, cleaning spray equipment immediately after use, removing fresh lacquer errors while still wet, and stripping cured lacquer from a surface. It is a blend of multiple solvents — typically ketones (MEK, acetone), esters (ethyl acetate), and alcohols — each chosen for specific evaporation rate contributions. Lacquer thinner is not interchangeable between brands for dilution — use the same manufacturer’s thinner as the lacquer, or check the lacquer TDS for compatible thinner formulations.
Can you brush lacquer without special equipment?
Yes, but only with brushing lacquer specifically — a product formulated with retarder additives that extend the open time enough for a brush to level the film before it skins. Standard spraying lacquer is too fast-drying to brush — it skins within 30–60 seconds of application, well before a brush can produce a level surface. Brushing lacquer gives you a 2–3 minute working window, which is still very short compared to varnish or polyurethane. Use a high-quality natural-bristle brush, work in sections, and tip off every stroke immediately.
How do you remove lacquer from wood?
Lacquer thinner removes cured lacquer — apply with a cloth, allow 30–60 seconds contact, and wipe off the softened film. Repeat as needed. Because lacquer is thermoplastic, denatured alcohol also partially removes it, though lacquer thinner is more efficient. For furniture restoration where chemical stripping is not desirable, sanding is the alternative — start at 80-grit to cut through the lacquer film, progress to 120-grit. Chemical removal leaves a surface that can accept new lacquer immediately after drying; sanded removal requires a full preparation sequence before refinishing. Complete lacquer removal guide →